Why Do I Use A Projector And Not A Front-View TV?

I get this question quite a bit here and on YouTube, and recently answered in the question thread for a post here, so I thought I’d add the answer here as well. This is slightly amended from the original.

The reason is field of view. While the front window of the cabin is about 46″ in diagonal, from the seats in the cockpit the actual field of view is much wider, especially if you want both the left and right chair to have an immersive view without seeing the edges of a screen. The projection screen hangs just two inches in front of the front edge of the cabin. It’s a 100-inch screen, and even with a screen of that size if I lean forward too much over the glare shield I can see the edge of the screen. One option would be to tilt-mount a big display to the cabin’s front-slanted lumber, but that would probably not look immersive as the viewing angle would be at a significant down-facing degree. I would love to have a TV for the front view just to have similar view quality all way around, but 100-inch TVs are a bit out of the price range right now (NEC makes one for $33,000 – the price of a nice used Cessna 172l; Sharp makes a 90 inch for six grand). So I go with the projector. I use an ultra-short throw because with the height of my ceiling and the height of the cabin, a projector mounted too far back casts a shadow over the screen as the beam hits the top of the cabin. So the projector needs to be really close to the screen (in my case, just about 24 inches). Finally, I also like the projection screen because I can look around the edge of the window a bit to find the field on final approach, just like in the real world.

Reader Mail: Saitek, SPAD.neXt, and A2A

This recently from a reader, and I thought my reply (while not completely thorough) might be of help to others. I’ve made some minor edits  from the original.

I bought the Saitek Multi Panel and Switch Panel but I can’t get them to work with the A2A 182 or 172. I read about Spad.NeXt but am not comfortable using it. Is there another way to get Saitek and A2A to get along?

[NAME]

***

SPAD.neXt is the best I’ve found. Part of the key is understanding profiles and snippets. Load up your 172 or 182, and then in SPAD.neXt go to the profiles page and look at the available online profiles. There should be some that others have made for the A2A planes. Download one and assign it as the profile for the plane in Prepar3d. You do this all in SPAD.neXt, and it’s really pretty easy once you get used to it. This should have the right codes for most of the switch panel and multi panel switches. You can also go to one of those instruments – say the switch panel – click on a button on the panel (say, fuel pump), and then click snippets. You can then download online snippets for that switch, or for the entire panel. I think I published my switch and multipanel snippets – they’d be listed with “basementflyguy” as the author. Try this and see if it helps. Someone before you has surely already done the work of figuring out the variable assignments and you just need to find the profile or snippet online … [and note that you need to be a paid user of SPAD.neXt to have access to the library of online profiles and snippets, which is well worth it in my opinion]

And if you decide to roll your own, it’s really not too difficult. Every function in the sim has a command or variable associated with it – either a “simconnect” command (which is most of the stock functions) or an “LVAR” variable, which are custom variables like those in the A2A aircraft. To program a switch (say, the fuel pump), you click on it, pick if you want it switched up or down (for example), then assign the condition to be true when it’s flipped. You can pick a SimConnect command, a LVAR variable setting, turning on a light on the Saitek BIP panel, or several other things to result from the switch being thrown or button pushed.

The commands and variables are searchable, so you could select “LVAR,” it pulls up a big list, and then you can type “pump” in the search box and all the LVAR variables that have “pump” in their name pop up. You see one listed “TOGGLE_ELECT_FUEL_PUMP1,” and you suspect that’s the right one. Select it, leave the assigned value at “0” (because it’s a toggle – with other variables, like barometric pressure, the variable could have a real value like 2995 – and the SPAD.neXt screen shows you in the lower left corner of the variable list screen what the possible values are), click OK and that switch is now assigned. Flip it and it will toggle the fuel pump.

For the A2A aircraft most of the switches use LVARS rather than the stock SimConnect commands. You can find PDFs with all of those variables here: http://www.ontheglideslope.net/2016/07/08/a2a-cessna-172-182-piper-180-lvar-lists/

I know a lot of folks struggle with the battery and alternator switches. For the A2A Cessnas the variables are:

Eng1_GeneratorSwitch
Battery1Switch

Assign those variables to those switches in SPAD.neXt to those two switches on the switch panel (with values of 0 for off and 1 for on) and you should be good to go. [Also note that you need to ensure SPAD.neXt is configured to read LVAR variables, and this is an option you set on the SPAD.neXt settings screen].

One last word: depending on when you have saved a scenarios some of the variables may already be “on” when you load the scenario, even if the switch is off. I often open the “mini panel” instrument menu in P3D just to ensure everything is clicked to off with all my switches off when I start a flight.

Some day I will probably write a little how-to on SPAD.neXt and A2A. Until then, I hope this helps.

~ BFG


Reader Mail

I recently had this exchange with a reader and thought it might be worth posting.

I have a question regarding your setup.

I have upgraded my pc to exactly your specifications (6770k 4 gh -> overclocked to 4,6; 16GB DDR4 3000, NVidiaa GTX 980TI) with 3 monitors (all 3 with nvidia surround connected together to get 3x full hd).
The good thing: when I am at ORBX pacific NW scenery with normal airports (Concret Mun eg) i get 30 fps with a view configuration like yours (3 aditional views one left, one right and one main). When I go to KSEA (san francisco) i only get 11 FPS.

Could you please send me your settings (Graphics, NVIDIA?, any tewaks?)? And do you use hyperthreadeing?

I have changed Afinity Mask to 14 (have swiched off HT but it males no change)

Thank You!

***

Hi [name],

My settings are pretty standard. I use no real tweaks in the config file after corresponding with Rob Ainscough who said he uses none and believes P3D is best when it self configs. I do use HT, but have alternated over the past year from using it to not using it. I use AM 116, and then I use the Project Lasso app to assign all the add-ons to the other cores (0-1, 5-7) so that P3D can run on a few cores by itself. I think that helps with FPS. I also overclock the 980ti a bit (+50). All that said, in Orbx SoCal with Orbx vector my FPS can be very low. I turn the scenery way down when I’m down there. The bottom line is that three or four open windows is a test, even with our powerful gear. But 11 FPS would be very low for me.

I would send my graphic settings but I change them a lot based on when I’m flying (for example, SoCal – very few AI aircraft, normal scenery settings, vs out in the mountains where I max everything out). I also use a different graphic setting at night than in the day (lower resolution for everything including terrain because you can’t see it).

I did an informal analysis of the FPS impact of different settings on my rig a few weeks back, which I’ve not yet published, but it showed that by far the biggest FPS hits for me were (in set order):

– Airline, GA, and Road Traffic
– Casting Shadows (with clouds being the big hit, more so than scenery and vegetation)

For what that’s worth.

Let me know how the rumble keeps working out!

BFG


Reader Mail

Thanks to Tom Tsui’s post I’ve had an influx of new visitors and subscribers, and a few have sent in some questions about the sim. Here are three recent ones with my answers, and I’ve kept the senders anonymous.

After months of searching for the optimum sim, I found this video from a guy called… Liberty! and I really thought this was the best solution in terms of value for money. I found your website today and surprise surprise, you also followed Liberty’s design.

I was about to start designing it when I saw your site, so I could not resist sending u this email asking you a few questions:

1) Is this solution (proj + 2x Lcd) as immersive as shown in the videos??

2) How much space did you need?…eg front of instr panel to wall. I have serious room constraints :(.

3) How did you mount the heavy side LCDs on the frame?

If you have time to answer that would be greatly appreciated, otherwise well done- your sim looks great.

Thanks for your questions and the compliments! Yes, in the sim it is quite immersive, in fact when I’m using PilotEdge and talking with ATC it feels so much like being in an airplane it’s a bit amazing. The resolution on the projection screen is of course not as fine as the side monitors (even though they are all 1080p) given that the pixels are much larger, but it’s not something I really notice, and I’ve calibrated the screens so the colors match up well enough.

The sim fits in a pretty small space because I use an ultra-short-throw projector. The entire cockpit is only 58 inches deep, and it’s 62 inches from the back of the cockpit to the projection screen. The front of the glare shield / panel with the instruments is 18 inches from the projection screen. But it’s the ultra-short-throw projector that allows this, and it came with a price. But that was the only way for me to get the cockpit close enough to the screen to fill my field of vision.

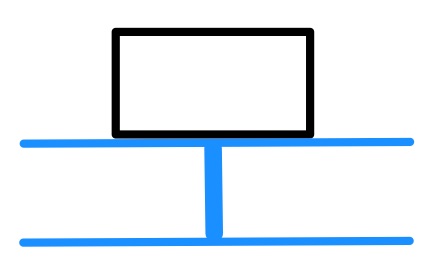
The LCDs are actually really light. But just to be safe they sit on a 2×2 cross-beam in the side wall that is reinforced with a 2×4 beam beneath it, like this:

Blank

You can see pictures of that on the Construction Journey page, too.

Another reader asks:

hi I … live in the Uk and I liked you video and flight sim and wondered if you could let me have some info on it how you made it what materials used have already mode two Cessna and like the look of yours  if you could send me some pictures of the out side many thanks

Thanks for the email. The sim is really entirely made of simple 2×2 lumber (which actually measures 1.5 inches x 1.5 inches in the US) for the frame and a corrugated plastic for the walls. This link is, or is close to, the plastic I used:

7e8a1533-2f16-46fd-84e8-846df41fd102_1000

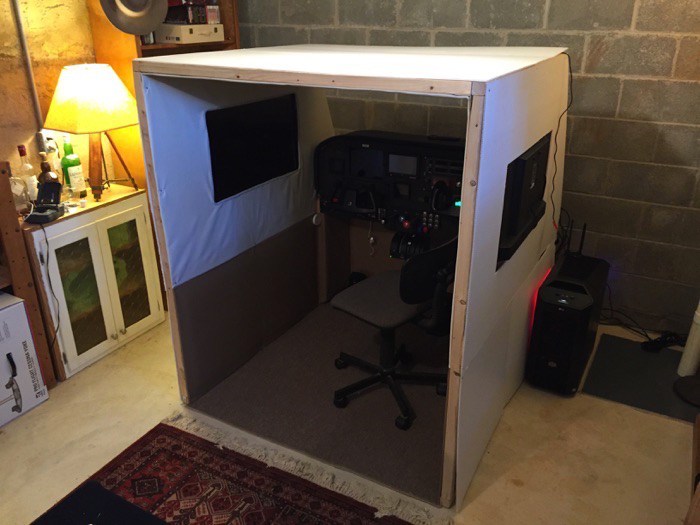
You can see more of the frame and construction on the Construction Journey page, and here’s a picture of the outside:

IMG_2629-2

On the inside I covered the walls with muslin on the top and top-sides and a brown leatherette on the bottom. The floor is remaindered carpet.

And finally, a reader asks:

I’ve recently purchased a vr insight cockpit and plan to build a 182 like yours one thing I’m concerned about is the frame rate droppage when you open up a second view is there A way around this with multiple views or is it a byproduct we have to deal with? Thank you

At least for me, it’s a byproduct I have to deal with. When I run only one screen my rig produces frame rates well over 80 fps, and that’s with extreme settings. With three windows open I get between 15 fps (which would be very low) to 50-60 fps, depending on scenery, autogen, weather, and air traffic. If I don’t run the GPS, which is a fourth window, they are about 10 fps higher. So there’s a good argument for getting the most powerful CPU and GPU you can get if you’re running three windows. I know some simmers use NVIDIA’s screen-spanning technology to stretch one window across multiple screens, but it doesn’t align the views well for me on my setup, and I don’t like how it stretches the image at the right and left edges of the view. So I run with three undocked full screen views.