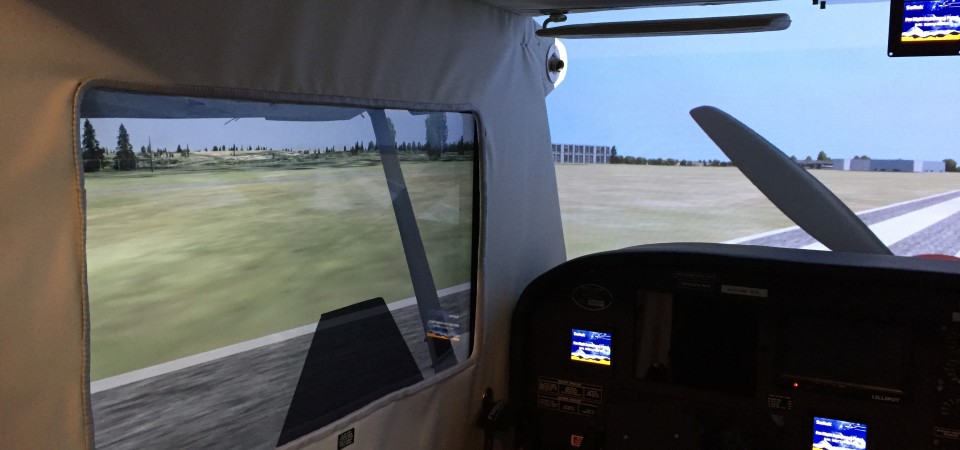
Many of the questions I get on my YouTube channel are about my screen setup and how I manage to get the images on the projector and side screens to align. I do it through custom cameras created using the custom camera tool in Prepar3d, and thought it might be helpful if I wrote a post here explaining my process.
There are two ways you can use custom cameras in P3D. One is to create new camera views in a particular scenario. These will be saved in the scenario config file (which is stored in the P3D folder in your PC’s Documents folder), and they will be persistent with that scenario: whenever you load it, those camera views will be listed as options in the Custom Camera submenu of the View menu at the top of the screen. If you save custom cameras in your default scenario, they will remain there, too. The other is by adding them to an airplane’s default configuration file, in which case that camera view will always be available for any scenario or flight with that airplane. That’s a bit more complicated. I’ll describe both here.
Creating custom views is easy but not always intuitive, and through (much, much) trial and error, I’ve learned ways to simplify the process and get good alignment across multiple screens. Here’s my process for setting up a new set of screen views, which for me would involve three cameras: Front (for the projection screen and view out the front of the aircraft), Left (for the view out the left window), and Right (same for the right window).
FIRST: I begin with the front view, because it’s the front horizon that I will want the side views to match up with. Custom cameras inherit the settings of the view from which they start, so to save time I first use the view directional keyboard commands to move the view to something close to what I want to have (forward / back, left / right, up / down). It’s easier to tweak a view that’s sort of close than to start completely from scratch.
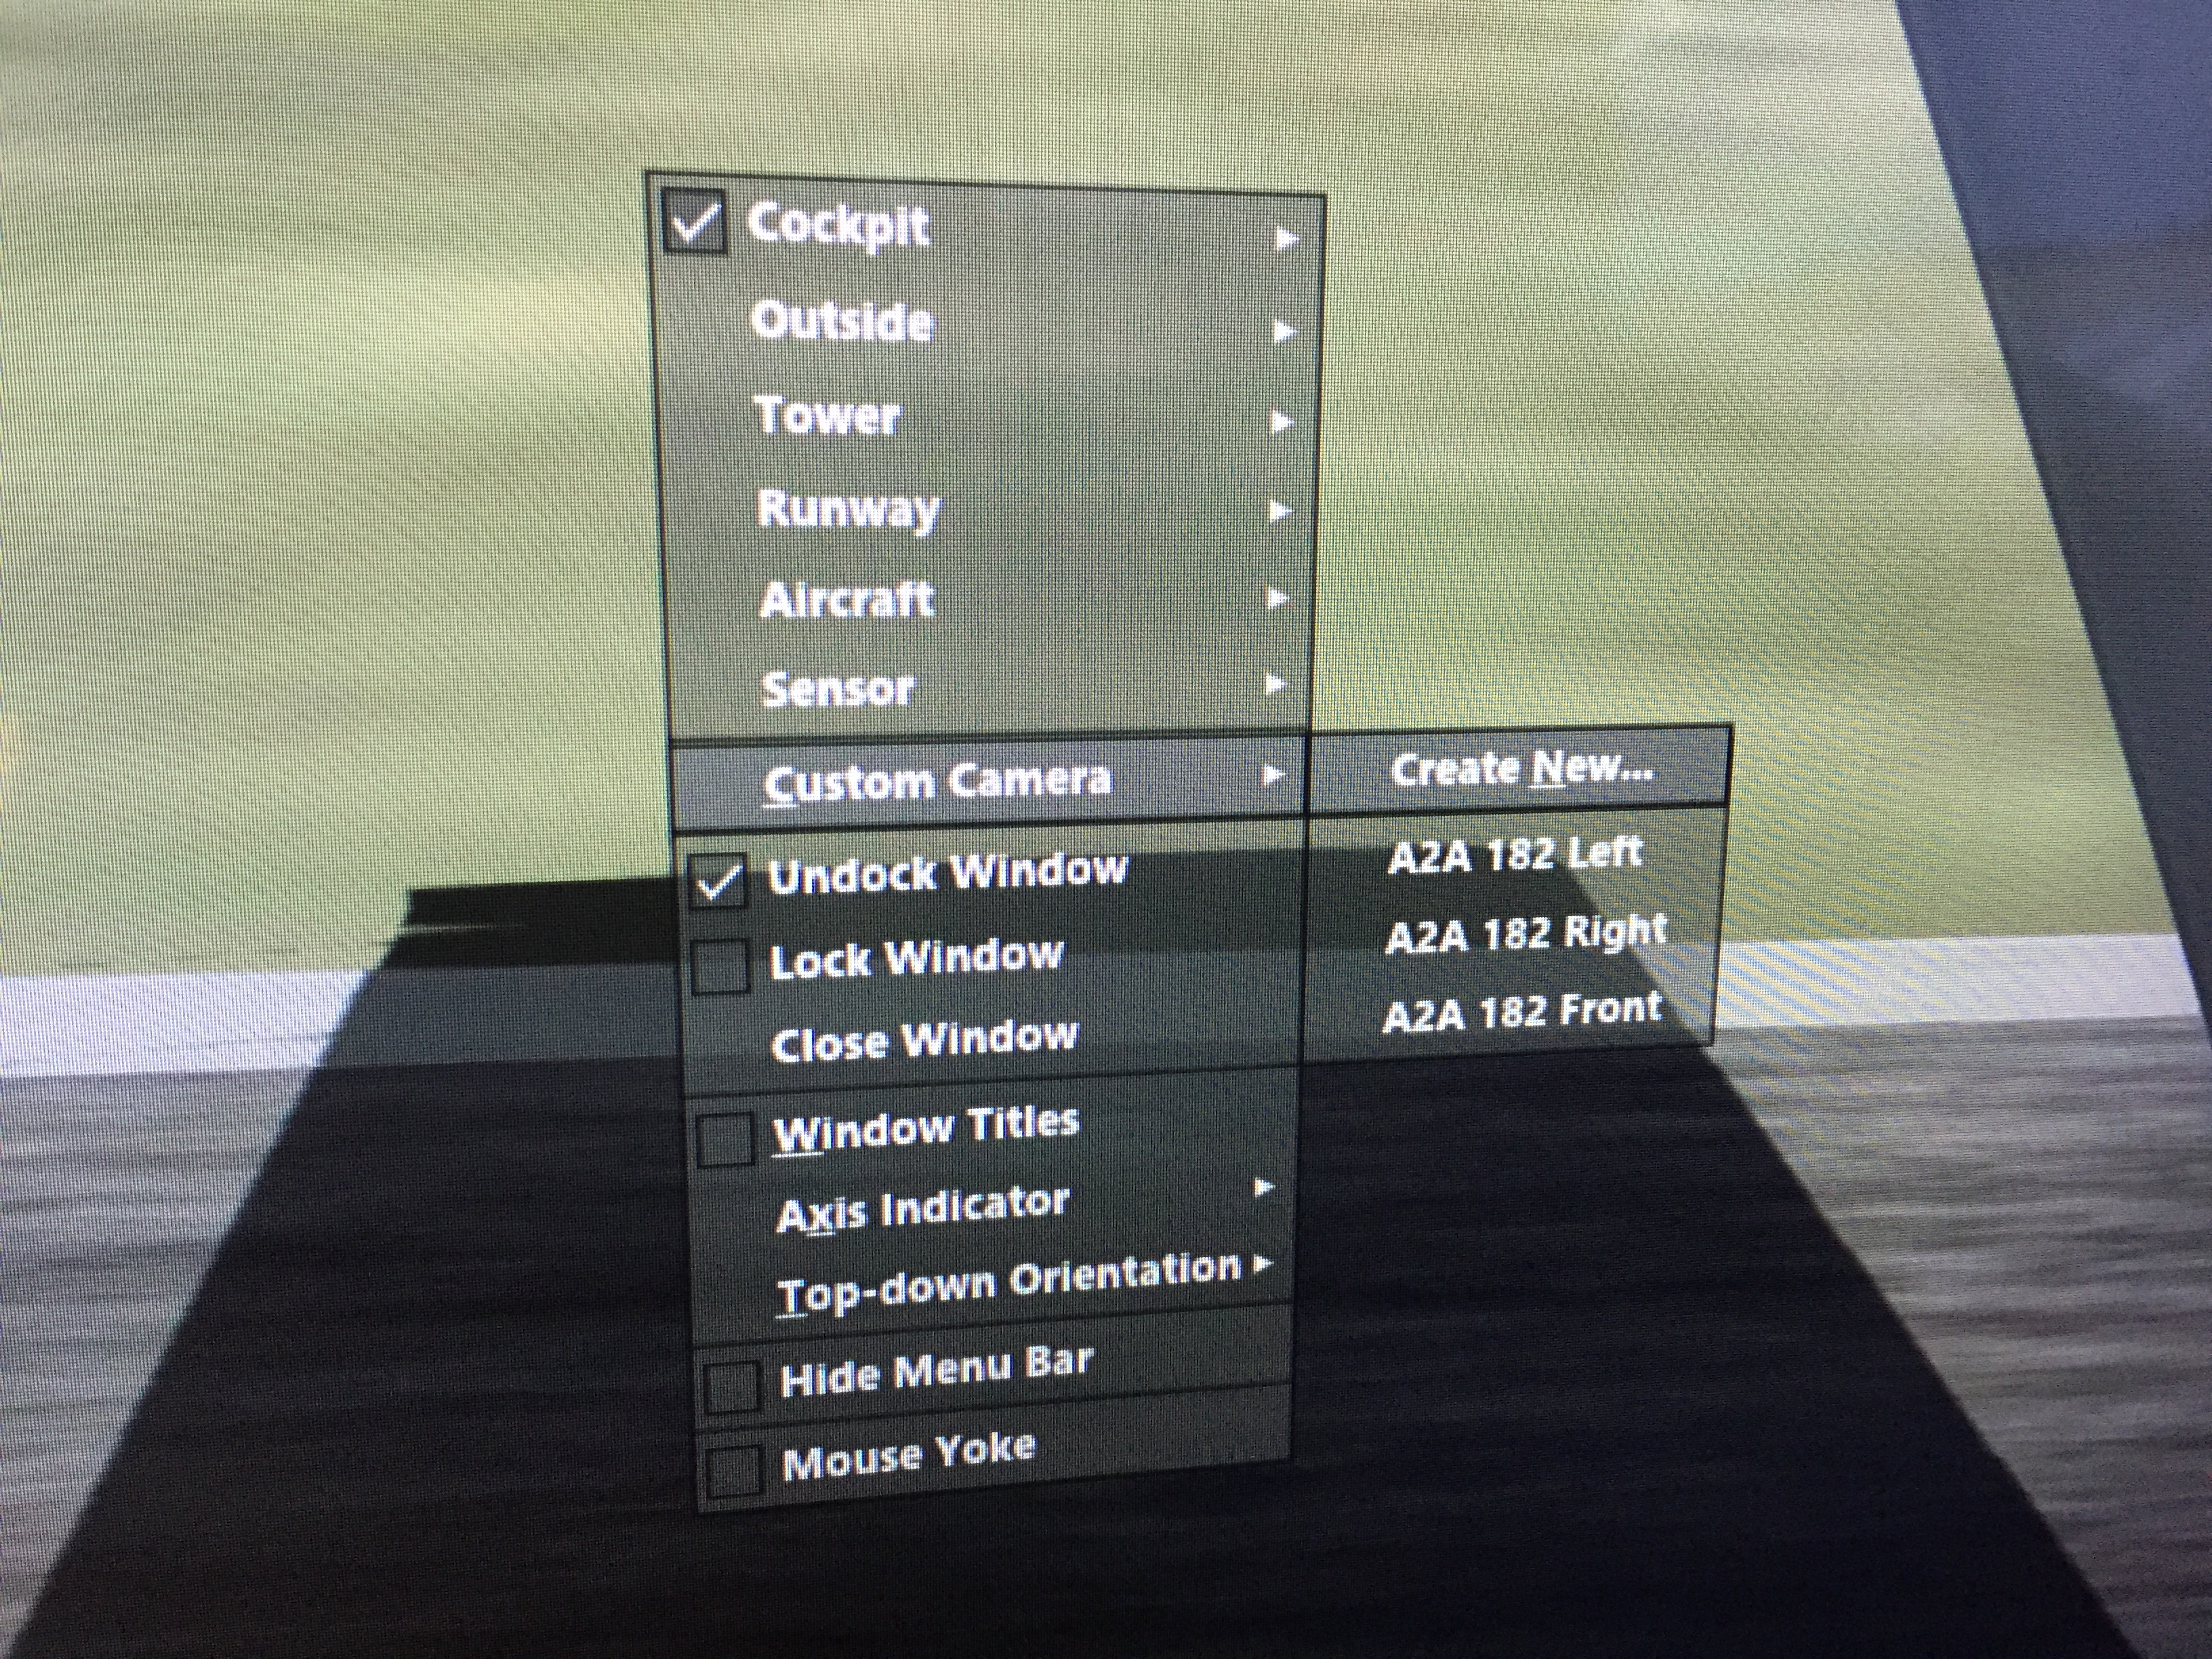
SECOND: I right click on the front view select “Custom Camera / Create New” from the popup menu:
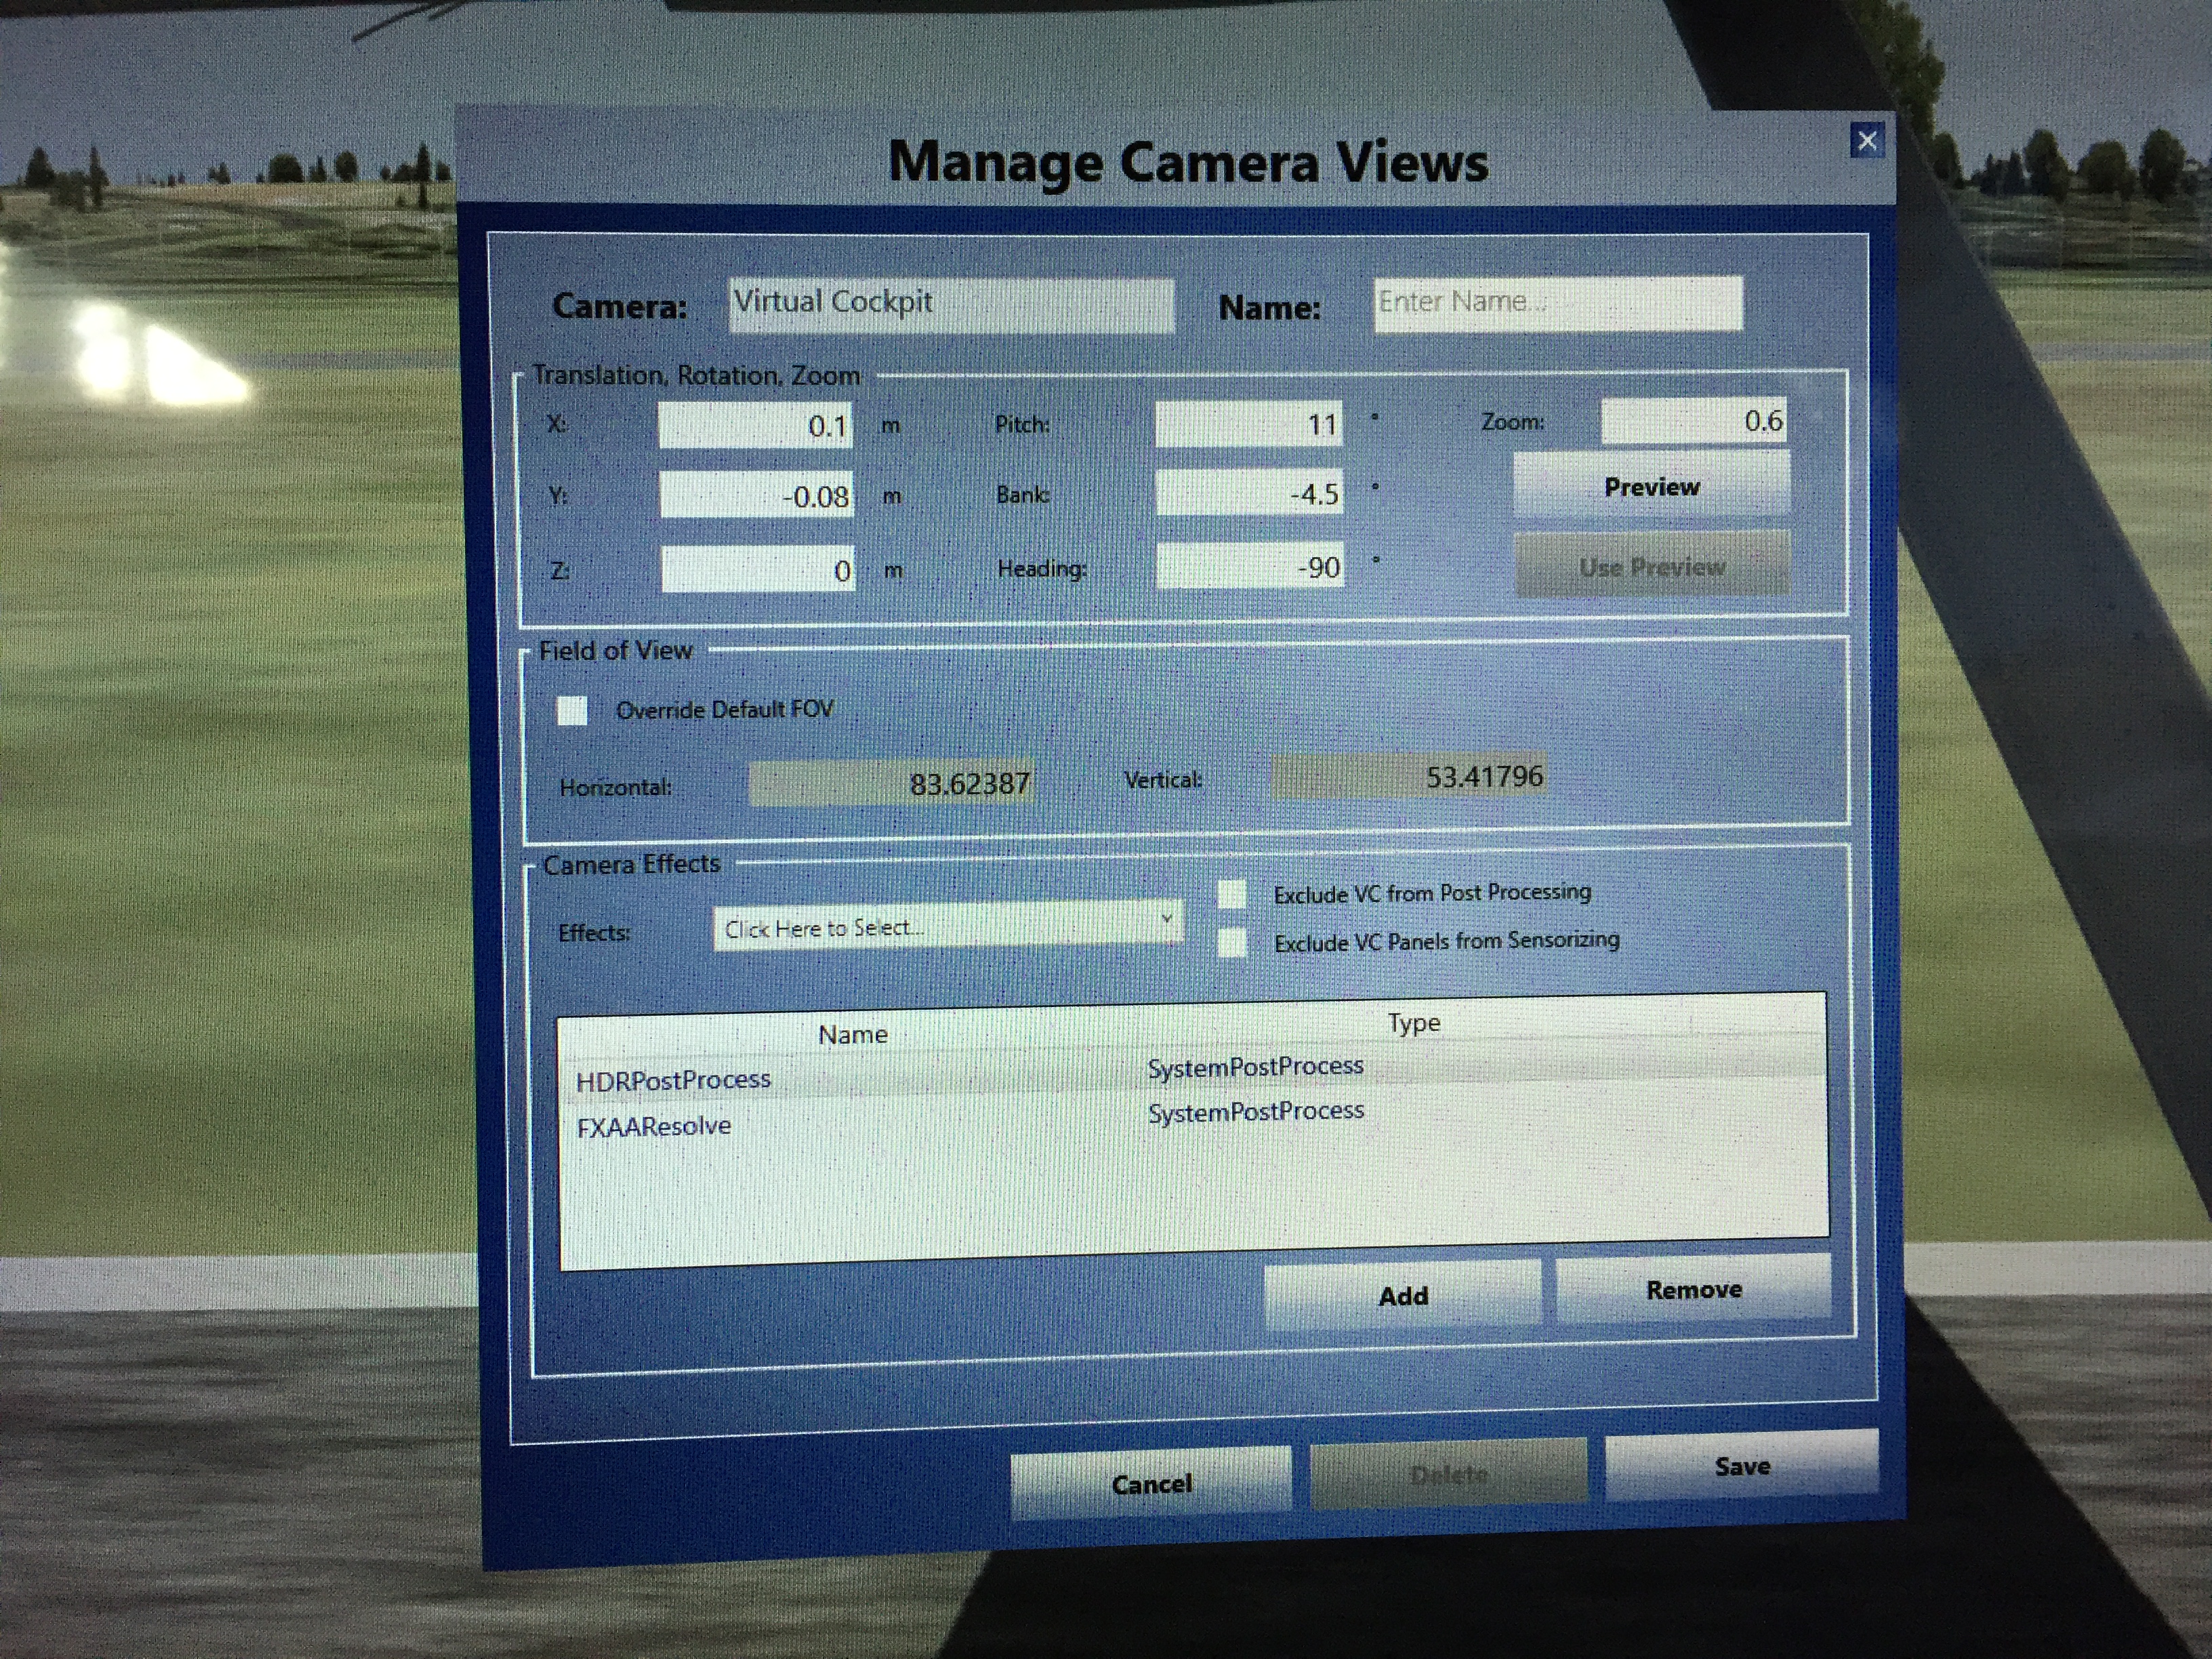
This brings up the Manage Camera Views screen:
THIRD: I tweak that view to get it to my liking, and the easiest way to do this is to use previews. Click the Preview button, and it will open a new view window on the main screen that has inherited the view from which you clicked. Drag the window and its edges so it fills the front view screen. From now on any changes that you make to the variables in the Manage Camera Views dialogue will show instantly on that view screen when you click the Preview button. So you can easily tweak, preview, tweak, preview, etc.
As for the variables in the dialogue, here’s what they mean:
- X is the placement of the eye point left or right of center in the aircraft
- Y is the placement of the eye point above or below center in the aircraft
- Z is the placement of the eye point front or back of center in the aircraft
- Pitch is how “nose up” or “nose down” the view is
- Bank is how angled left or angled right the view is
- Heading is how turned to the left or turned to the right the view is
Tweak these settings until the view is how you like it, then give it a name in the dialog and click “Save.” P3D will then ask you if you want to quit or not. If you choose “Yes” the dialog will close as will the preview window, but a view with that name will now appear in the Custom Camera pop-up menu, and you can select it for your front view. With my front view is that I like to see the cowling of the aircraft, but not the glare shield (as my sim has one). This means my front view is pushed forward quite a bit along the Z axis, and yours may be different.
FOURTH: Once the front view is created, I make a left-hand view for the left window monitor. I follow the same process as above, using the keyboard keys to turn the view to the left, move it close to the window, adjust the height, etc. Again, I’m just trying to get it close. Once it is, I open the Manage Camera Views dialogue, create a preview, drag it over to the left window monitor, fill the screen, and begin tweaking the preview. One variable that I simply set rather than tweak is the Heading variable. For the Left view I set it to -90, as this has me looking directly out the left side of the aircraft.
Through trial and error I’ve learned two things are important with the side views. The first is that at least for me, the side views and front view need different zoom settings. My sim is really close to the projection screen, and it’s a 100-inch screen. To keep objects from being huge I have the front zoom at .30. For objects on the side views to be about the same size they need a greater zoom, and I use .60. I’ve come to this through trial and error, and in my sim this has things like the buildings and taxiway lines matching up well from a size perspective. Your zoom settings will be different, but know that the front and side views may need different zooms. The second is that the Bank variable is important. The default camera views nearly always have the horizon when viewed out the side window tilted toward the front or rear of the aircraft. I use the Bank variable to adjust the tilt to make the horizon straight, and the Pitch variable to adjust the height of the horizon so it lines up with the horizon of the front view across the two screens. This may take some trial and error, and might mean re-tweaking the front view’s Pitch a bit, but when it’s dialed in I can (1) see the cowling of the aircraft out the front, (2) see the bottom of the wing and my flaps out the side, and (3) have the horizon match up across both left and front screens.
When I have the left view correct I save it with the name “Left,” and instead of quitting the Manage Camera Views dialogue I click “No” because I want to continue with the next view: Right.
FIFTH: Once I have my Left view I do NOT close the Manage Camera Views dialogue. Instead, I rename the view Right, and keep all the variables THE SAME except three: X, Bank, and Heading. Bank and Heading are easy: just make them the inverse version of the Left value (so if the Bank and Heading were -4.5 and -90 for left, they should be 4.5 and 90 for right). Y, Z, Pitch, and Zoom should stay the same. This ensures your Left and Right views are mirror compliments of each other. The only variable to tweak is X, as it’s how far left or right of center the eye point is. For the Right view you’ll want it up close to the right window, so I tweak that variable, looking for a point where the both the left and right struts (or wings for a low-wing airplane) seem about the same size and position. Then I save that view as “Right” and close the dialogue.
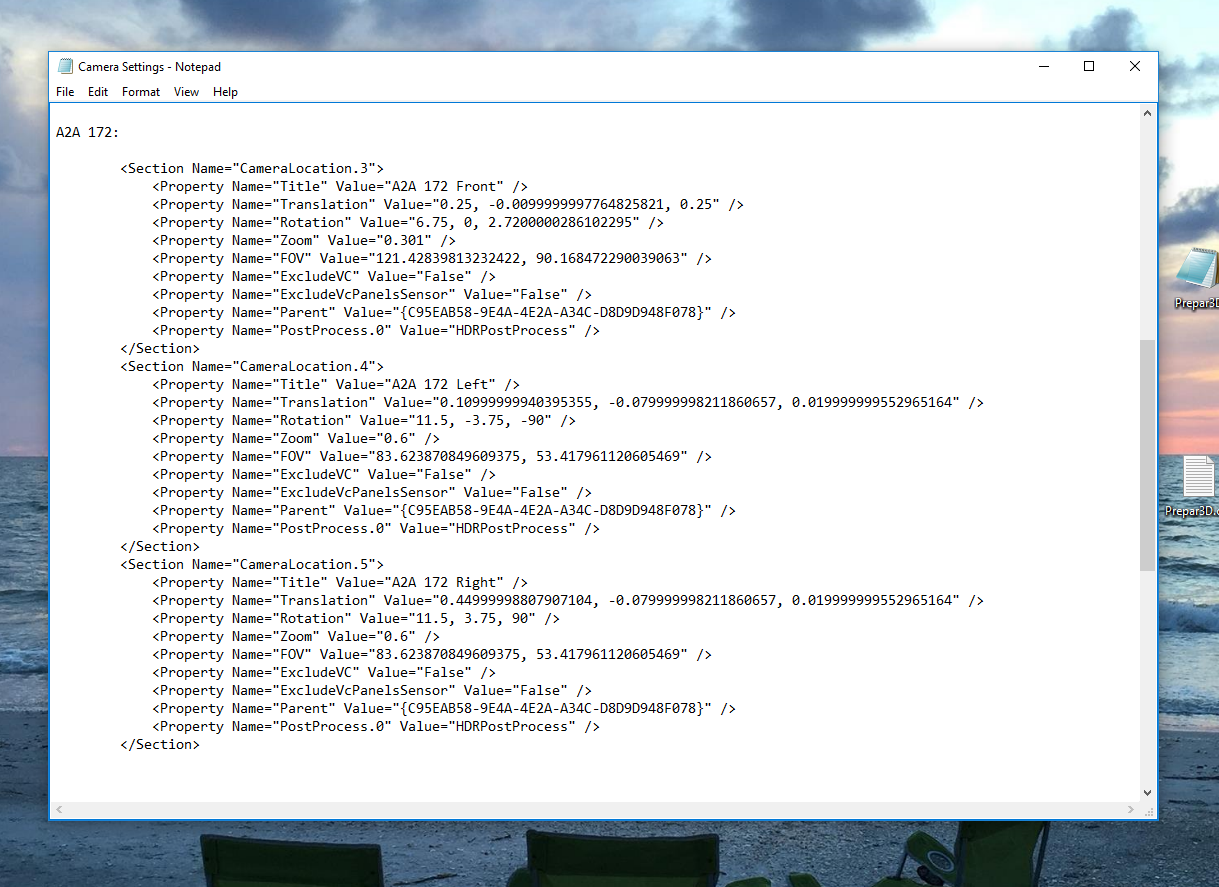
At this point you should have three saved camera views, Front, Left, and Right, and you can assign them to their respective views and monitors. Now the question is how to keep them for use in other flights. I have two ways of doing this. First, and easiest, is to add the camera views you’ve defined to other saved scenarios. To make this easy (and to back up my work) I’ve created a text file on my desktop called “Cameras” into which I’ve pasted my camera settings so they are backed up and easily at hand. This is easy to do: go into the Documents/Preapar3d folder on your PC and open in a text editor the scenario .CFG file in which you created your custom views. Scroll down and you will see the standard camera views, and below that your custom ones. Just copy and paste the code into your backup Cameras file. Here’s a screen shot of part of mine:
I have camera setups for four aircraft: the Carenado 182, A2A 182, A2A 172, and A2A Piper 180. All are pasted into this backup file so I have them. Then I can copy and paste the appropriate camera code into the config file of any particular scenario without having to create the camera views via the dialogues. Just open the scenario config file in a text editor and add the appropriate camera code at the bottom of the pre-existing camera locations. Just be sure to continue numbering the camera setups consecutively within the file.
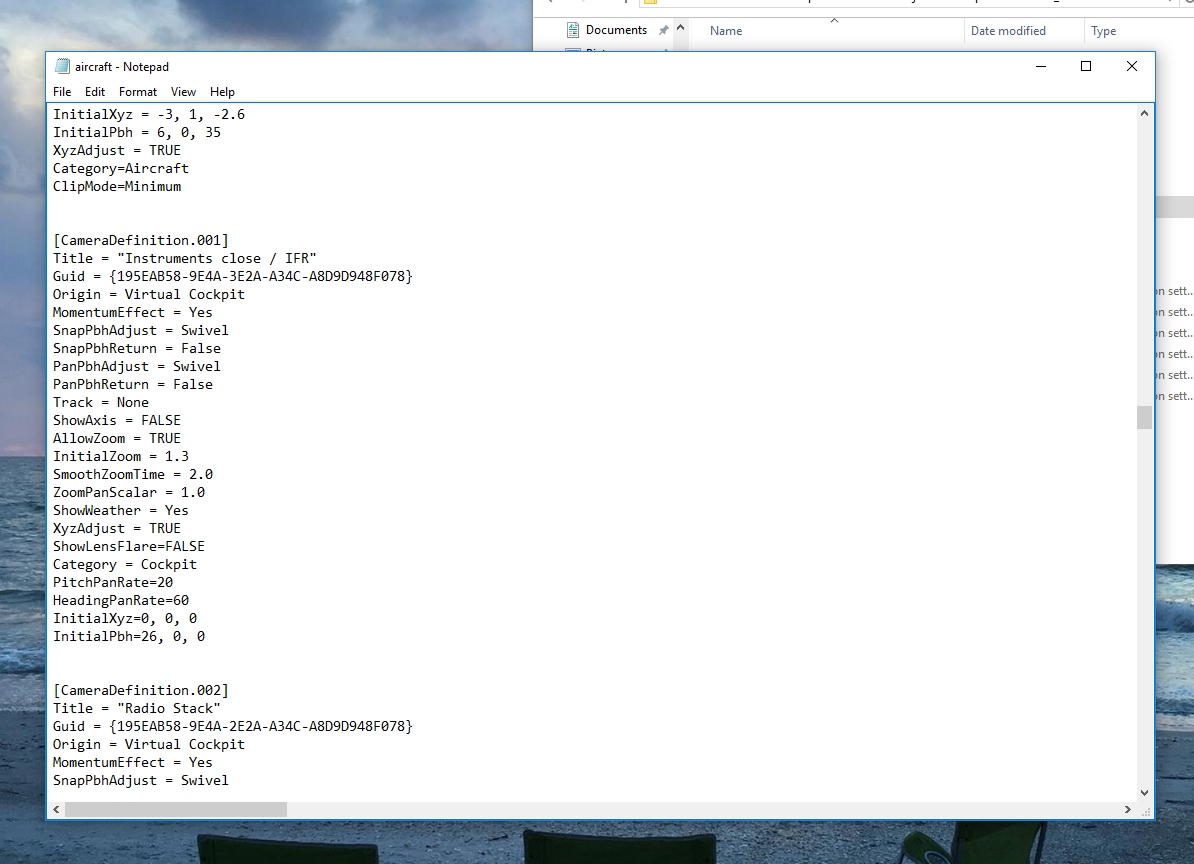
You might also want your camera setups to be part of a default aircraft configuration, so those views are available whenever you start a flight with a particular aircraft (saved scenario or not). This is a little more complicated, but not much so. Let’s say I want to add my the A2A 172 Front / Left / Right camera setups to the default A2A 172 so they are always available whenever I use that aircraft. To do this I would go into my P3D directory / simobjects / airplanes / A2A 172 subdirectory and open the airplane .CFG file in a text editor. If you scroll down in an airplane .CFG file you will find the camera definitions, and they look like this:
As you can see, these look DIFFERENT than the scenario camera definitions, which is where people get confused. The good news is that there are only a few lines of code that you need to change to convert one of these default views into a custom camera view. Here’s how to do it.
- First, copy an existing camera definition within the airplane .CFG file. It doesn’t matter which one.
- Second, paste it at the end of the camera definitions, and give it a new cameradefinition number that is next in the sequence from the definition above it.
- Third, change the Title variable of the view to the name you want (e.g, “A2A 172 Front”).
- Fourth, change the InitialZoom variable to be the correct zoom for your custom camera.
- Fifth, change the InitialXyz line to reflect the X Y Z values from your custom camera.
- Fifth, change the InitialPbh line to reflect the Pitch, Bank, and Heading values from your custom camera.
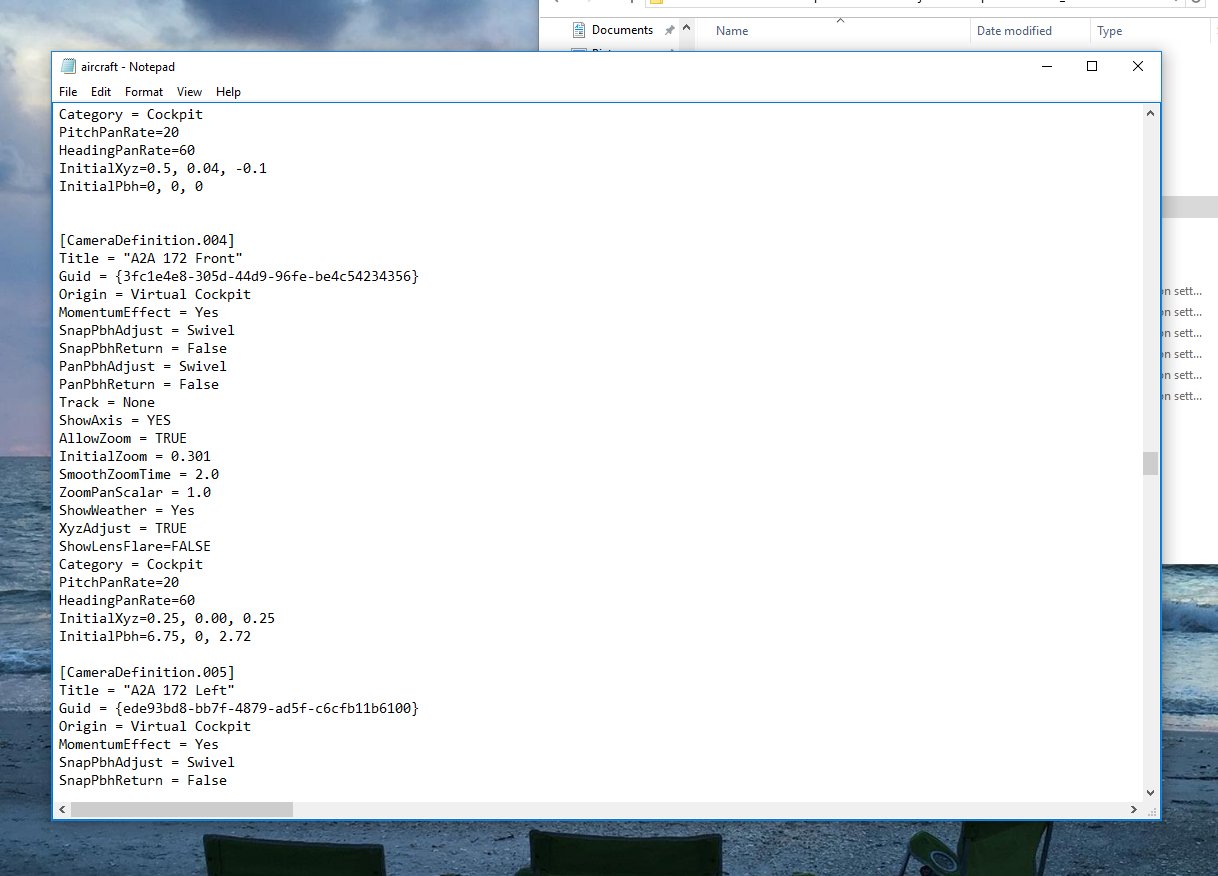
- Sixth, and last, go to www.guidgenerator.com and grab a GUID number. Each camera needs a unique identifier, and this site will give you one. Paste it OVER the GUID value between the brackets at the top of the camera definition. When you’re done, it should look something like this:
Save the file. That’s it, unless you want to add Left, Right, or other views, in which case you can repeat the process.
In terms of having this all look good from a REAL camera’s perspective if you’re filming with a GoPro etc., what I’ve learned is key is that the camera be at about the same height as your eyes in your simpit. Then everything should line up across the three monitors as they do from where you sit (with some minor variability).
I hope this is helpful.
Any way to do this so that the cameras are also loaded and open with an aircraft, rather than just having the cameras available in the menu?
Hi CK. Yes, if you have the camera views saved in a scenario, whenever you open that scenario all windows and views will be as you left them. So I have a default starting scenario for each aircraft I fly, with the location set to whichever field I most often fly that aircraft out of. I load the scenario and then move to a new airport if I want to change location.
Hi I might have missed something, in your front view the nose cone and propeller remain fixed my moves with the G force of the throttle input, is there a way to stop this, Kindest Regards
In the Prepar3d.cfg file there is are a few lines of settings for “Dynamic Head Movement.” Set them all to 0 and you’ll stop seeing the G effects. Hope this helps!
Thank-you so much greatly Appreciated!!!
My pleasure. Hope it helps.
Setting X parameter for the Right view is a point of discussion I believe. You’ve chosen to make the eye point close to the right window, which is great for the person sitting next to you, but from your perspective it’s wrong (IMHO). So you should have 2 scenario’s, one when you’re alone in your cockpit and one when you have a friend joining you on the right hand seat. In the last case you should use the setting described above..
Thanks for the comment. Actually, from my perspective in the left seat the right window looks great. For both left and right my camera positions are set so that the horizon and runway stripes align with the front view, and so that I see the view I would see out a window (meaning I see none of the virtual cockpit). They look very good from left and right seat in the sim, but others’ mileage may vary.
Love your stuff!
Thank you very much for your explanation.
I use TrackIR. Maybe I missed it, but when I create camera views, I stretch the view across my three screens then hit Alt/Return twice. This gives me 3 full screen with TrackIR Active across all three screens… The deficit is that the side screens are stretched and therefore distorted.
When I try to create screens as you have done here , undock and move the screen to its proper position, and , I get what I want with a TRACKIR-Active center screen, but the side screens are no longer TrackIR active, rather non-moving and fixed.
I know you don’t use TrackIR, but you appear to know more about multiple screens then I do; having just gone that way in the last couple of months..
Any suggestions to UNDOCK views, move them to where they belong, and still retain my “TrackIR-ness” across all three?
Thoroughly enjoy your flights and try to duplicate each one !
Chas
Hi Chas. I don’t know if TrackIR will work on multiple screens or not. Maybe check their forums?
Hi, I have seen your work on youtube, congrants, it’s pretty amazing. I have one question, How did you connect the GTN650 gps with the simulator so that it can show current position?
Thank you! It’s the GTN750 add on flight Flight1 software. It simulates the real thing and I’m running it on a small touch screw monitor and it connects automatically to any airplane in the sim in which you install it. The add on was pricey, but I use it all the time.
HI. every time I am opening a new view my fps drop by half’. How did you using 3 monitors and stil get 30 fps?
A powerful CPU and GPU are the key. With one window my frame rates are 100-110. Every new window I undock they drop a bit more, but not by half. If I have the frames externally limited by NVIDIA Inspector they do, though. So I have my screens set to refresh at 30 hrz, and in P3D I have frames set to unlimited with VSync set to on with triple buffering.
Hi N15JG!
First of all, congratulations for your cockpit and your job sharing it. Because I love your cockpit, I have just built one very similar, and now is time for screens configuration. Although I’m following your configuration, my NVIDIA shows the screen dark (during try time) if I chose 30 hrz.
Did you change the resolution of the monitors?
Did you notice improvement changing from 60 hrz?
Do you have any problem abaut quality visualization in 30 hrz?
Thank you so much
David
Hi, good work!
When you need to look out the right window in your sim, in a left traffic pattern, to view a landing runway while on downwind, normally you would try to have the airplane positioned at about a 45 degree angle looking back towards the runway numbers as a reference to know when to begin turning to base-leg. (sorry the long sentence).. How does your setup workout in that scenario? As a private pilot, I know you will know what I’m talking about… Others reading this may be confused without diagrams. From what I’ve noticed, in your vids., it looks like your screens are actually a little bigger than the sim-window-opening, allowing you to lean forward, for example, to see around your pillars between the front and side windows. Are you able to look back at the runway touch-down point after having passed it on downwind, approaching turn-to-base?
Hope that makes sense.. Steve
Hi Steve. Thanks for your comment and question. The short answer is, “I guess.” You’re right, I can’t see the field at 45 degrees behind me. But I know that in the real world I should be thinking base turn about 45 seconds to a minute after being abeam the numbers, so that’s what I do (or when I’m somewhere around 700 AGL, but I tend to guess based on the feel of the time passed than the altimeter).
And I thought I was the sensible one. Thanks for setting me stathgir.
Thanks!
Correction, I said right window, when I meant left. I like your setup and I’m considering fiddling with mine (again) giving the projector another go. Besides the method you gave for base turn timing, I suppose one could just use the hat switch for a quick look back at the field.
Indeed, but the view won’t necessarily go back to exactly where it was. You could use EXDoc I suppose to quickly switch views …
Great tutorial on saving Windows.
Worked perfect.
Thank you,
Tom
Great, Tom. I’m glad to hear it and many thanks.
I believe you mean saving Cameras…saving windows, tho that is exactly what you are doing, is less informative to noobies,I think.
Regards,
Chas
Great work.
Well done. Also I really appreciate the fact that you always respond to people in a sincere way.
I want to increase my frame rate as you suggested by lowering my refresh rate to 30, but my monitor dosn’t have any lower refresh rate than 60.
How to I reduce my monitor refresh rate to 30.
Thanks
Thanks Amro for the kind words. Mine didn’t have a native refresh of 30 hrz either, but I was able to create one in the NVIDIA Control Center app. It has a custom resolution option, which includes refresh rates. At least in my version it does. A quick Google of that will probably bring up a solid how-to.
My Nvidia I have an option called adaptive v-sync in there I had three options one of them said to limit the refresh rate to half. . I tried that. And I think it did give me some extra frames. I would have to do much more research and see whether this will work. Thank you for your feedback.
I did that until I figured out how to change the rate on the screens and it worked well. But you also need to them limit the sim to 30 fps in the sim settings, so be sure to do that, too.
I am trying this out tonite on my PilotEdge Alphabet Challenge #12…then decided to go ahead and put myself, my Tail Number and VCplackard.. 0n and in in my Lancair Legacy V2….then I am doing your N. Carolina mountain tour…..Lovin your vids!
Chas
Awesome! Also Chas, I removed my name just because I like my anonymity. Enjoy your flight. Those mountain strip should be exciting in the Lancair!
Goth have re the name…sorry
Chas
No problem. How were the flights?
While tweaking my nvidia setting in the nvida control panel, I thought lets start fresh so I have reset it.
It seems that this was a very bad idea, as when I went back to my P3d v3.3 the water texture became very cartoonish and the slider in the P3D setting is shaded.
Any ideas
First delete the contents of your shaders folder in the Prepar3d file structure so it can rebuild the next time you load P3D. If you’re not sure how to do this a quick Google search will inform you. Be sure to give the scenery time to load on P3D scenario boot – sometimes it takes a few minutes to redraw everything fresh. If that doesn’t work delete your P3D .cfg file and let it rebuild itself. These two things almost always fix any scenery problems I might have.
Thanks. That worked. Dont know which part did, but it worked.
Hello Again,
Thank you again for all the work that you are doing to assist so many of us.
I am having a dilemma with the GTN.
I have been running P3D now for awhile with 60+FPS. After seeing your awesome simulator, I decided to dig out one of the iPad’s that I haven’t been using and see if I could put my GTN 750 on it. Well, all seemed fine, I pop out the 750, undock it, and as I drag it to my iPad, it causes P3D to totally crash. I can drag items to the iPad and use the there with no problem, so the APP is working as designed, I think P3D just does not like it. I tried running the App as Admin, with same results.
Had you experienced anything like that when you were setting up your sim? Or possibly, could it be the fact that I am using an APP to do it? (twomonusb)
Thanks again for all you are doing for our hobby.
Tommy
Thanks, Tommy for your kind words. Candidly, I never had any luck with the “use your iPad as a monitor” apps. They’d crash or be laggy or any number of things. I finally ditched the idea and spent the money for a small touch screen monitor, and it’s worked seamlessly. I do use an iPad with the sim, running instruments on it with native iPad apps, and those work great. But not so much as an extended monitor, at least for me.
Hello N15JG,
I would like to know what type of projector screen you went with. I currently have a roll up screen, but the quality of the image from my brand new Optoma 320UST is not the best quality. I am wondering if this is because the screen has some years on it and the reflective material is wearing out and also because the screen is not stretched tight.
Great Job on your sim and all of the information on your website.
Thank you for giving us this 3-monitor setup. You rock!!!
My pleasure.
I’ve been following this sim for a while and it never ceases to amaze me. I do, however, have a couple questions regarding your screen configuration. Unless I missed it, I’m curious, how did you remove the window borders? Running three separate images, I can only assume it is in windowed mode, as that is how I have to run mine to get three displays to work. Also, do you run in wide view mode or standard? My screens are configured in a similar fashion and I feel like I get better horizon alignment when in standard mode as opposed to wide-view mode. Keep up the great work!
Standard. And see the How To tab at the top of the page for screen config help.
My home cockpit has four monitors. The configuration is that two monitors are for front view, one for left wing view and one for right wing view. For P3D, in left view, the wing appears without fuselage as required. However, in right view, the fuselage covers major portion of the view alongwith only tip of right wing appearing through window. Is there any method in P3D to eliminate fuselage so that only right wing appears ? In X-Plane, required parts of aircraft can be removed through Plane Maker and I successfully get right wing view. Is there any such option available for P3D ?
Any reply ?
It’s been a long time since I’ve used P3D, but I don’t recall an easy way to make parts of the aircraft invisible. But you should be able to modify the camera point so it’s looking out the window and the fuselage isn’t visible. Custom cameras are the way to create very specific views in P3D, as I describe in the post.
can using 8> monitor?
Hi OTG
something I’ve always struggled to get ‘right’ – well, I accept it can’t be made really right without a huge field of view projection and even then is not strictly ‘right’ – but…
I now have the majority of my PA28 panel built. Your website has been both invaluable as to advise and encouragement to do it!
Currently, until I can pick up some bigger screens, I have three 17″ LCD’s in horizontal span providing a nice wide forward view, just above the glareshield of the panel. The problem is, the view by nature seems to be permanently oriented as if looking to the right (assumedly to simulate being sat on the left seat for better eyepoint). If I position the central column with the compass dead on in the middle of the display, the view is skewed from where I’m sat to the left of it. I.E. the centreline doesn’t run ‘under’ my side of the panel, down ‘behind’ the attitude indicator and HSI so to speak, as if passing below me. It always seems to be at an odd angle forcing me to sort of always kink my head over to fly looking through the middle screen rather than sitting naturally over in the left seat and looking straight over the panel.
I appreciate there may be no perfect way to cure this with the current setup. I did use VR which sorts this out amazingly but the low res and the lack of physical stuff like my kneeboard put me off (and to some extent missing out on all the hard work put into building the panel!)
At some point I’ll be getting some big TVs for side views like your setup, but this will still leave me with the weird forward view issue. Any thoughts? I’m running XPlane 11, current build.
Thanks
Rich
When you create a custom view, can you enable rotation (like with a hat switch or the space key)?
Hi will chase plane work o long side this setup .
Will it conflict .
Cheers Dan