First, I’m writing this quite quickly as I have someplace I need to be. So forgive any typos, and I may revise it a bit later …
After several days of tweaking I finally have my X-Plane 11 visuals for the Basement Sim where I like them, and I like them a lot. It was a bit of a process getting there, and absolutely a learning experience as I’ve never played in this space in X-Plane before, but it was fun and I feel like I understand it much better – and I really like the results.
You’ll remember that the reason I had to do all of this is because of how X-Plane handles multiple monitors. Historically, it didn’t do this at all without significant add-ins. With X-Plane 11, though, we have multi-monitor support, and it works great, thanks to a simple dialogue that allow you to set a field of view (the default is 60 degrees), along with lateral, vertical, and roll offsets for that field of view. In essence, if each monitor is like a camera on a tripod, you can set the width of the image (field of view), as well as the direction it is pointing horizontally (lateral), tilt (vertical), and side-angle tilt (roll).
So by setting different offsets for each camera, you should be able to achieve a set of views where the front screen is looking out the front of the airplane, the left screen is looking straight out the left window, and the right screen is looking straight out the right window. By varying the fields of view, which act like a zoom, you should be able to get objects on different-sized monitors (I have a 100 inch projection screen in front and 32 inch LEDs on the sides) to match up. And finally, by varying offsets, you should be able to get the horizon to match up across the three screens.
After some trial and error, I was able to do this. For my screens and my cockpit, this was the setup that worked best:
LEFT SCREEN:
- 57 degree FOV
- -90 lateral offset
- – 6.5 vertical offset
- 0 roll offset
FRONT SCREEN:
- 97 degree FOV
- 0 lateral offset
- 7 vertical offset
- 0 roll offset
RIGHT SCREEN:
- 57 degree FOV
- 90 lateral offset
- -6.5 vertical offset
- 0 roll offset
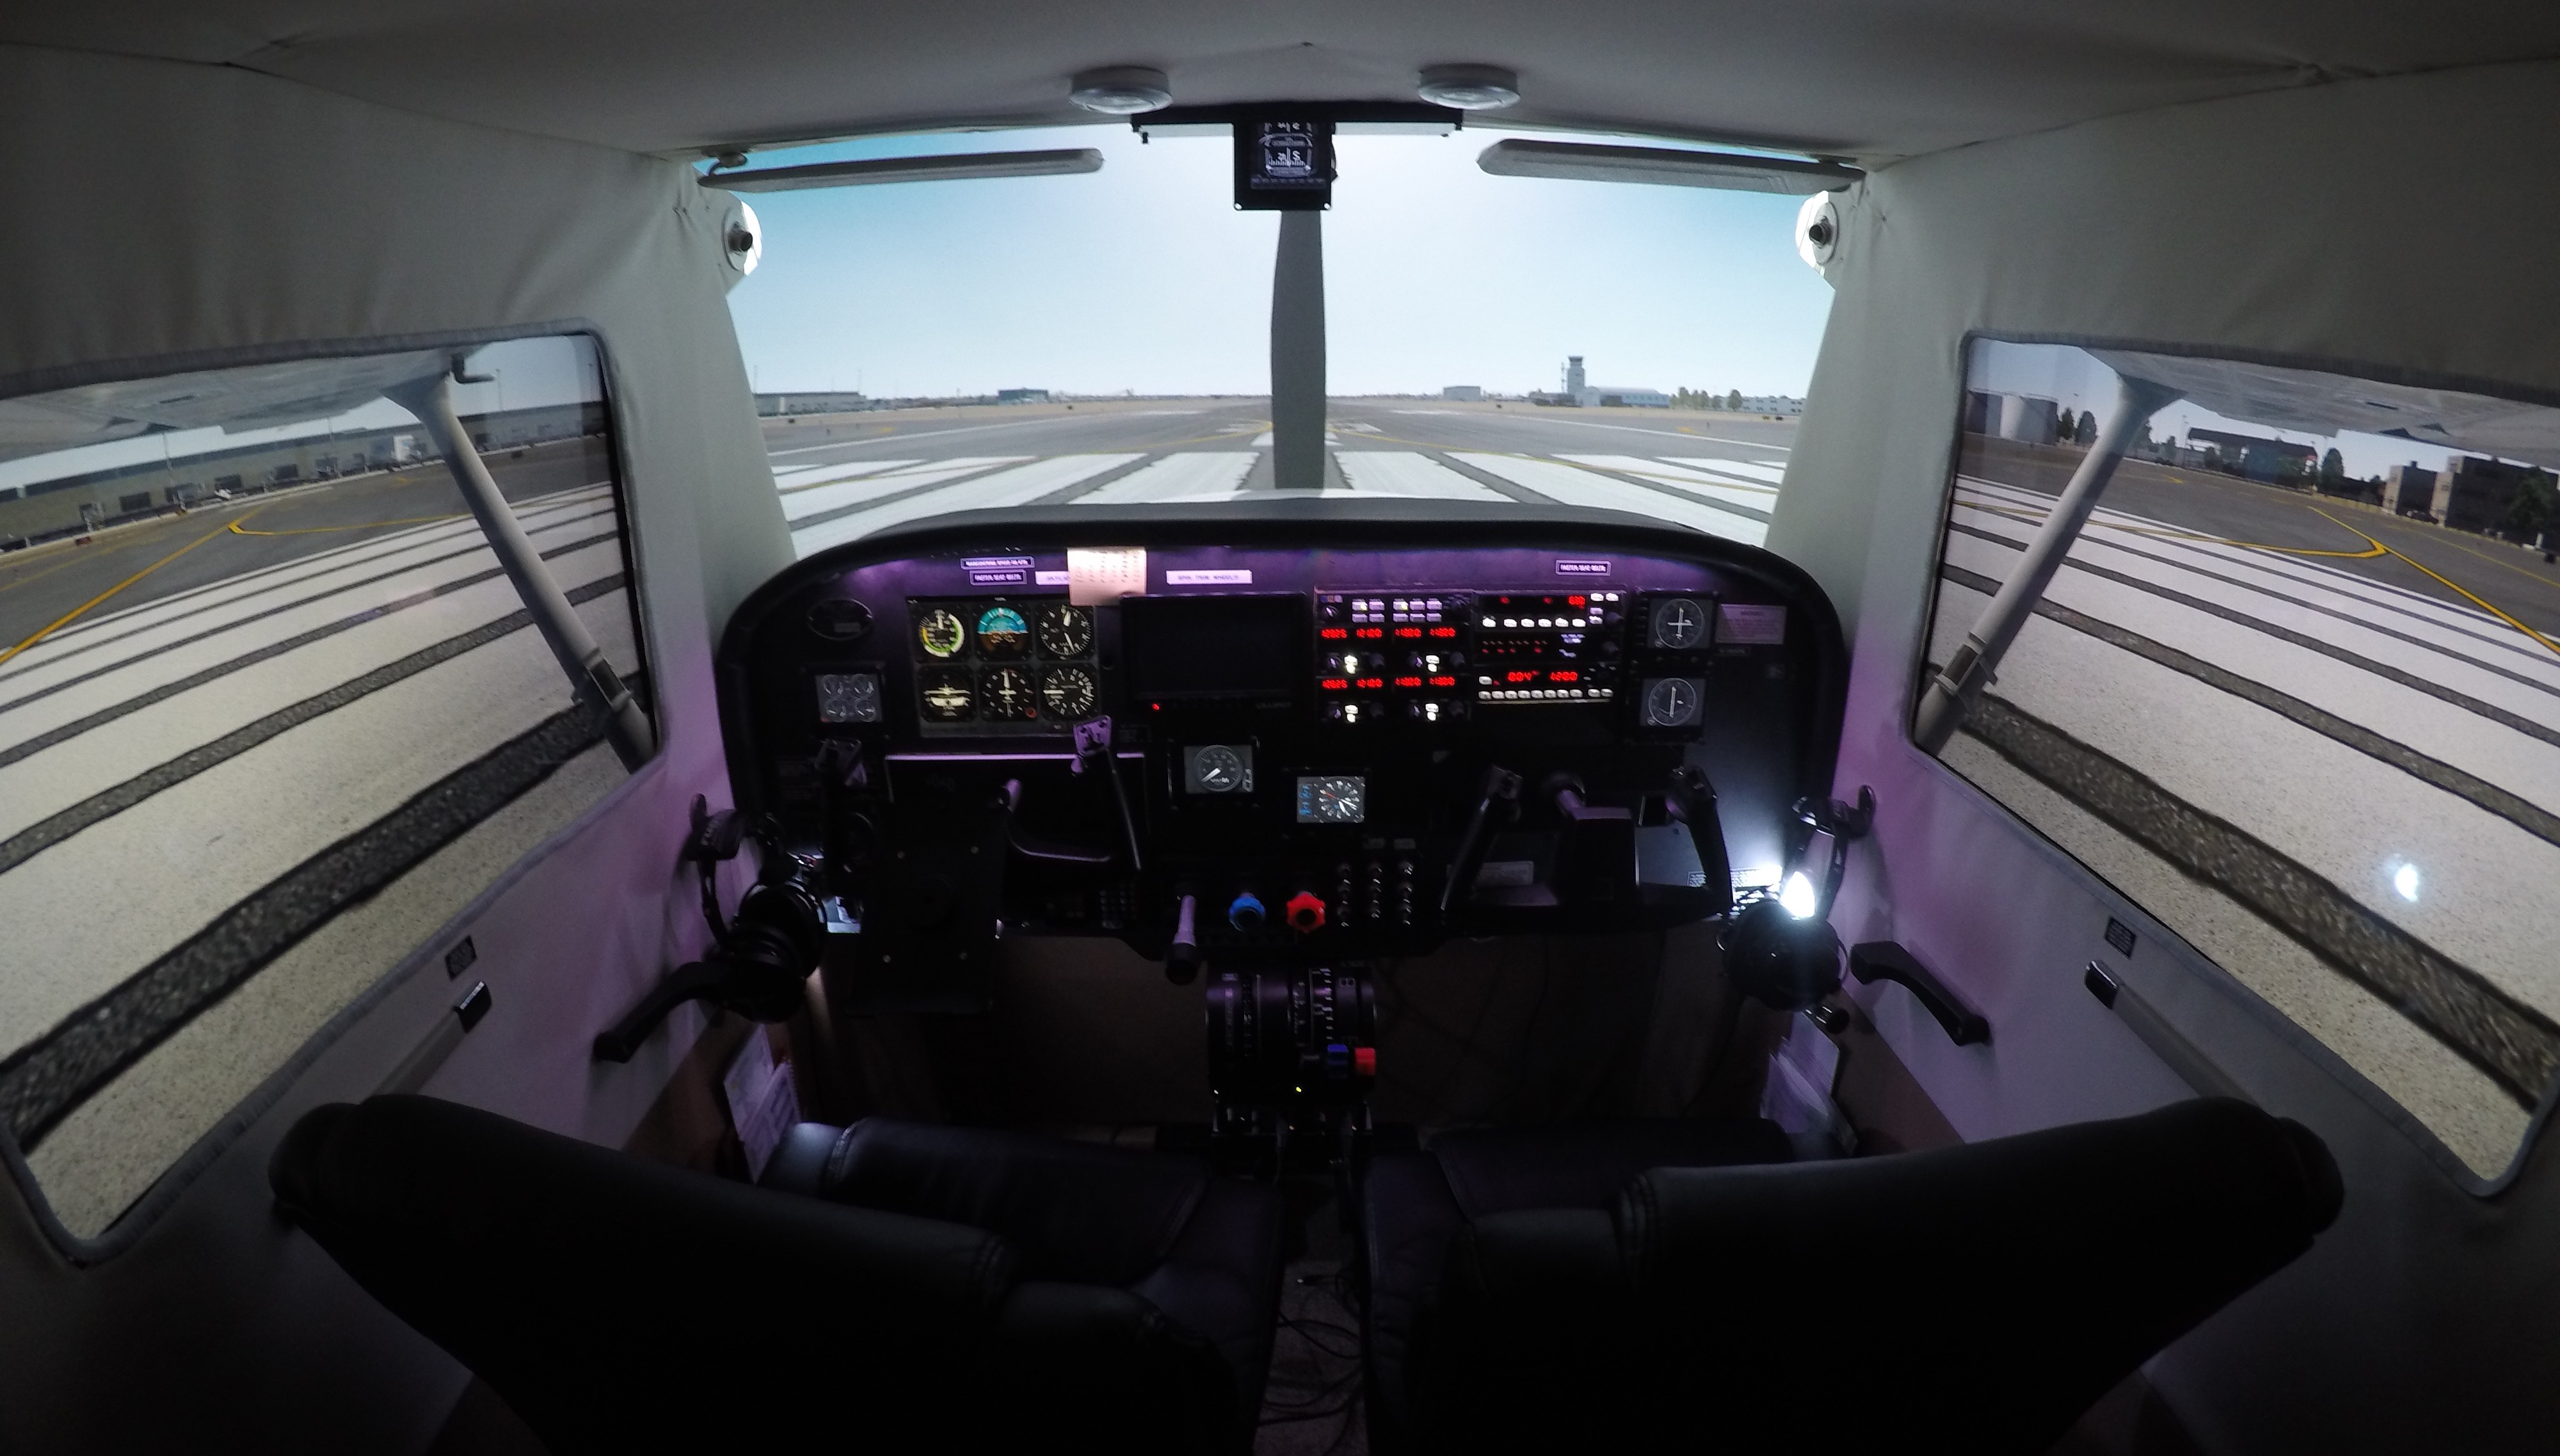
These settings produced a nice alignment of horizon and runway lines that matched up very well, especially from the position of the GoPro in the back middle of the cabin. But there was a problem, and the problem was that I could still see the panel on the front screen. So just use the arrow keys to raise the eye point, right? But therein is the complication, because in X-Plane 11 (at least so far) the multiple views are all connected to a single eye point, meaning that they all move together. So when I raised the view to get the panel out of the way, the top of the virtual cabin windows were now in view. And if I lowered the view to get the windows out of the way, the panel was visible. Everything moves together. So how to solve THAT problem?
The answer is the great little program that comes with X-Plane, Planemaker.exe. It allows you to make your own aircraft for the sim, or to modify the ones you fly. You can find it in the same root directory in which X-Plane sits. It turns out that the airplane models in plane maker are made of three-dimensional objects that the designer loads to cover the wireframe (and invisible) physical dimensions of the airplane and flight model. In essence, they design a wireframe airplane, and then fill and cover it with textures and objects, like wings. These objects don’t affect the flight characteristics, as they are simply window dressing for the flight model. And it turns out that you can move them around, and even delete them entirely. The airplane will look different–if you delete the wings and look at the airplane in chase view, it will have no wings–but it will still fly just fine.
It’s because of this that I was able to solve my view problem of having a panel that was too high, wings that were two low, and cabin walls that I could see. Here’s how I did it, with some screen grabs from my Mac which has X-Plane 10 on it (this Cessna looks a bit different than the one in X-Plane 11, but you’ll get the idea):
- In my X-Plabne “Aircraft” folder I made a duplicate of the default Cessna 172 folder. I created a full copy called “Cessna 172SP Copy” that had all the contents of the original in it. This way I could work without messing up the original.
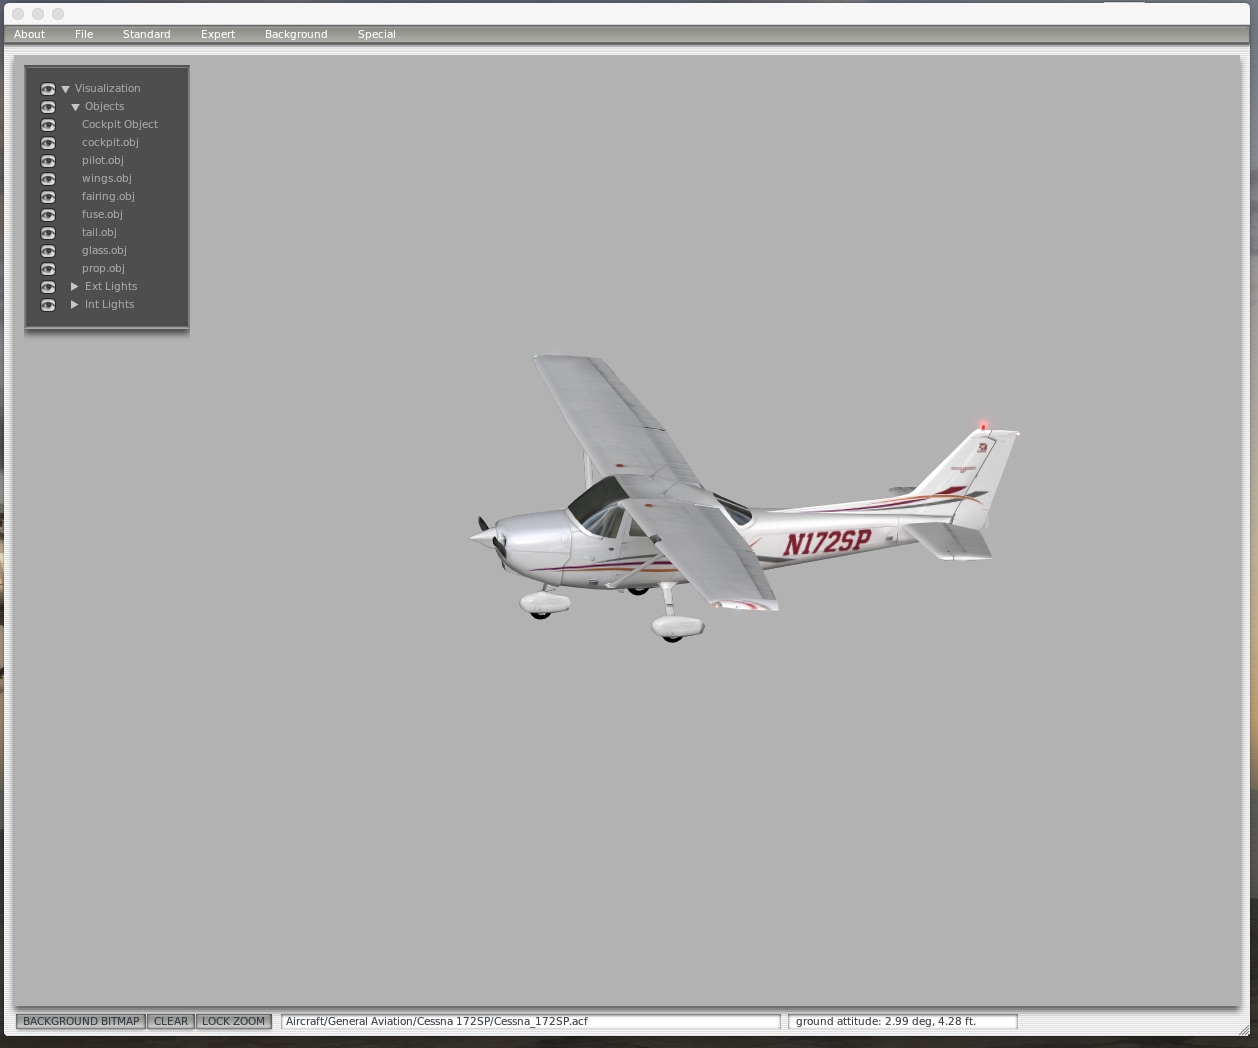
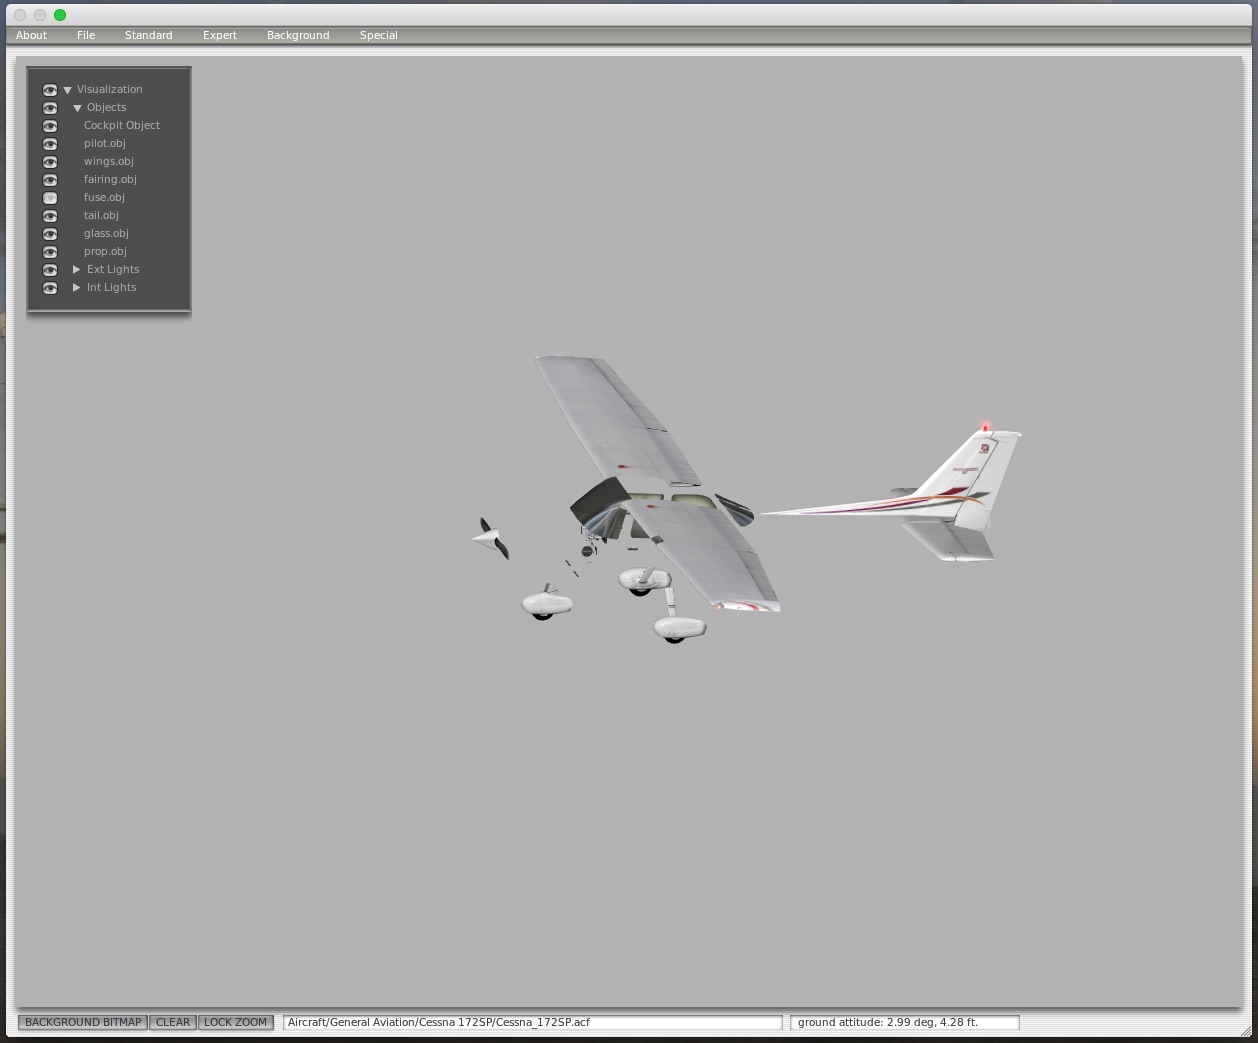
- The file that Planemaker reads is a .acf file. I opened plane maker, and opened the Cessna_172SP.acf file from the Copy folder. When you do, you’ll see something like this:
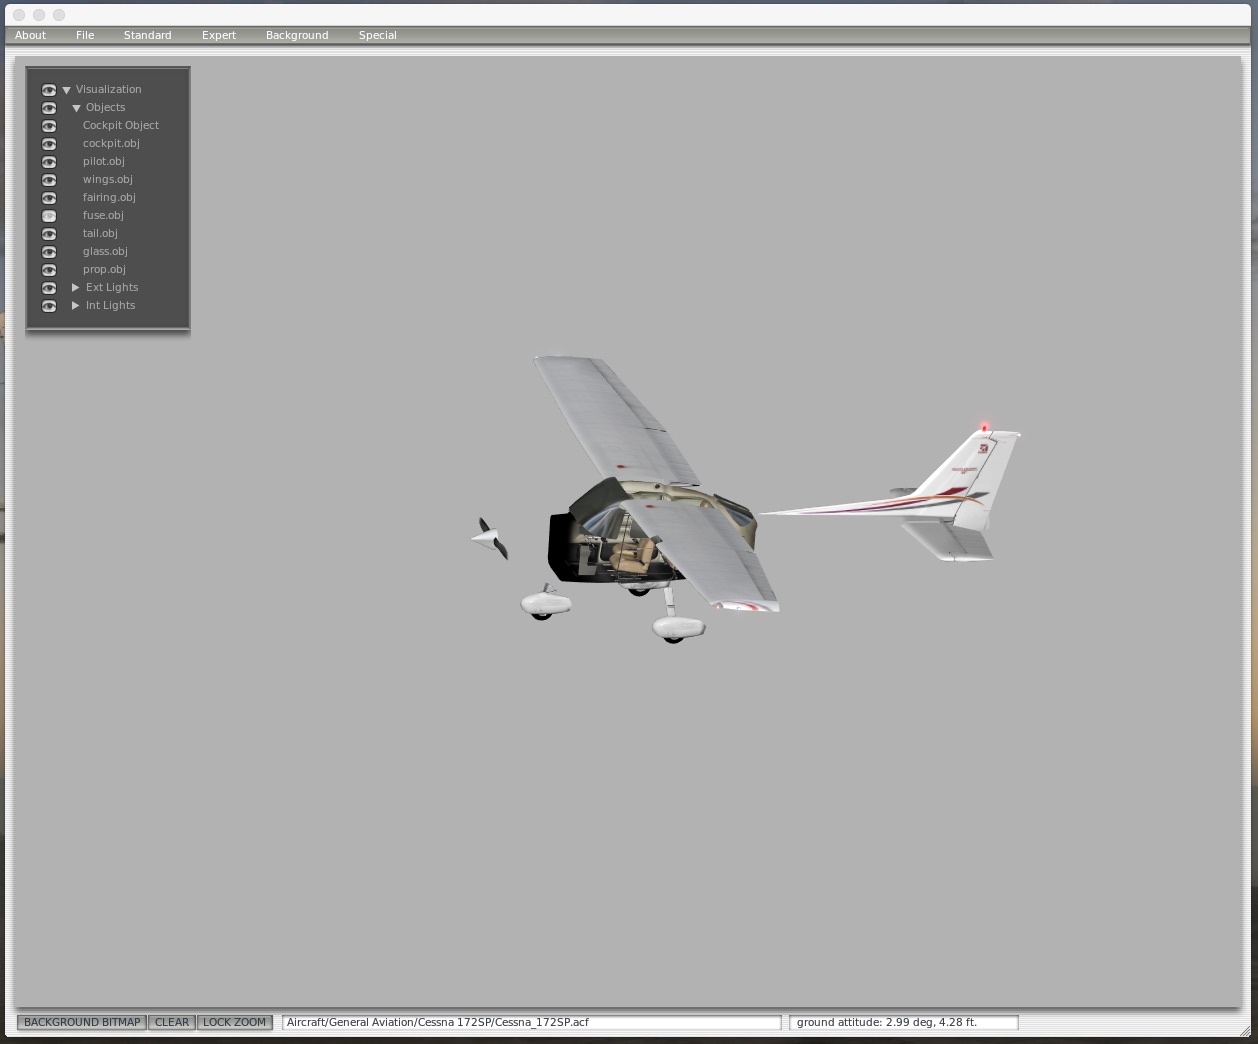
- With the Visualization menu on the left you can “turn on” or “turn off” different parts of the visual model. This does NOT make them invisible in the sim – it just makes them invisible so you can see what’s behind them. Here’s a view where I’ve turned off the fuselage object:
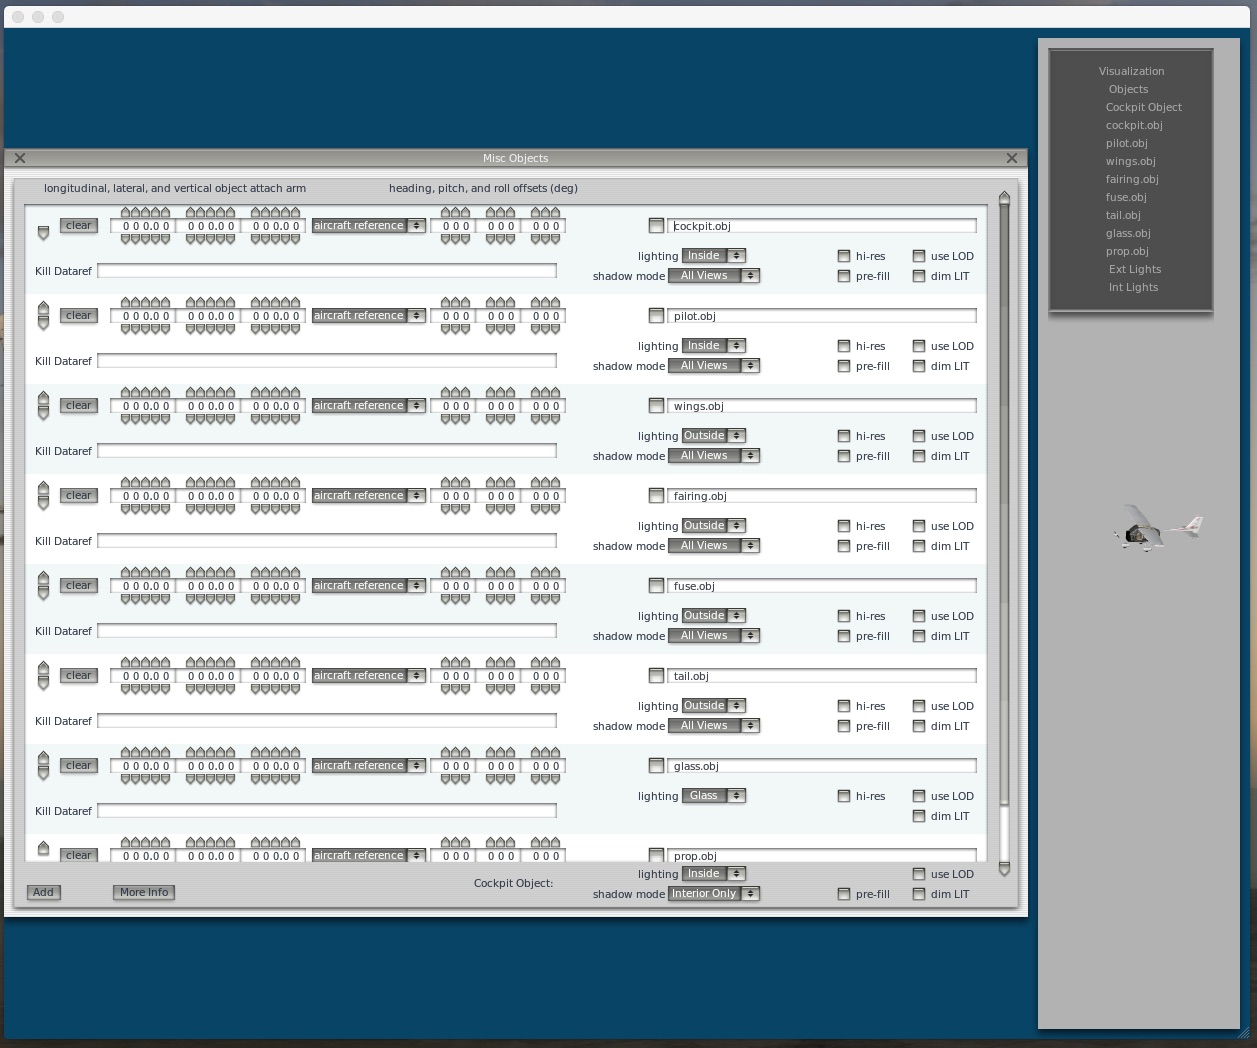
- Turn off the fuselage object so it’s out of the way. Then click Standard / Misc Objects from the menu. You will see a screen that lists all the 3-D objects that make up the visual model of the airplane. something like this:
- This is a powerful screen, so tread lightly here. But if you click the “clear” button for any of the objects, Planemaker will delete them from the visual model. They won’t show up in the sim at all, but it also won’t affect the flight model. Your external screenies may look strange, but you can easily remove things you don’t want to see. If I delete the cockpit.obj object, the model now looks like this:
- So that’s what I did. In the X-Plane 11 172 I also deleted a second cockpit object, seats, and a bit more. I DID NOT delete any of the avionics or panel, because I think they may need to be in the model to work, but I’m not sure. When I loaded X-Plane 11 and loaded that Cessna (if you look at the details for the airplane in the flight setup screen it will show you which folder it’s in so you can pick the correct one from the Copy folder), I could see the wings, cowl, and prop, but the cockpit was gone, and I finally had a correct view like I was looking out real windows. BUT – there were still alignment problems (wings too low, cowl too high, panel too high).
- If you look at the Misc Objects screen you will also see that you can adjust the vertical, lateral, and horizontal positioning of objects, and you will actually see them shift around on the screen. I used this to lower all the panel objects a lot (but still so I could see them by tiling my view in case I needed to), to lower the cowl and prop a bit, to raise the wings a bit (I suppose I could have just raised them and left the cowl in place, but I’d already moved it), and to move the wings forward.
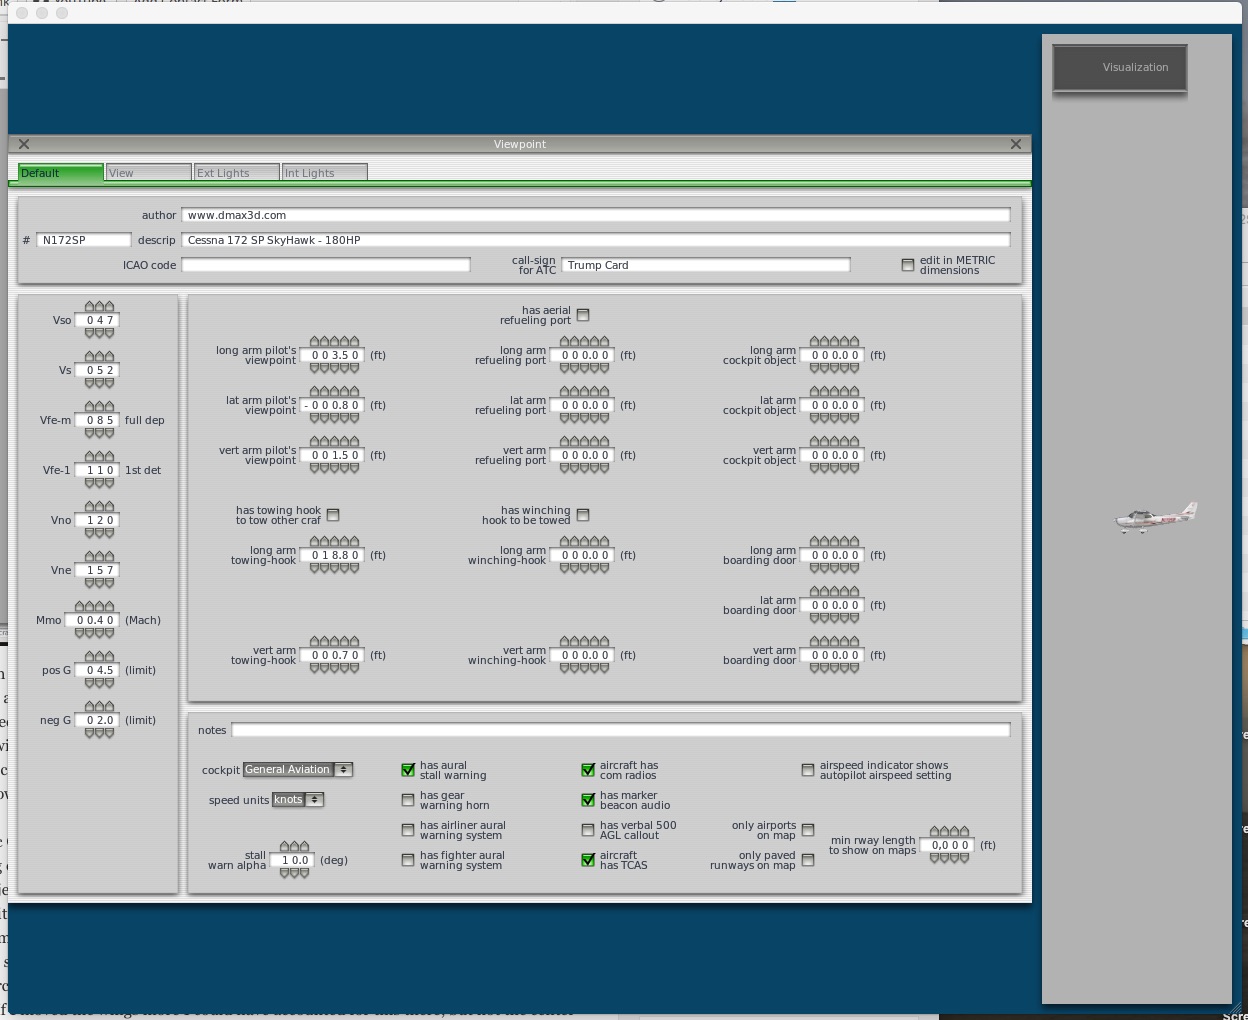
- Finally, I adjusted the starting eye point so that every time I load that airplane the view is in the right place: in the center of the aircraft, rather than in the pilot’s seat, and a bit forward so the wings are just where I wanted them (again, If I moved the wings more I could have accounted for this there, but not the center position of the view). You can tweak this in Planemaker as well, using the Standard/Viewpoint window. It looks like this (this is the X-Plane 10 version, and the 11 is just a bit different):
- By adjusting the “pilot’s viewpoint” values you alter the starting location of the view when you open a flight with the plane. I adjusted the lateral value to 0, which starts the camera right in the center of the cabin, and moved it forward a bit by adjusting the longitudinal arm (long arm) value DOWN to be about 2.2 feet. This starts the sim with the view just where I want it, and the whole thing now looks like this:
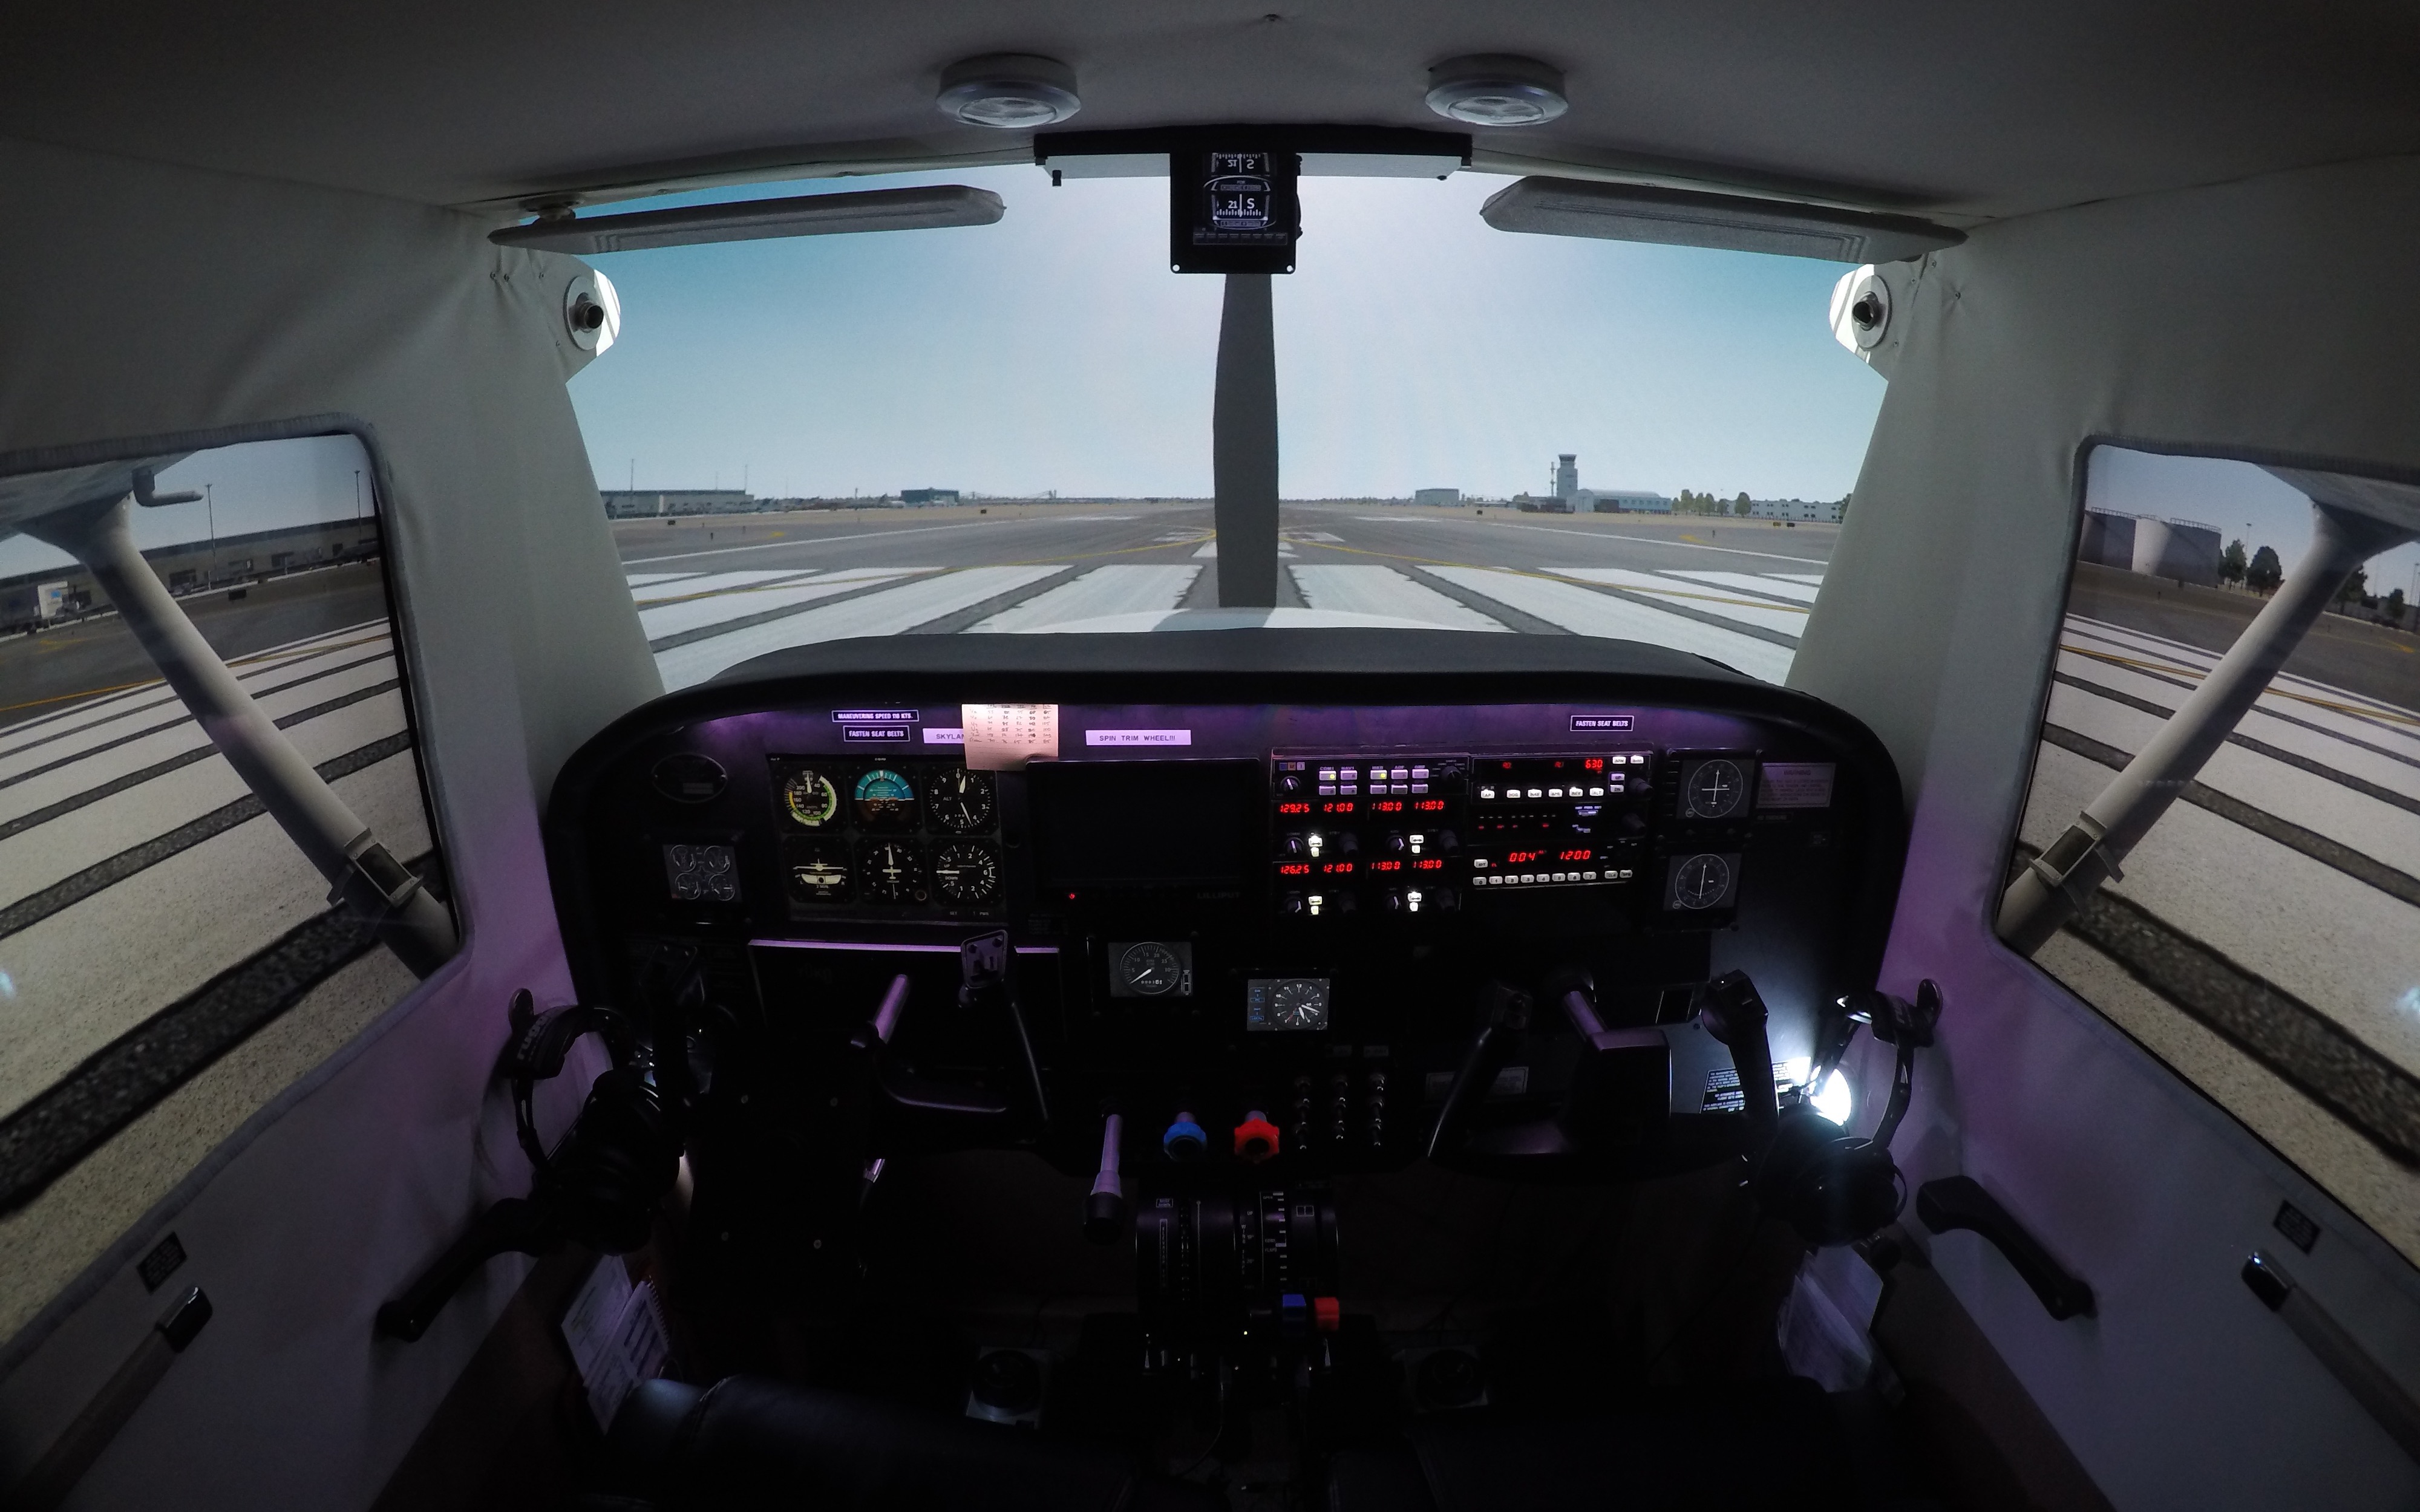
And I think that looks pretty good. So, with all this behind me, when it’s time to do this for a new aircraft I believe I’ll do the following:
- Configure the screens first, probably using the “no scenery, no HUD” view so I can just focus on getting the sizing and alignment correct.
- Then look in the 3D cockpit view to see how things interrupt with the view, and to move the eye point around to get a sense of what I need to delete and move.
- Use Planemaker to delete objects.
- Go back into X-Plane to see how it looks and to decide if I need to adjust the wings, etc., then go back and forth with Planemaker until I have those adjustments how I like them.
- Use Planemaker to get the permanent starting eye point where I want it.
I actually don’t think that will take very long, now that I’ve done it once. Of course, If Laminar allows unique eye points for each screen, all this will be unnecessary. Until then, I hope it’s of help to you, and that it helps many more X-Plane simmers build their own cockpits. To help with that, you may download my .acf file for the 172 here. It probably won’t be perfect for your sim, but it might be a good starting point. Thanks for reading.
Would probably go more quickly if you weren’t tweaking when you did it.
You’re a funny man, Angus!
Awesome… thanks for spending so much time on this and sharing your detailed findings.
My pleasure, Tim. I hope it helps. I sure love the way X-Plane 11 looks and flies.
Just be careful with different offsets (vertical / lat & roll) – you can end up with the 3 screens not being synchronized correctly – you will notice this in a turn – rapid roll inputs will show it up. You can set your screens to Forward with nothing – which would obliviate your need to edit the ACF file. Iv’e done this on a commercial sim I’m working with (180˜ view via 4 x 2 ranks of 56″ LED monitors)
True, but I enjoy seeing the cowl, prop, and wings. That’s part of the experience I’m trying to recreate. And you’re right on the offsets – it’s inevitable to have horizon misalignment in some turns and pitch changes with this screen setup. Luckily I don’t notice it when I’m flying.
thanks very much for your time really excellent resource of information !
ray
My pleasure.
You’re setup is awesome!!!!! I originally had a three monitor setup with center/left/right…My monitors have taken over my desk. Right now I am just using 2 24″ widescreen monitors next to each other in front of me…..Could you…..know you’re busy but something where I get a almost 180 degree and backup from the panels where I can have a view of cockpit. Kinda like yours without 3 monitors but 2? Might could help someone else out too.
If you can’t, I completely understand. You may be the next hottest thing on xplane besides Rasmussen with what you have done.
Warmest regards!!
Bob M.
Thanks, Bob. I think you should be able to set that view up very easily in XP 11. Just set both monitors to 90 degree fields of view and if they’re arranged side-by-side you should be good to go.
First of all, big compliments on your site and the sim. It gave me lots of inspiration to build a GA cockpit! The cockpit tour video and the list of what is inside are especially useful, as well as reports on X-Plane 11, which I’m planning to use. Regarding the problem to set the view – have you considered getting in touch with the X-Plane developers to discuss the problem? Maybe they will be able to quickly implement a fix to move the point of view independently?
Hi John. I haven’t, but that’s a good idea. I’ll try. Also, I’m writing a guide for how to build a sim like this and hope to finish it over the holidays. I should help a lot if you’re looking to build something similar.
I asked X-plane about the problem to set the view. they said will do it in future X-11 upgrade, no cost. If email Randy or Thomson they will answer. hey are great replying to email and looking for a way to make things better.
Great video of your first proper flight. Interested to know what you did about the sounds. I have been using the Airfoil labs c172 for a year or so and it is a really nice aircraft. They don’t do a cockpit builder version though so I might try your acf editing to see how that goes. The sounds on the default c172 have always annoyed me, so would be great to know what you did for that (where you found alternatives)
Keep up the great videos. You may also want to check out skymaxx pro for weather. Has really nice real weather cloud textures.
The default C172 sounds are great – I just didn’t have them in the correct folder on the earlier flights. The weird screech sound is gone, the avionics sounds are great – the whole thing is really good from a sound standpoint. And thanks for the tip on skymaxx pro.
What do you mean you had them in the wrong folder? I am having the same screech issue.
When I first made a copy of the aircraft file to customize for the views I didn’t copy over the entire 172 folder. When I made a copy of the entire folder it included the custom sounds that change the screech noise.
Can you please explain where you find the area in xplane 11 that allows you to set up different monitors. I have looked everywhere but cannot find it. As you know, my set up is exactly like yours but at the moment the image is just stretched across the three screens. I have looked everywhere for the multi monitor support you are talking about but can not find it for the life of me. I am currently using the fly elise software with x plane 10 which works great to give me the same views as you have but would really like to know how to do it for xplane 11. Is it because I am only using the Beta demo version??
Multi-monitor settings are at the bottom of the graphics screen in the XP11 beta. Click the plus signs next to the offsets etc. to adjust those settings. You won’t need to run Fly Elise as XP11 spans the screens on their own. But you do need to adjust the fields of view and offsets for each monitor (as detailed in my post) to get the out-the-windows views on the sides. Again, you do that in the graphics screen. There are settings for each monitor you have attached.
Hello, Your page and videos are really great! I’m having trouble setting up my 3 monitors. I am using the same projector as you and two 27″ asus monitor for left and right view. I have a nvidia 980ti graphics card that is set to one large display. My graphics span across all 3 monitors. I do not see any + signs in the graphics screen on X plane 11 and I only have one set of FOV so I can change the other monitors. What am I doing wrong?
Thank you in advance for your help!
Having it set to one large display is the problem. Turn that off, and use them as three separate monitors. Then in X-Plane you will see three monitors in the graphics config screen, with the ability to set fields of view and offsets for each monitor.
Thank you! That did the trick
Thanks for your help with this. I finally got the three screens up and running. On the pics you posted in this thread your front screen just shows the nose of the plane and the prop. Is there anything we cant see that might be hidden by dashboard or did you just delete the whole panel as well?
Cheers
Ian
Hi Ian. I actually moved the panel down a bit in the plane editor. But it’s still there so I can confirm radio settings etc. just in case I need to.
Almost perfect solution, thank you.
Just one disadvantage with such solution is probably replay mode. I like to take a look at landing from outside view. But in this case now you see something funny but not a plane 🙂
Yep. If I want to make screen caps or replay I need to fly the normal 172!
Hey A!
I quote
“LEFT SCREEN:
57 degree FOV
-90 lateral offset
– 6.5 vertical offset
0 roll offset
FRONT SCREEN:
97 degree FOV
0 lateral offset
7 vertical offset
0 roll offset
RIGHT SCREEN:
57 degree FOV
90 lateral offset
-6.5 vertical offset
0 roll offset
These settings produced a nice alignment of horizon and runway lines that matched up very well, especially from the position of the GoPro in the back middle of the cabin. …
So are you saying that it’s optimal for the go Pro in the back but not necessarily for him you’re seated view point?
I am still going crazy with X-Plane’s three monitor set up playing with FOV and rotational offsets of -45°, zero, +45° and increments above and below keeping it all to 135° which matches my physical layout.
…Yes The three views are synced, but I am NOT able to get any kind of proper lineup….
Chas
Things look great from my seat but I would tweak the numbers just a bit if not filming.
Re: your setup, I find that curious. All three monitors are the same physical size?
Using X-camera, I got as close to perfect aspect… that is (-45°, 0°, +45°)… That’s physically… can’t check the config file (where is it?) or graphics setup cause everything crashed around my ears… http://forums.x-plane.org/index.php?/forums/topic/113215-owned-fresh-install-xp11-beta-hangs-then-reboots-win10/
Thanks,
Chas
Did you get this fixed, Chas?
Mmmmm…kinda…I have set up two copies of X-PLANE11PB6 .one stable(Semi)
.both still crash…as you might imagine, the test bed more than the “stable” version
…at least crashes don’t halt Win 10 any more
Thanks A
Love all your videos. You’ve inspired me to create my sim, something I’ve wanted to do for years. I was wondering is your sim box centered on your screen?
Thanks
Bill
So I followed the “How I Configured X-Plane Screens For The Basement Sim” guide on how to setup the interior to get rid of the seats and the cockpit objects. I do it, save the copy, and then boot the sim. Then it crashes after saying that it couldn’t find load the sound bank (Master bank.bank). I even tried bypassing the tweaks and just downloading your ACF file and I get the same error and then crash. Any ideas?
I had the same problem initially. I needed to make a FULL copy of the ENTIRE Cessna 172 folder. I just called it C172 COPY. Then I modified the ACF file inside that. Otherwise it could not seem to find the sound files etc. When you’re in XP you’ll see you have two 172s. If you click “customize” it shows you the file name and you can correctly fly the copy.
Even making a copy of the C172 with no mods causes the “couldn’t load the sound bank (Master bank.bank)” error and then crash. Something isn’t right here.
Sounds like it. I’ve not had the problem so I’m not sure what the next step is.
I guess I’ll submit it as a bug ticket then.
The problem is AI Aircraft. On the Aircraft Selection screen you need to go up near the top, click the AI aircraft button, and make sure the aircraft you are flying is NOT selected as AI. This will allow you to fly copied aircraft.
HI Danny,
I had this same problem. I got it to work by opening the Plane Editor first (before making a copy of the folder) opening the stock 172 file, and using the ‘save as’ to save the modified version as a new file name. This enabled me to make the mods then load the aircraft ok.
The only thing now is that I’ve lost the clickable regions on the panel when I use this version.
THANK YOU!!!! That worked!!! Now to figure out the other things that should be deleted.
Hi Danny,
Did you ever resolve the issue re the lost clickable regions?
If you move the panel in PlaneMaker the clickable regions DON’T move with it. So you need to click where things would have been, not where the are. For me that means I click a bit above things.
That’s the weird thing, I haven’t moved the panel at all. I started by deleting the interior cockpit1 and nothing else and the clickable regions disappear. I’m sure it won’t be an issue once I have hardware installed to the point where I don’t need a mouse to click functions.
Hi,
I must be really stupid because I am still not able to do it. I tried both the methods 1) Copy first and then modify 2) Modify first and then use save as. In addition to the sound cannot be loaded (Master Bak.bank) error I also have another problem – i.e. after saving when I open the file again in Plane Maker I don’t see the changes I made to visualizations – the fuselage is again set to visible. I checked that the files are not read only and everytime I save the timestamp of .acf file gets updated.
It will be great if someone can zip the folder and upload it somewhere. Took a lot of time to build the setup but now I am unable t hide the fuselage.. 🙁
Making the fuselage visible or not in PlaneMaker does not make it visible or not in X-Plane. It only makes it so you can see or not see things in PlanMaker. To delete something in the sim via PlaneMaker you need to delete the object in PlaneMaker. Follow my tutorial step by step.
Also, I don’t delete the fuselage. I deleted those objects in the cockpit, like the interior windows and pillars, that obstruct my view.
On a 3 monitor set-up, how do you connect them? IOW, what kinds of cables with what kind of connectors? I will be using a system with either Nvidia 1070 or 1080.
Thanks.
E
I have a 980ti so can only speak to that. I use the VGA output, the HDMI output, and its three DVI outputs.
Hi BFG,
I’m trying to replicate your high FPS. I have a GTX 1080 with x1 1080 projector, x2 1080P 40″ LCD’s and x1 7″ touch screen all connected to the single GPU.
When I only have the projector going I can get ~30FPS with all the settings maxed out. When I add one of the 40″ LCD’s this drops to about 15 FPS, then with all three it’s down to 8-10 FPS.
I had thought this was do to CPU limitations (I have an old Xeon) however every benchmark test etc I run puts this setup in the top 10% of setups tested.
I just wanted to confirm you have all 4 monitors connected to the single GPU. Did you ever have FPS issues when running them all together?
I’ve tried going back to a vanilla install of XP11, no improvement.
Jarrod what are your computer specs? I have the same setup as BFG and get around 30fps on full settings. I also have a gtx1080 running all three monitors
Hi Ian,
I have a HP Z620 Workstation with an 8 Core Xeon E5-1620 3.7Ghz CPU and 24GB RAM. The PC is about 3 years old but I thought it would be up to the task with the GTX 1080 added.
I have all 4 monitors connected to the GPU but can’t understand why the FPS is so terrible.
Hey Jarrod
It could be a number of things. I am running the following specs for my flight Sim…
Processor Intel(R) Core(TM) i7-6700K CPU @ 4.00GHz
Video Card NVIDIA GeForce GTX 1080
RAM 32 GB
Operating System Microsoft Windows 10 (build 15063), 64-bit
Max out your Ram slots as it is always better to have to much than to little. Try changing some of the settings in Xplane to improve your frame rate. Some things you just dont need and can switch them to low. Turn your shadows off as this makes a big difference! I am wanting to install another GTX1080 to try and get better FPS but you have to draw the line on price somewhere! :/
Hope you can manage to figure something out to get it running better for you. I know how much of a pain slow FPS can be.
What are your frames if you back off all X-Plane graphic settings all the way to the left-hand side of the sliders?
Jarrod
I had this problem when using a TV as a monitor. Ensure that the TV is set to run at 60Hz and also that your monitor settings in Windows are also set to run at 1920 x 1080 @ 50Hz.
That solved it for me. It was set to run at 30Hz rather than 60Hz.
That should be 1920 x 1080 @60Hz (not 50Hz)
Hi BFG, You need to go back a few steps for me with the 3 screen configuration. How do you go about creating the 3 different views in each of the displays (a projector and 2 monitors)? Is this done in Windows? Then how do you call up each view (side view LH, side view RH and front view) in X-Plane and then move them to there respective screens? Regards Chris
In X-Plane you don’t create views. If you have multiple monitors attached to the PC X-Plane sees them in its graphics settings configuration screen. Set each monitor’s settings there to “full screen” and you should be good to go per my instructions, which if you follow carefully will show you how to adjust the view on each screen to fit your liking.
My flight Sim PC is being built at the moment to my spec. So I will be able to check this out when it arrives. Just installed the instrument panel in the cockpit frame in the Squadron building.
When you modify the Cessna in Planemaker and delete those areas (cockpit, seats, etc), do you lose the ability to have clickable zones or for that matter the ability to click anything on the screen? Also, does the GPS still work for you?
Is it possible to get the same “scenery only” view in fsx, by any chance?
Love the Cessna you left the file for here. One question. There is a double switch the the avionics bus. So,when you turn on the avionics it only triggers the left switch. Is using the saitek panel to do that. It give me a voltage annunciation and eventually an engine failure.
So do you know the key stroke or how to push that switch?
The panel in you plane doesn’t seem to work if I try to click it. I have a full cockpit so,don’t need it but can’t seem to solve this issue. Sorry new to X-plane 11 from FSX.
There is a key command to Tie bus A and B. look in the control settings.
It’s exhausting to seek out knowledgeable individuals on this topic, however you sound like you recognize what you’re speaking about! Thanks
Hey BFG
I’m some ways into building a PA28 cockpit, but there’s one issue I struggle with. I’ve got two 22” LCDs for my forward view (linked using nVidia software to give one wide resolution), which works fine. The issue I have is setting the lateral eyepoint. Because the view ‘out the window’ is flat rather than lots of different objects, setting the lateral offset to 0 means both screens (for left and right seat forward view) look straight out. But of course you don’t fly like that, you need to be able to look down the nose for landing, runway alignment etc without cocking your head to look straight up the middle where the bezels meet! So I can set a 7.0 lateral offset and that shifts the view to the right so if I’m sat in the left seat it works. But that means the view from the right seat looks out to the right as well…
I’m guessing I just have to accept that there’s no way round it, although I suspect having a projector screen would help as it would be bigger and further back. But I just thought I’d ask how you work around this issue, or whether you’ve made the same acceptance?
Thanks
Rich
Given that I use a projector I’m afraid I’m not much help. You might post in the forums …
Thank you for sharing your experience with all of flight sim enthusiasts! I have been running 3 34 in LG ultrawide monitors with 2-GTX 1080’s in SLI only to find out that I am not getting any additional FPS. I have been flying in XPlane 10. I have just started with XPlane 11 and am running into some trouble with some of my Saitek equipment. Can I possibly call you when I attempt to go to the 3 monitor setup if I get stumped?
I don’t take calls, but know that XP does not support SLI.
I have a question ..I have built my cockpit using a projector and 2 32″ monitors for left and right.
I have configured my views the way I like it..so when I go to save a flight situation and restart xplane11
with the same situation..my views turn out all screwy..left is right…front view is on my left..
When I start with a new flight..my views stay correct…then I can choose that particular location..
Am I missing something here?
Hi,
Thanks for the info. It has allowed me to make my sim more immersive.
Can you tell me, when flying PilotEdge, do others see your plane missing parts or does it look like a whole plane to them?
Brenton
It looks like a whole plane. The models are driven by each user’s PC.
Got it. Makes Sense. Thanks for the info.
Good stuff! Setting up the three monitors is easy (menu, Graphics, set monitor 0 as unused (my GPS), Monitor 1 is left, Monitor 2 is center, Monitor 3 is called “Main Monitor” and is the right window.
Main Monitor being the right side needs a +90 Lateral Offset in display configuration. Can set it once and it’ll stay for duration of XP session, but after exit and start XPlane again, it resets back to 0 as does vertical rotation offset. Only for the Main Monitor though, the left monitor (-90 lateral offset) doesn’t ever reset.
Is there a fix for this annoying behavior? Whacked all the preference files and let XP build them from scratch; that didn’t change the situation at all.
Suggestions welcomed.
To the person with slow framerates. If nvidia card there’s two main tweaks that in default configuration will slow down XP. Launch nvidia control panel, select Manage 3D settings, choose either Global Settings or per Program Settings and choose xPlane. Set Power Management Mode to PREFER MAX PERFORMANCE and set Threaded Optimization to OFF. That’ll help a bunch.
And, get nVidia driver 398.11, it seems to work really well with XP – faster, less artifacts and overall better quality.
http://www.guru3d.com/files-get/geforce-398-11-whql-driver-download,1.html
Thank you for this information, I will try it today, I love watching your YouTube videos, I got lots of info from you just by doing so, thank you again.
I’m running a MacBook Pro (2015, Graphics: Intel Iris Pro 1536 MB) and when I hook up the second and third monitor I see a dramatic slow down in frame rates and overall computer responsiveness. Is there anything I can do to get a better experience with xPlane 11? Thanks!
Every screen you add cuts the frames by an equal proportion: two by 50%, three to a third. Unavoidable.
Thanks for your advice on this site. I’ve completed a similar build in my shed with a curved projector screen made from an old trampoline frame and two short throw projectors, had to put in air conditioning unit to keep the projectors cool! There are also two traditional monitor side screens. I use three separate networked PCs to spread the simulation load.
One issue I cannot seem to resolve is synchronising the road traffic between the PCs/screens. Do you know anything about resolving this? Perhaps its just one of those things that has not been programmed yet, after all its a flight simulator not a road simulator, but if it can be done Id like to do it.
Great question. I have no idea. Have you asked Laminar?
I’ve been using a modified version of your 172 ACF for the past couple year with no issues. Have you had any trouble with the 11.5 betas (I’m on beta 10), affecting the starting eye point and other visual items?
(It appears in the 11.5 release notes there have been quite a few changes to Plane Maker)