The creator of this great Saitek driver replacement utility has posted a good getting started video on YouTube. Recommended.
The creator of this great Saitek driver replacement utility has posted a good getting started video on YouTube. Recommended.
Many of the questions I get on my YouTube channel are about my screen setup and how I manage to get the images on the projector and side screens to align. I do it through custom cameras created using the custom camera tool in Prepar3d, and thought it might be helpful if I wrote a post here explaining my process.
There are two ways you can use custom cameras in P3D. One is to create new camera views in a particular scenario. These will be saved in the scenario config file (which is stored in the P3D folder in your PC’s Documents folder), and they will be persistent with that scenario: whenever you load it, those camera views will be listed as options in the Custom Camera submenu of the View menu at the top of the screen. If you save custom cameras in your default scenario, they will remain there, too. The other is by adding them to an airplane’s default configuration file, in which case that camera view will always be available for any scenario or flight with that airplane. That’s a bit more complicated. I’ll describe both here.
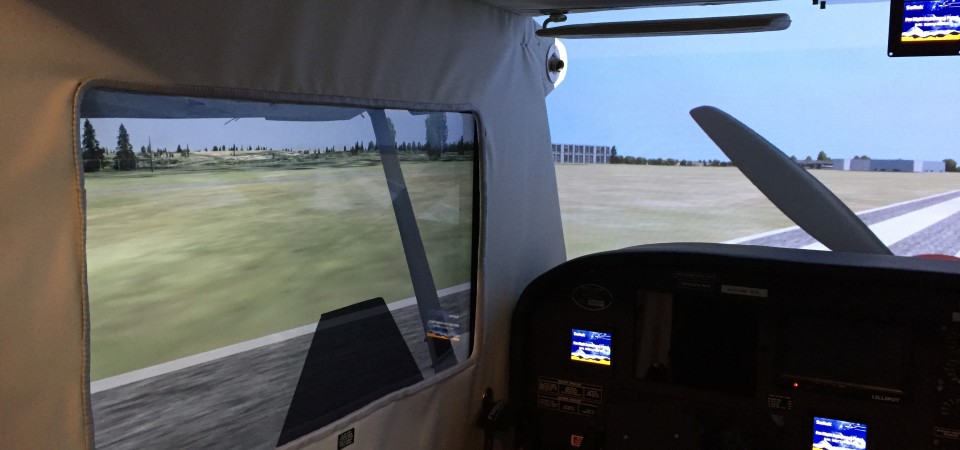
Creating custom views is easy but not always intuitive, and through (much, much) trial and error, I’ve learned ways to simplify the process and get good alignment across multiple screens. Here’s my process for setting up a new set of screen views, which for me would involve three cameras: Front (for the projection screen and view out the front of the aircraft), Left (for the view out the left window), and Right (same for the right window).
FIRST: I begin with the front view, because it’s the front horizon that I will want the side views to match up with. Custom cameras inherit the settings of the view from which they start, so to save time I first use the view directional keyboard commands to move the view to something close to what I want to have (forward / back, left / right, up / down). It’s easier to tweak a view that’s sort of close than to start completely from scratch.
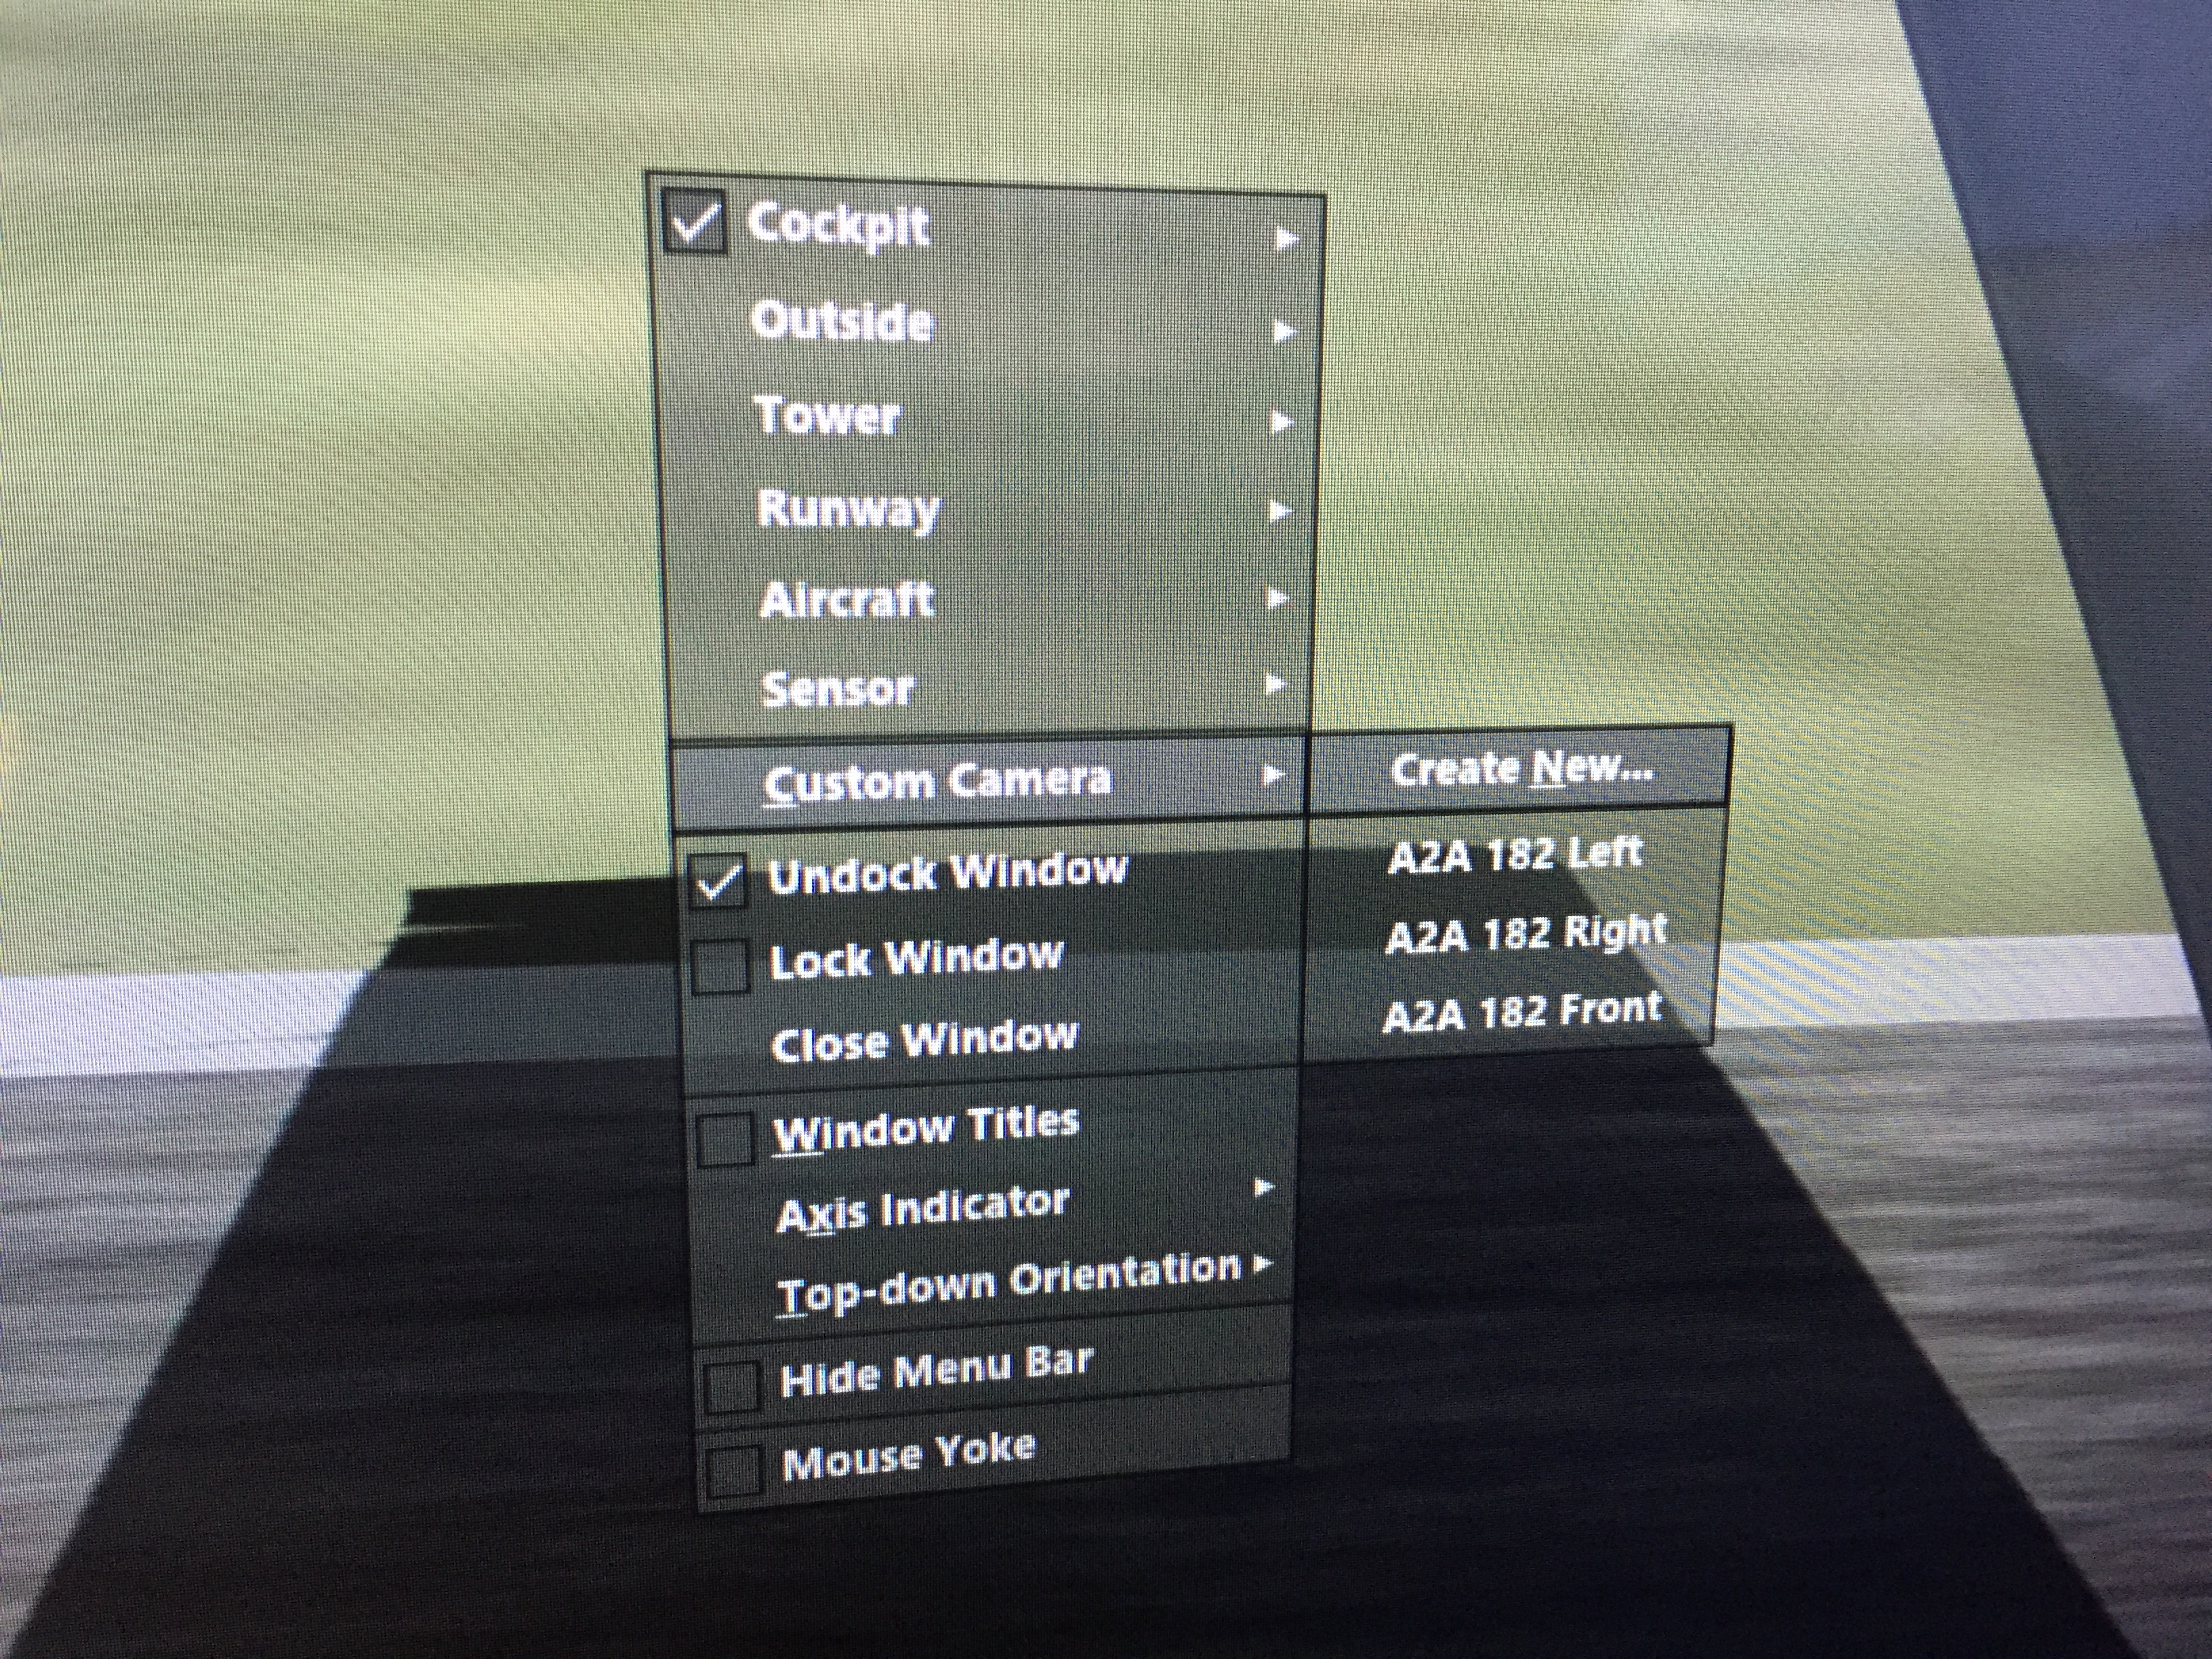
SECOND: I right click on the front view select “Custom Camera / Create New” from the popup menu:
This brings up the Manage Camera Views screen:
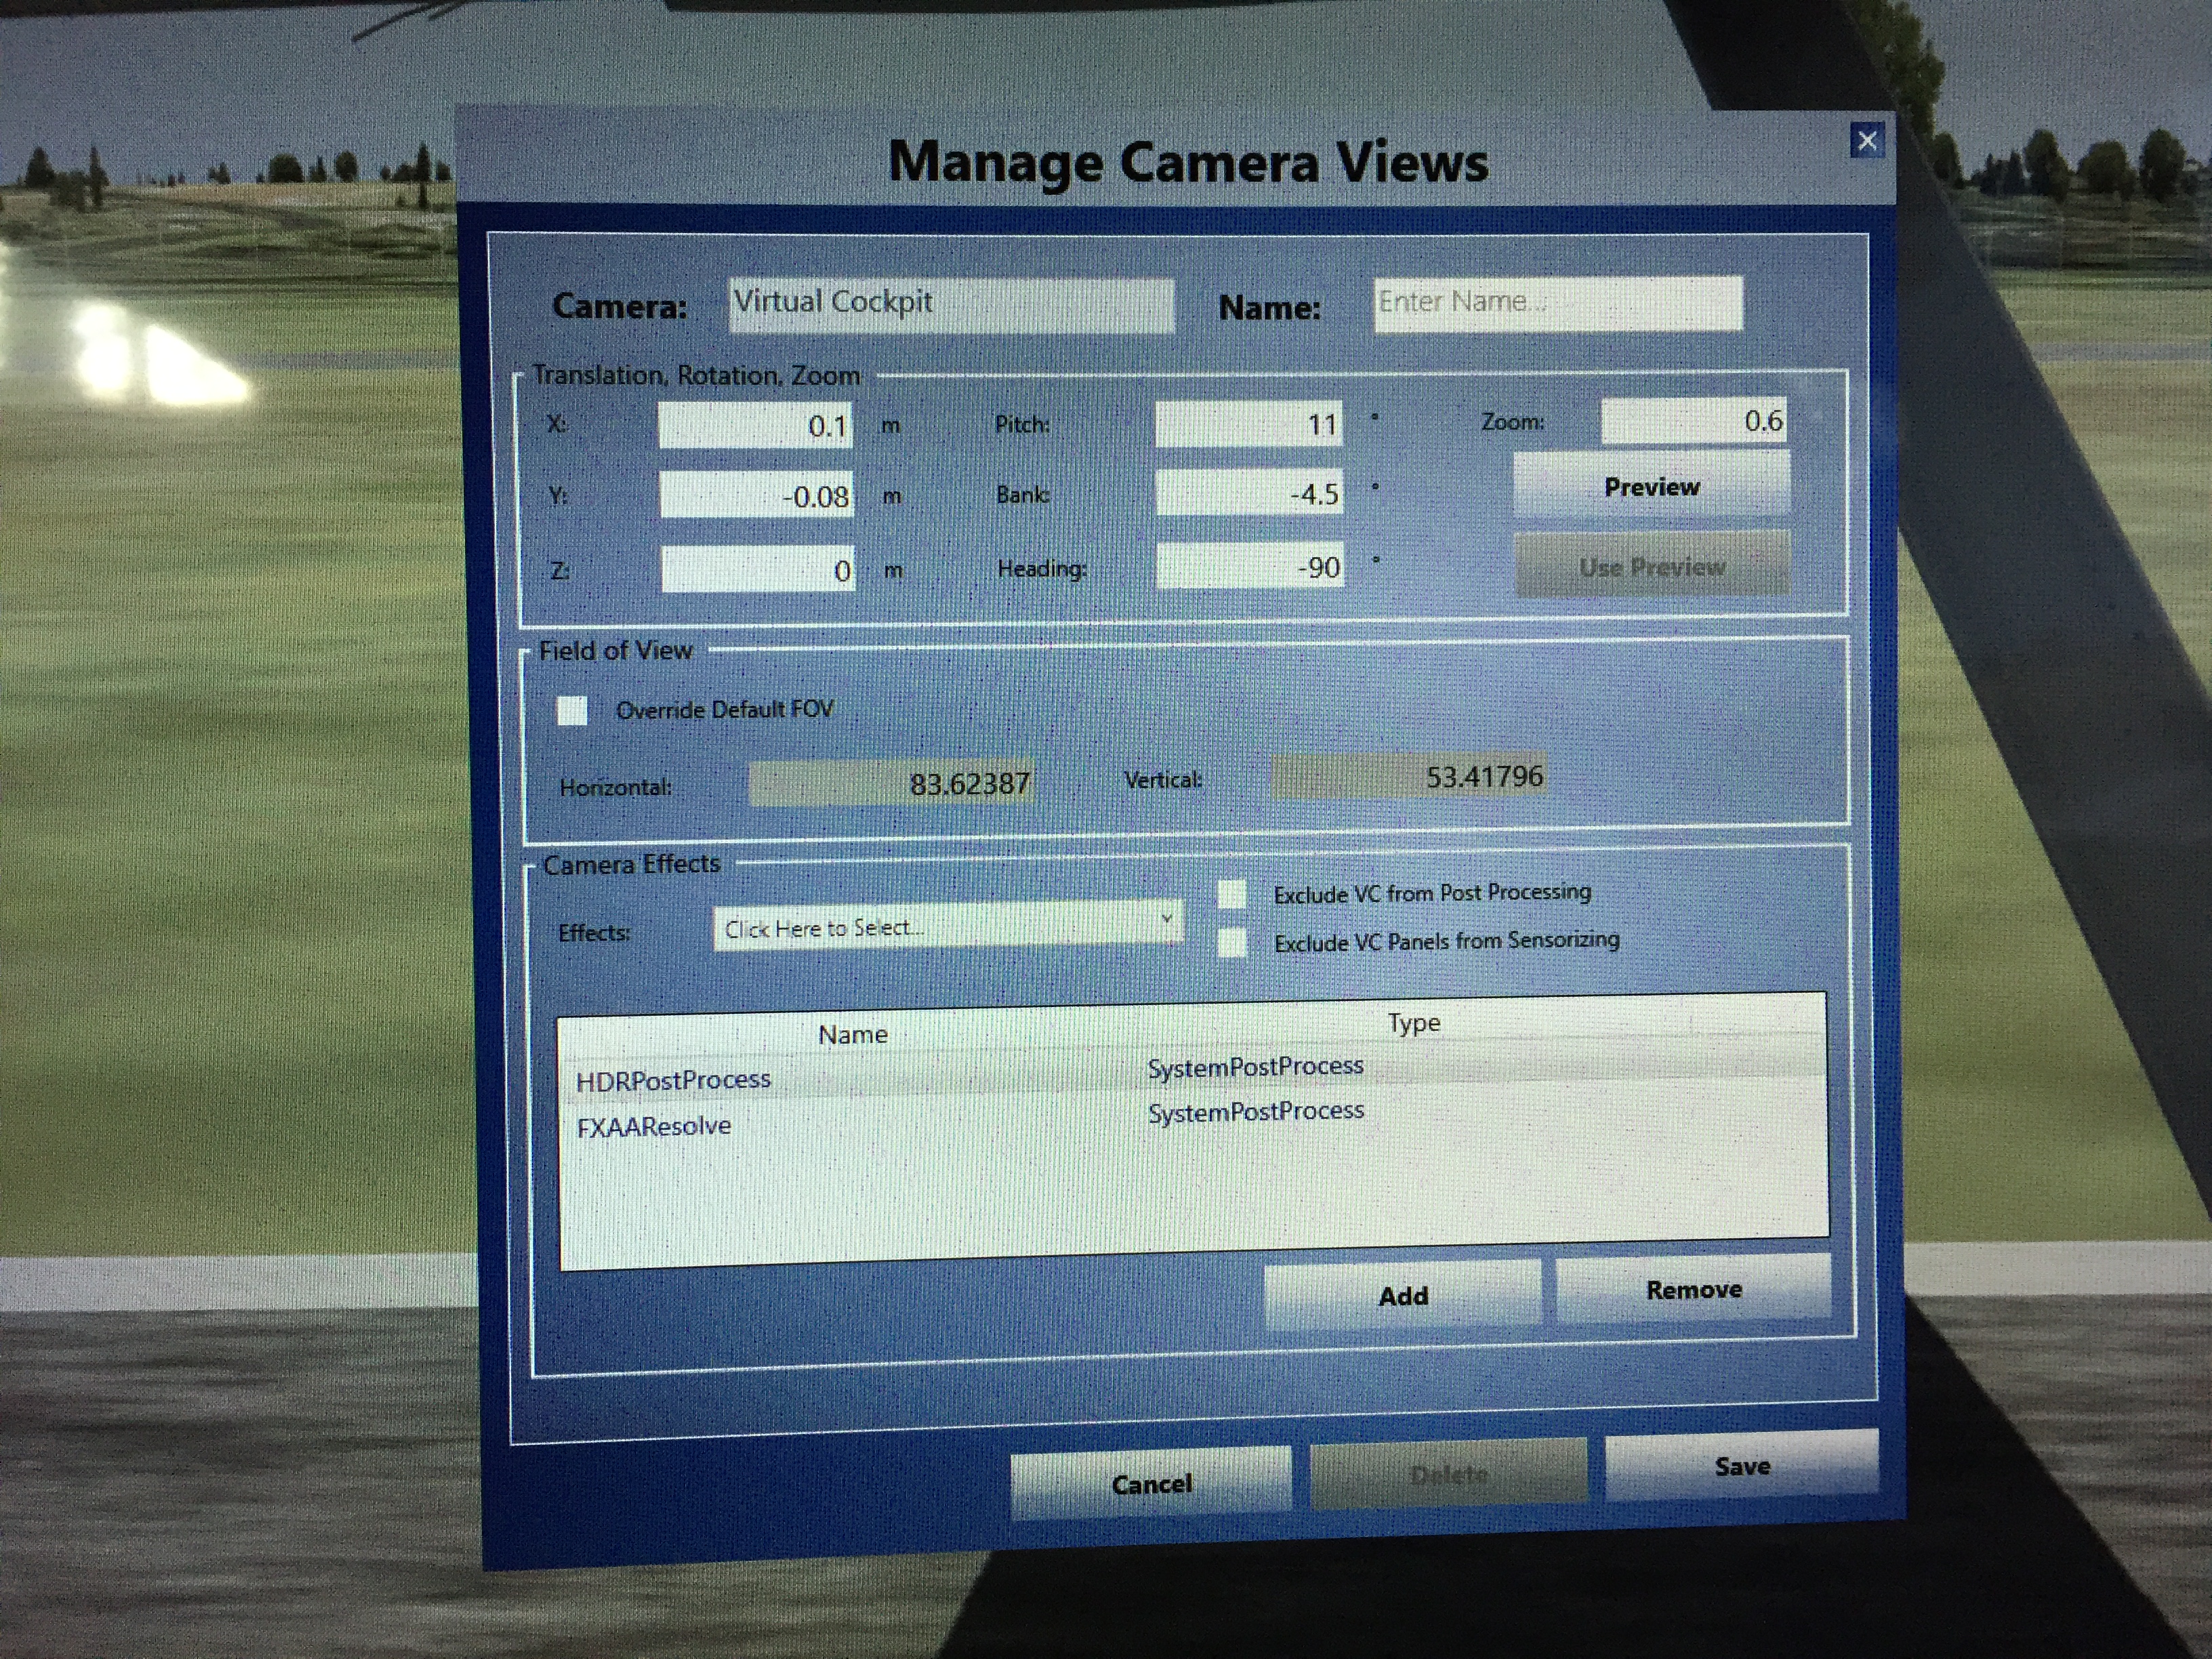
THIRD: I tweak that view to get it to my liking, and the easiest way to do this is to use previews. Click the Preview button, and it will open a new view window on the main screen that has inherited the view from which you clicked. Drag the window and its edges so it fills the front view screen. From now on any changes that you make to the variables in the Manage Camera Views dialogue will show instantly on that view screen when you click the Preview button. So you can easily tweak, preview, tweak, preview, etc.
As for the variables in the dialogue, here’s what they mean:
Tweak these settings until the view is how you like it, then give it a name in the dialog and click “Save.” P3D will then ask you if you want to quit or not. If you choose “Yes” the dialog will close as will the preview window, but a view with that name will now appear in the Custom Camera pop-up menu, and you can select it for your front view. With my front view is that I like to see the cowling of the aircraft, but not the glare shield (as my sim has one). This means my front view is pushed forward quite a bit along the Z axis, and yours may be different.
FOURTH: Once the front view is created, I make a left-hand view for the left window monitor. I follow the same process as above, using the keyboard keys to turn the view to the left, move it close to the window, adjust the height, etc. Again, I’m just trying to get it close. Once it is, I open the Manage Camera Views dialogue, create a preview, drag it over to the left window monitor, fill the screen, and begin tweaking the preview. One variable that I simply set rather than tweak is the Heading variable. For the Left view I set it to -90, as this has me looking directly out the left side of the aircraft.
Through trial and error I’ve learned two things are important with the side views. The first is that at least for me, the side views and front view need different zoom settings. My sim is really close to the projection screen, and it’s a 100-inch screen. To keep objects from being huge I have the front zoom at .30. For objects on the side views to be about the same size they need a greater zoom, and I use .60. I’ve come to this through trial and error, and in my sim this has things like the buildings and taxiway lines matching up well from a size perspective. Your zoom settings will be different, but know that the front and side views may need different zooms. The second is that the Bank variable is important. The default camera views nearly always have the horizon when viewed out the side window tilted toward the front or rear of the aircraft. I use the Bank variable to adjust the tilt to make the horizon straight, and the Pitch variable to adjust the height of the horizon so it lines up with the horizon of the front view across the two screens. This may take some trial and error, and might mean re-tweaking the front view’s Pitch a bit, but when it’s dialed in I can (1) see the cowling of the aircraft out the front, (2) see the bottom of the wing and my flaps out the side, and (3) have the horizon match up across both left and front screens.
When I have the left view correct I save it with the name “Left,” and instead of quitting the Manage Camera Views dialogue I click “No” because I want to continue with the next view: Right.
FIFTH: Once I have my Left view I do NOT close the Manage Camera Views dialogue. Instead, I rename the view Right, and keep all the variables THE SAME except three: X, Bank, and Heading. Bank and Heading are easy: just make them the inverse version of the Left value (so if the Bank and Heading were -4.5 and -90 for left, they should be 4.5 and 90 for right). Y, Z, Pitch, and Zoom should stay the same. This ensures your Left and Right views are mirror compliments of each other. The only variable to tweak is X, as it’s how far left or right of center the eye point is. For the Right view you’ll want it up close to the right window, so I tweak that variable, looking for a point where the both the left and right struts (or wings for a low-wing airplane) seem about the same size and position. Then I save that view as “Right” and close the dialogue.
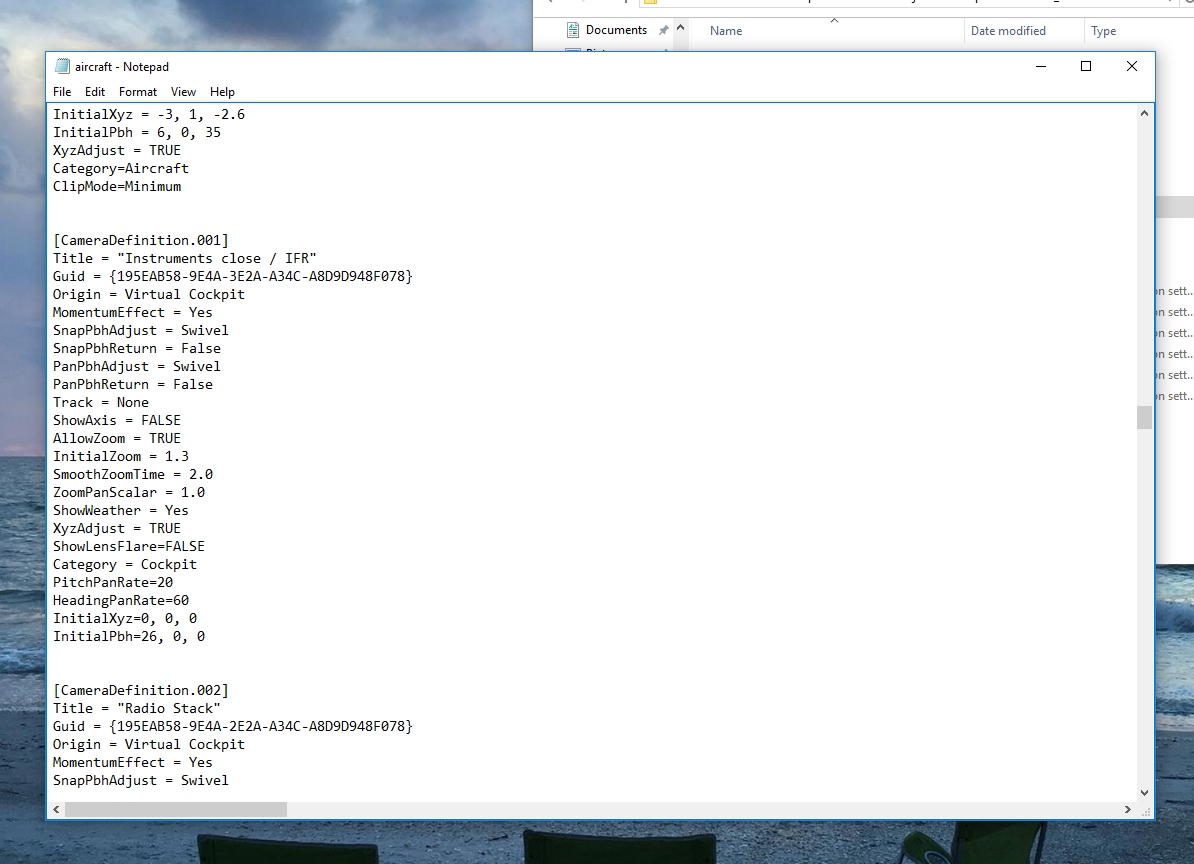
At this point you should have three saved camera views, Front, Left, and Right, and you can assign them to their respective views and monitors. Now the question is how to keep them for use in other flights. I have two ways of doing this. First, and easiest, is to add the camera views you’ve defined to other saved scenarios. To make this easy (and to back up my work) I’ve created a text file on my desktop called “Cameras” into which I’ve pasted my camera settings so they are backed up and easily at hand. This is easy to do: go into the Documents/Preapar3d folder on your PC and open in a text editor the scenario .CFG file in which you created your custom views. Scroll down and you will see the standard camera views, and below that your custom ones. Just copy and paste the code into your backup Cameras file. Here’s a screen shot of part of mine:
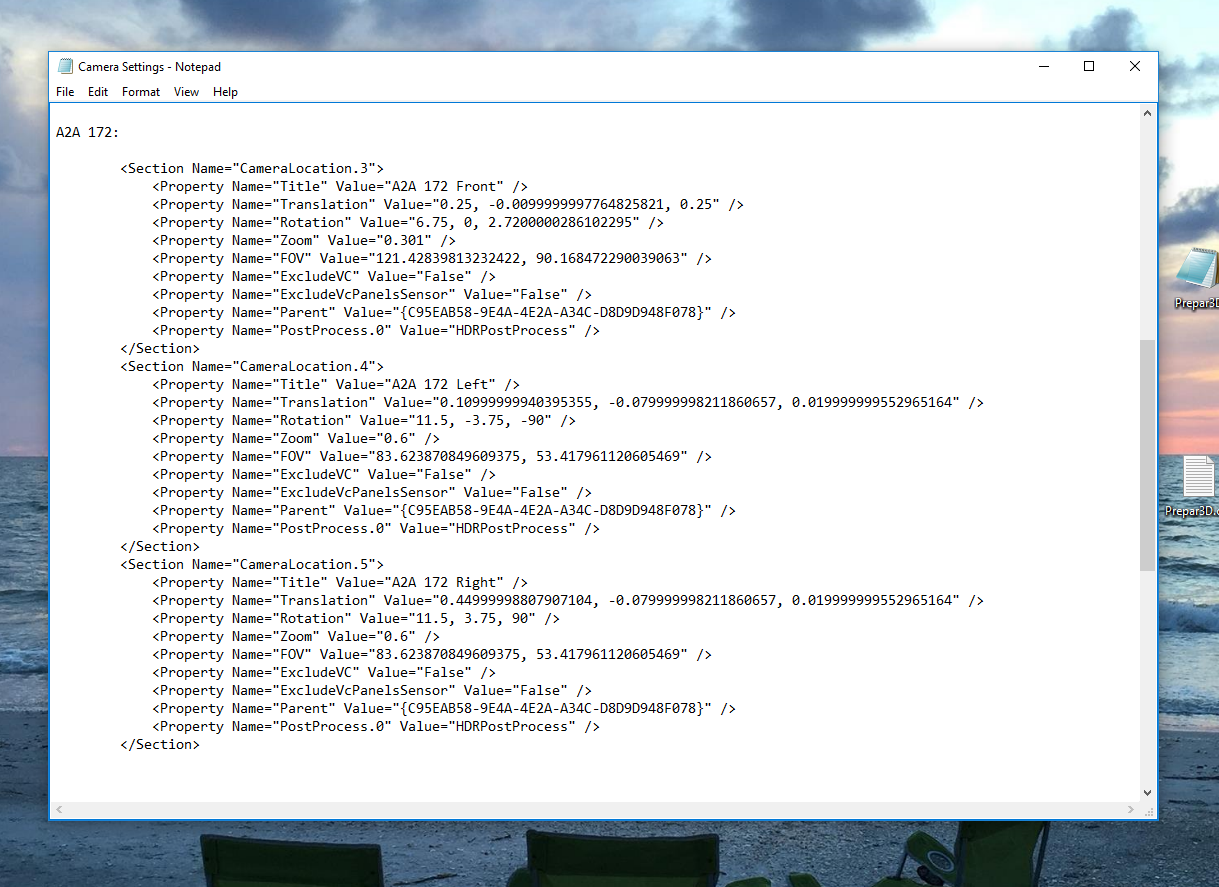
I have camera setups for four aircraft: the Carenado 182, A2A 182, A2A 172, and A2A Piper 180. All are pasted into this backup file so I have them. Then I can copy and paste the appropriate camera code into the config file of any particular scenario without having to create the camera views via the dialogues. Just open the scenario config file in a text editor and add the appropriate camera code at the bottom of the pre-existing camera locations. Just be sure to continue numbering the camera setups consecutively within the file.
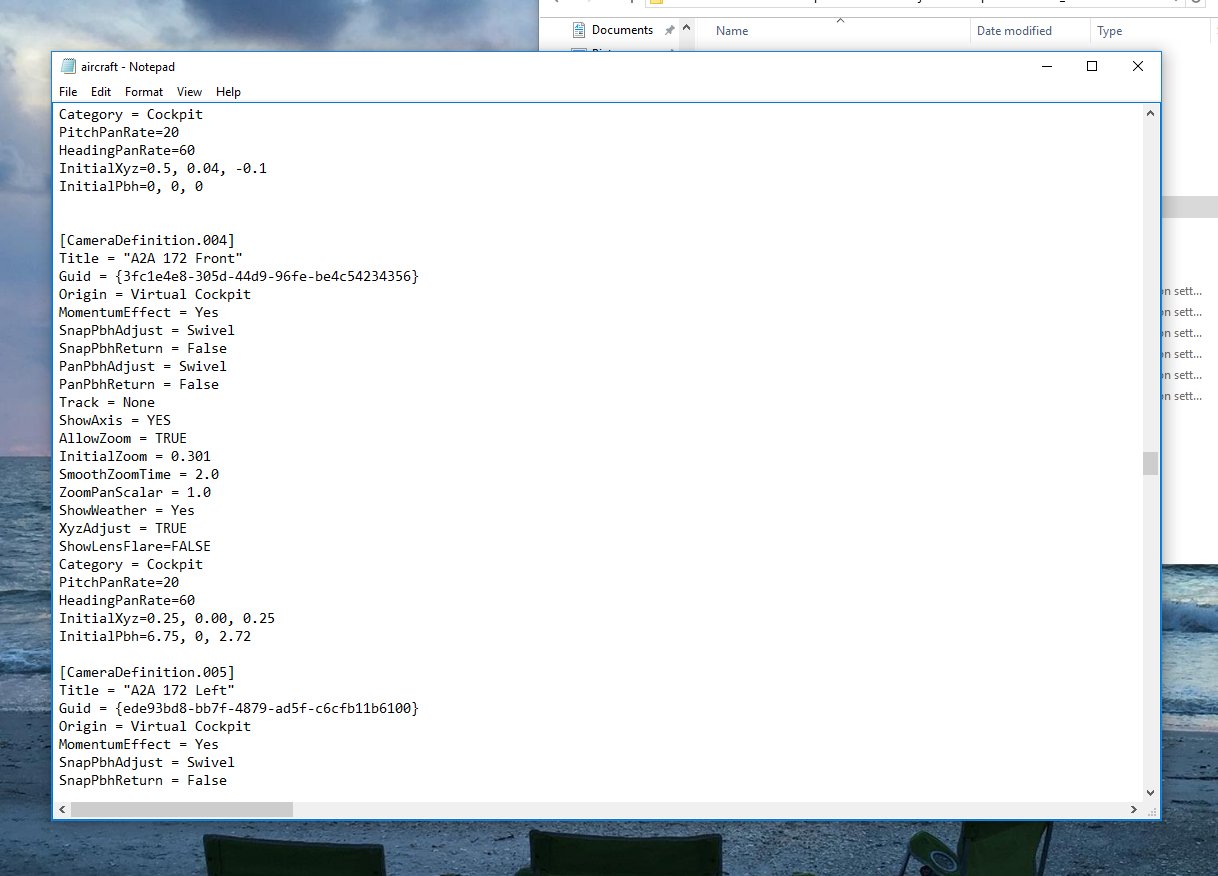
You might also want your camera setups to be part of a default aircraft configuration, so those views are available whenever you start a flight with a particular aircraft (saved scenario or not). This is a little more complicated, but not much so. Let’s say I want to add my the A2A 172 Front / Left / Right camera setups to the default A2A 172 so they are always available whenever I use that aircraft. To do this I would go into my P3D directory / simobjects / airplanes / A2A 172 subdirectory and open the airplane .CFG file in a text editor. If you scroll down in an airplane .CFG file you will find the camera definitions, and they look like this:
As you can see, these look DIFFERENT than the scenario camera definitions, which is where people get confused. The good news is that there are only a few lines of code that you need to change to convert one of these default views into a custom camera view. Here’s how to do it.
Save the file. That’s it, unless you want to add Left, Right, or other views, in which case you can repeat the process.
In terms of having this all look good from a REAL camera’s perspective if you’re filming with a GoPro etc., what I’ve learned is key is that the camera be at about the same height as your eyes in your simpit. Then everything should line up across the three monitors as they do from where you sit (with some minor variability).
I hope this is helpful.
I love A2A’s aircraft, and have three: the Cessna 172 Skyhawk trainer, the Cessna 182 Skylane, and the Piper 180 Cherokee. Of these, the 182 is my favorite and aircraft of choice. The A2A simulation, especially with its Accu-Sim component, makes this aircraft as realistic as I can imagine it could be for a simulator. This includes knowing how to start the sucker, which can be a challenge unless you’re into flooding the engine, fouling the plugs, and possibly running down the battery. (But this is why we have checklists, and if you follow the real one for the 182, you’ll be just fine.) The sound of the engine, the flight mechanics (today I was flying and noticed a constant bank to the right, and sure enough that fuel tank was about twice as full as the other), the sound of the brakes and the creaks of the airplane … everything about the A2A aircraft is first rate and terribly realistic.
But I haven’t flown them much over the past month or two, instead sticking with the very nice Carenado 182T. Now don’t get me wrong — the Carenado is a great simulation aircraft. Compared to everything else out there, it’s first rate. But it’s not the same as the A2A. The A2A just feels and flies and sounds terribly real compared to anything else. It’s absolutely about the texture and immersion of the sim, and the A2A wins that hands down. But I’ve foregone it for one reason: it hasn’t played well with the myriad Saitek panels and avionics I have running in the sim.

This problem is well-documented. Still, I haven’t found a good solution, and it’s boiled down to three things: getting the master battery and alternator switches to work correctly, getting the fuel and engine gauges on Tom Tsui’s great integrated fuel gauge to read correctly, and getting the RPM also on Tom’s RPM gauge to read correctly. There’s a fix for the battery / alternator issue, and at times the engine gauges would mostly reflect what the A2A would show on the virtual cockpit panel, but the RPM gauge as always very far off from reality (also well-documented).
Well, today I finally found the fix. It was a roundabout way of getting there, but get there I did. And now the A2A is absolutely perfect, and I can’t wait to fly these aircraft for many years to come. Here’s what worked: First, I deleted all Saitek software and drivers, including the folders in Programs and Programs 86, and only installed the Flight Information Panel drivers (NOT the FIP software) consistent with the guidance near the end of this thread. Then I installed the registered version of SPAD.neXt, activated its LVAR option, and activated SPAD’s A2A 182 profile. Then I changed this line in the .XML file of Tom’s 172 RPM gauge:
< Value Minimum=”0″ Maximum=”35″>(A:General eng1 rpm,RPM) 100 /</Value>
… to this line:
< Value Minimum=”0″ Maximum=”35″>(L:ENG1_RPM,RPM) 100 /</Value>
(Thanks, Tom, for that fix!) After that I played with the A2A 182 profile in SPAD.neXt a bit. I had to change the fuel pump switch snippet to just be a simple fuel pump on/off command. I programmed the BIP panel. And I still run some things via FUSIPC, like controlling the transponder Ident and Alt-C settings with the buttons on the throttle quadrant. But the rest of the setup was straightforward. The swtiches and controls did as they should, and the FIPs ran great … and most important the engine and RPM gauges were accurate. After you get through its (somewhat steep) learning curve, SPAD.neXt really is a great tool, and I’m looking forward to getting the most out of it in the coming weeks.
Now, into the (virtual) air in the A2A 182!
As I posted yesterday, I’ve been on the hunt for a memory leak in the basement sim. I devoted a good portion of yesterday to the job, and rather than mess with uninstalling and installing things one-by-one, instead I uninstalled everything (EVERYTHING: the sim, add-ons, aircraft, textures, land classes, instruments – all of it), and started from scratch with new installations. My method was to install the sim first, and then install an add-on, run the sim to test stability, exit, install
the next add-on, repeat.
The results? Everything worked great up to the very last add-on, the GTN 750 GPS software from Flight 1. There were no problems with memory, but soon after adding it Prepar3d started to throw some crashes, as did the RemoteFlight connector. I uninstalled the GTN, and a much more stable sim returned. I’m not sure why those would conflict, but that seems to be the case, and I hope I can find a fix because the GTN 750 running on the 7-inch touchscreen in the cockpit panel is an awesome tool. I also installed SPAD instead of the Saitek drivers, but it actually was making communication with my panels more 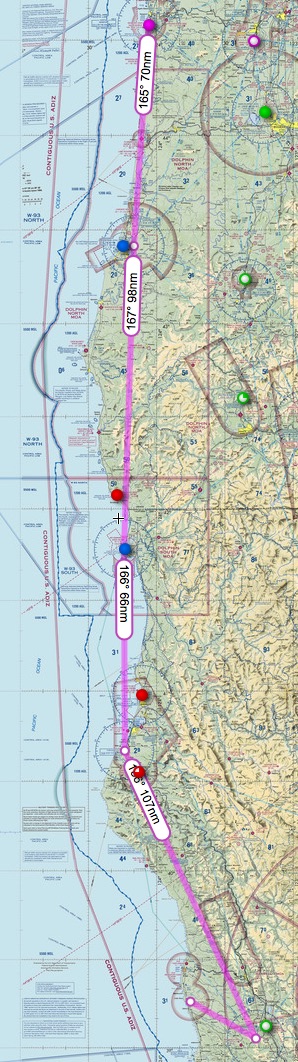 difficult, so I uninstalled it and went with the latest drivers from Saitek which worked fine.
But GPS or not, I’m left with a spectacular flight simulator. I’m getting 30-60 frames per second, with the A2A C 182 Skylane, high graphic settings, high-resolution textures, max scenery and autogen settings, Active Sky Next live weather, AI traffic, and MultiCrew Experience running in the background. Today I took a 3-hour VFR flight from Newport, OR to Albion, CA (KONP OTH CEC FOT ENI KLLR – click the image at right to see the route, which was VOR navigation the whole way), and had not a single hitch.
So I’m REALLY happy. The sim loads fast and runs great. There are a few micro stutters, but I disabled hyper threading to try to maximize my VAS usage and tomorrow I’ll re-enable it and set my Affinity Mask back to 116, and that should be the end of those. Most important, my memory usage is rock solid, with my available VAS never dropping below 1.3 gig. Now I just need to ping Flight1 support and see what’s up with the GTN. Maybe they know of a fix. In the meantime, it sure is fun flying the basement sim.
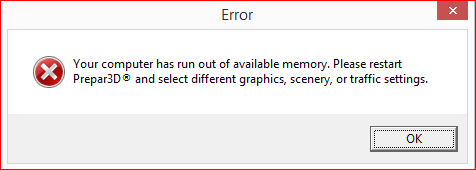
A few weeks back I upgraded the sim software to Prepare3d 3.2, and as I posted here it generally went great but did create a few issues, one of which was a memory leak leading to out of memory errors (known as a OOM in the sim community). For those who are new to this, both Prepar3d and Flight Simulator X are 32-bit programs, meaning they are written for platforms from the first generations of powerful desktop PCs (which had 32-bit architectures). At some point this is too much inside baseball, but the important thing is that because these programs run on a legacy set of code that’s more than 10 years old, they can only access a total of about 4 gig of RAM (called VAS, for “virtual address space”). So even though my PC has 16 gig of fast memory available, the sim can only get to a portion of it.
As the sim loads scenery, other aircraft, clouds, etc., it fills that memory up, and at some point there’s not enough left for it to run and the software crashes. FSX historically isn’t great at freeing up new memory as you fly over new terrain and the old terrain is not longer visible. P3D is better. But with both, OOM errors can happen when you have lots of complex scenery, aircraft, and add-ons, so you want to preserve your available VAS memory as best you can.
Which is why the memory leak I had after the upgrade was a big deal – it was chewing through my VAS at an alarming rate, even as I was just sitting on the tarmac. At first I thought Active Sky Next was the issue, but a re-install of that seemed to run ok. Then I thought it was Multi Crew Experience, an add-on I use to talk to the computer ATC in my own voice (and that I really love). MCE runs outside of the sim software, so it shouldn’t eat VAS, but it’s in the mix so I’m looking at it. I’ve since re-installed both, and done a full reinstallation of P3D. The VAS usage is better, but still not as good as it should be, and it seems to be worse with MCE running. I’m going to spend some time this morning taking out add-on scenery, aircraft, and the rest, and then adding them back one-by-one to find out what the issue is. I’ll report here when I have it cracked.
In the meantime, there’s a good thread on VAS / OOM management here for those who want to learn more.
Having upgraded the sim to Prepar3d 3.2, last Friday night I downloaded the most recent Active Sky Next patch to keep everything current. I don’t know that this was necessary, as my ASN was working fine post-3.2, but I wanted to have the latest code running. After the install, two things happened:
I believe the complicating factor is that I had uninstalled FSX Steam Edition just prior to the ASN upgrade, and I’m guessing the sim is searching for a Simconnect client that it can’t find. But while I can see how that might result in no visible weather, I don’t know that it would create a massive memory leak.
I’m away from the sim for a bit so I won’t be able to try to tinker to a solution for a while, but when I get it I’ll post it here.
A day of tweaking today. The sim’s performance is pretty good – really good, actually – but I can tell when it’s stressing the CPU and GPU and the photorealistic scenery just isn’t quite as beautiful as I know it should be. With the benefit of an early start this morning I was poking around this thread on AVSIM, and as a result today’s tweaks are in two groups: processor and graphics.
In terms of the processor, I’ve been running the quad-core CPU with hyper threading on but no affinity mask and no core dedication for the add-on software (Active Sky Next, the Flight1 GTN 750 GPS, and Multi Crew Experience). After reading the AVSIM thread I set my affinity mask to 116 in the P3D.cfg file, then downloaded Process Lasso and used it to assign the add-on software to virtual cores 1, 6, and 7. This was all seamless and easy, and Lasso really is a very cool piece of software.
Then it was time for graphics. A few weeks ago I found this thread in the ORBX forums, and after making those changes then to both my P3D.cfg file and my NVIDA Control Panel I had really good performance from the sim. One key (I think) was using the NVIDIA Control Panel to set the VSync to “Adaptive 1/2 Refresh Rate,” which would make the refresh rate 30 frames per second on my 60 hz monitors. One of the things I’ve learned over the past couple of months is that you want your PC and your monitors synced up, both displaying at 30 FPS or 60 FPS or whatever it may be. Given that 30 FPS is realistic for my setup (and movie-quality besides), that’s what I’m shooting for.
So this morning I figured I’d take the advice in the AVSIM thread, set my P3D settings to VSync “on,” triple buffering “on” and FPS to unlimited, set the frame rate limit to 30 in NVIDIA Inspector, and turn off the VSync adaptive setting in NVIDIA Control Panel. The result was that my frame rates absolutely tanked. As in six or seven frames per second, tanked. Abysmal. At first I thought maybe it was the affinity mask / Lasso settings, so I backed up on those. No difference. So then I took the sim’s graphic settings back to default. No change. So then I returned the NVIDIA Control Panel and Inspector back to default, and my frame rates with high settings and some pretty hefty Active Sky Next weather were back to 45-60 frames per second.
So the problem was clearly in the NVIDIA settings. I started to re-tweak with the Inspector limit at 30 fps, and that was clearly the problem – frame rates immediately dropped back to six or seven frames per second. I don’t know why that would happen, give that I had no other limiter on frame rates, but happen it did.
In the end, I cleared all settings back to the P3D defaults in NVIDIA Inspector. In NVIDIA Control Panel I fixed my settings consistent with the ORBX thread (including setting VSync to 1/2 adaptive, which should = 30 fps for my monitors). In Prepar3d I set VSync “on,” triple buffering “on,” and frame rates “unlimited.” This flew very well – the scenery was beautiful, actually – but there were some serious stutters when making steep banking turns, as well as on approach. I set the frame rates as limited to 30 fps in the sim, and things were then smooth a silk. Gorgeous textures (amazing, really, even far out – this is P3D v 3.2 at work, perhaps?), and great frame rates set at 30 fps, dropping only to 17-14 fps or so on final approach into KSLC, with maxed-out texture and mesh settings, traffic, scenery at max, and several sets of clouds from Active Sky Next. Most important, visuals were smoooooth – gorgeous photorealistic textures, and wonderful performance all around. It really was beautiful to look at.
So, it was a day of tweaking, and some real learning went on, but in the end things look and work great. I took a few flights around KSLC after all was said and done, and they were completely fulfilling. A ton of fun, and a reminder of what a great sim flight can feel like.
Post Script: Serious props to SteveW in the AVSIM forums, who has a site here, and Patrick Jorand in the ORBX forums.