The Feeling Of Learning The Ropes

Today was my fourth real-world flight lesson, and it was a day of slow flight, stalls (power on, power off, and turning), and pattern work. In fact I did seven takeoffs and landing today across two different fields. Today was a great experience, but I would not characterize it as “fun,” and compared to earlier lessons, today felt more like hard work. But I think this is a good thing. My instructor was definitely pushing my learning, especially with the pattern work (six routes of the pattern in about 30 minutes), and we had a nice 7-15 knot quartering crosswind to boot which introduced a whole new level of things to figure out. So I learned a couple of things today:

  • Take the time at the start of the flight to get settled. Get comfortable with your seat position etc. because the start of the flight is the only really good chance you’ll have to do this (at least in a lesson).
  • I finally got comfortable with putting the nose down when moving abeam the numbers and trimming for landing. On earlier lessons and in the first run of the pattern today when turning from downwind onto base I’d feel like I was driving the airplane downhill and it would freak me out a bit (especially at 500-700 AGL). In fact, I am driving it downhill, because it’s the only way to get down and land the sucker. But there is plenty of speed and plenty of altitude if I’m flying the pattern right, so I don’t need to let it freak me out.
  • My overall pilotage is pretty good for this point in my instruction. I made good decisions on the pattern turns (which my instructor left entirely to me) and crabbed the aircraft on final with no instruction to do so …
  • … but there is still a lot to learn about crosswind landings, and in particular, how to manage the flare. I feel like I will be learning these things for quite a while.
  • Little differences in power matter on descent. There is a real difference between 1,500, 1,400, and 1,300 RPMs. I need to find what’s best for me in how I fly the 172 to landing, and work with it. Based on today I think it’s probably 1,400.
  • Time away matters. I’ve been away from the simulator and real-world cockpits for more than a week, and I could feel my regression. I’m assuming this will feel less pronounced as the routines of flying the airplane become more automatic (it was the ground work where I felt most behind the curve), but staying current clearly matters while I’m learning.
  • MOST IMPORTANT: Building new skills takes time, and when you’re really practicing deliberately, it feels like hard work. There’s a bunch of research about deliberate practice and how it builds expertise, and I’ve read a good portion of it, and today’s practice was definitely deliberate. It had many repetitions, was designed by a professional, had immediate feedback, was difficult and tiring, and frankly not a ton of fun in a traditional sense. But I feel like I learned a ton, and that’s the point.

Video: El Monte To Fullerton On PilotEdge

I’ve been away from the simulator for a week traveling, but before I hit the road I videoed leg four of the PilotEdge Alphabet Challenge, El Monte to Fullerton. It’s only about a 10 minute flight, so I recorded it in its entirety as a way of giving folks who may be unfamiliar with PilotEdge a sense of what a simple VFR flight on the network is like. It also showcases the Orbx SoCal scenery, which is fantastic. I hope you like it (rough landing and all).

News For This Basement Fly Guy

Well, I have some news to share here, and it’s that I’ve started real-world instruction for my Private Pilot License. I suppose that building the sim was the nudge I needed to try something I’ve always wanted to do in real life. So far I’m three lessons in and having a fantastic time.

I’ll post about the experience here, although I expect the blog will remain primarily focused on simulated rather than real-world flight. But I do expect the topics will broaden some, especially regarding how home simulation and real pilotage fit together. And I guess I may have to change the site tag line a bit.

Here’s a pic of me in the left hand seat of the C 172 in which I’m training. It really is a ton of fun.

Cessna 172 R Cabin Dimensions

When I was building the basement sim one of the challenges was finding real world cockpit dimensions on the Web. I happen to have a Cessna 172 R Pilot’s Operating Handbook with me, and here are the measurements from its weight and balance section in case they are of use to anyone. (Note that I built my sim to reflect a 182 cabin, which is a bit wider and taller than the 172.)

Video: Bullfrog To Hite (And Why The Guys Who Can Do This Are Great Pilots)

A YouTube viewer and OTG reader asked that I record a flight from Bullfrog Basin (U07) to Hite (UT03) in SE Utah along Lake Powell. Hite is listed as “Hazardous” on the charts for what you will see are obvious reasons.

Today we fly the A2A C172 over Megascenery Earth’s Utah scenery. That little plane moves around quite a bit in the swirling cliff winds. Be sure to watch to the end. He used to fly this as a Utah bush pilot, and how he and others manage to do this in the real world I’ll never know!

Reader Mail

Thanks to Tom Tsui’s post I’ve had an influx of new visitors and subscribers, and a few have sent in some questions about the sim. Here are three recent ones with my answers, and I’ve kept the senders anonymous.

After months of searching for the optimum sim, I found this video from a guy called… Liberty! and I really thought this was the best solution in terms of value for money. I found your website today and surprise surprise, you also followed Liberty’s design.

I was about to start designing it when I saw your site, so I could not resist sending u this email asking you a few questions:

1) Is this solution (proj + 2x Lcd) as immersive as shown in the videos??

2) How much space did you need?…eg front of instr panel to wall. I have serious room constraints :(.

3) How did you mount the heavy side LCDs on the frame?

If you have time to answer that would be greatly appreciated, otherwise well done- your sim looks great.

Thanks for your questions and the compliments! Yes, in the sim it is quite immersive, in fact when I’m using PilotEdge and talking with ATC it feels so much like being in an airplane it’s a bit amazing. The resolution on the projection screen is of course not as fine as the side monitors (even though they are all 1080p) given that the pixels are much larger, but it’s not something I really notice, and I’ve calibrated the screens so the colors match up well enough.

The sim fits in a pretty small space because I use an ultra-short-throw projector. The entire cockpit is only 58 inches deep, and it’s 62 inches from the back of the cockpit to the projection screen. The front of the glare shield / panel with the instruments is 18 inches from the projection screen. But it’s the ultra-short-throw projector that allows this, and it came with a price. But that was the only way for me to get the cockpit close enough to the screen to fill my field of vision.

The LCDs are actually really light. But just to be safe they sit on a 2×2 cross-beam in the side wall that is reinforced with a 2×4 beam beneath it, like this:

Blank

You can see pictures of that on the Construction Journey page, too.

Another reader asks:

hi I … live in the Uk and I liked you video and flight sim and wondered if you could let me have some info on it how you made it what materials used have already mode two Cessna and like the look of yours  if you could send me some pictures of the out side many thanks

Thanks for the email. The sim is really entirely made of simple 2×2 lumber (which actually measures 1.5 inches x 1.5 inches in the US) for the frame and a corrugated plastic for the walls. This link is, or is close to, the plastic I used:

7e8a1533-2f16-46fd-84e8-846df41fd102_1000

You can see more of the frame and construction on the Construction Journey page, and here’s a picture of the outside:

IMG_2629-2

On the inside I covered the walls with muslin on the top and top-sides and a brown leatherette on the bottom. The floor is remaindered carpet.

And finally, a reader asks:

I’ve recently purchased a vr insight cockpit and plan to build a 182 like yours one thing I’m concerned about is the frame rate droppage when you open up a second view is there A way around this with multiple views or is it a byproduct we have to deal with? Thank you

At least for me, it’s a byproduct I have to deal with. When I run only one screen my rig produces frame rates well over 80 fps, and that’s with extreme settings. With three windows open I get between 15 fps (which would be very low) to 50-60 fps, depending on scenery, autogen, weather, and air traffic. If I don’t run the GPS, which is a fourth window, they are about 10 fps higher. So there’s a good argument for getting the most powerful CPU and GPU you can get if you’re running three windows. I know some simmers use NVIDIA’s screen-spanning technology to stretch one window across multiple screens, but it doesn’t align the views well for me on my setup, and I don’t like how it stretches the image at the right and left edges of the view. So I run with three undocked full screen views.

PE Alphabet Challenge Leg 3: KCMA to KDLO

The other day I flew leg three of the Pilot Edge Alphabet Challenge, which is Camarillo to Delano. For this leg I went old school and analog, flying the A2A C 172 R trainer and using only VOR navigation and the LA sectional chart. No GPS, no ForeFlight on the iPad, and no autopilot. Candidly, it was a ton of fun, and I plan to do quite a few of the rest of the flights this way (save those with more complex airspace transitions where it can be very helpful to know right were you are). Because I flew by hand the entire way you can see my headings and altitudes are a bit variable, but on the whole I did alright.

PEaware____N15JG_KCMA-KDLO

PEaware____N15JG_KCMA-KDLO 2

Here’s my progress on the challenge so far, and the next flight is Delano / KDLO to El Monte / KELM. I hope to fly it later today.

Alpha_Challenge_In_Progress

How To: Creating Custom Cameras In Prepar3d V3 (Especially For Three-Monitor Setups)

How To: Creating Custom Cameras In Prepar3d V3 (Especially For Three-Monitor Setups)

Many of the questions I get on my YouTube channel are about my screen setup and how I manage to get the images on the projector and side screens to align. I do it through custom cameras created using the custom camera tool in Prepar3d, and thought it might be helpful if I wrote a post here explaining my process.

There are two ways you can use custom cameras in P3D. One is to create new camera views in a particular scenario. These will be saved in the scenario config file (which is stored in the P3D folder in your PC’s Documents folder), and they will be persistent with that scenario: whenever you load it, those camera views will be listed as options in the Custom Camera submenu of the View menu at the top of the screen. If you save custom cameras in your default scenario, they will remain there, too. The other is by adding them to an airplane’s default configuration file, in which case that camera view will always be available for any scenario or flight with that airplane. That’s a bit more complicated. I’ll describe both here.

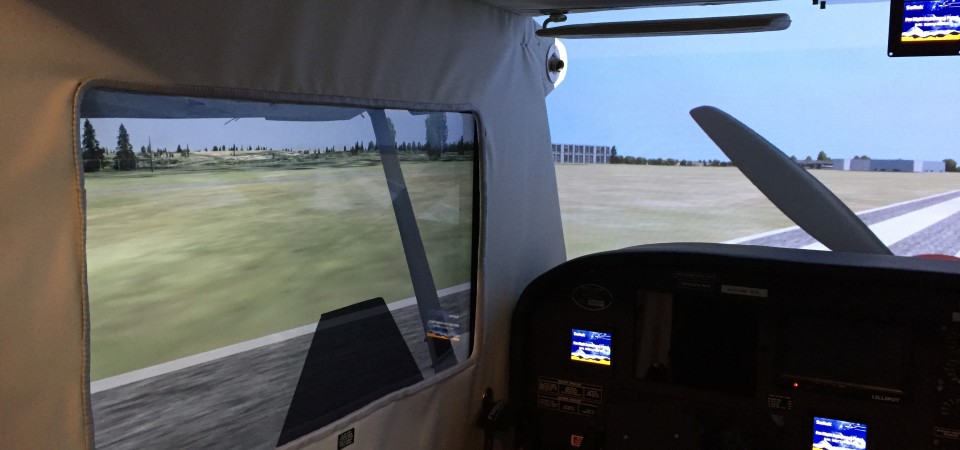
Creating custom views is easy but not always intuitive, and through (much, much) trial and error, I’ve learned ways to simplify the process and get good alignment across multiple screens. Here’s my process for setting up a new set of screen views, which for me would involve three cameras: Front (for the projection screen and view out the front of the aircraft), Left (for the view out the left window), and Right (same for the right window).

FIRST: I begin with the front view, because it’s the front horizon that I will want the side views to match up with. Custom cameras inherit the settings of the view from which they start, so to save time I first use the view directional keyboard commands to move the view to something close to what I want to have (forward / back, left / right, up / down). It’s easier to tweak a view that’s sort of close than to start completely from scratch.

SECOND: I right click on the front view select “Custom Camera / Create New” from the popup menu:

Photo May 15, 8 53 57 AM

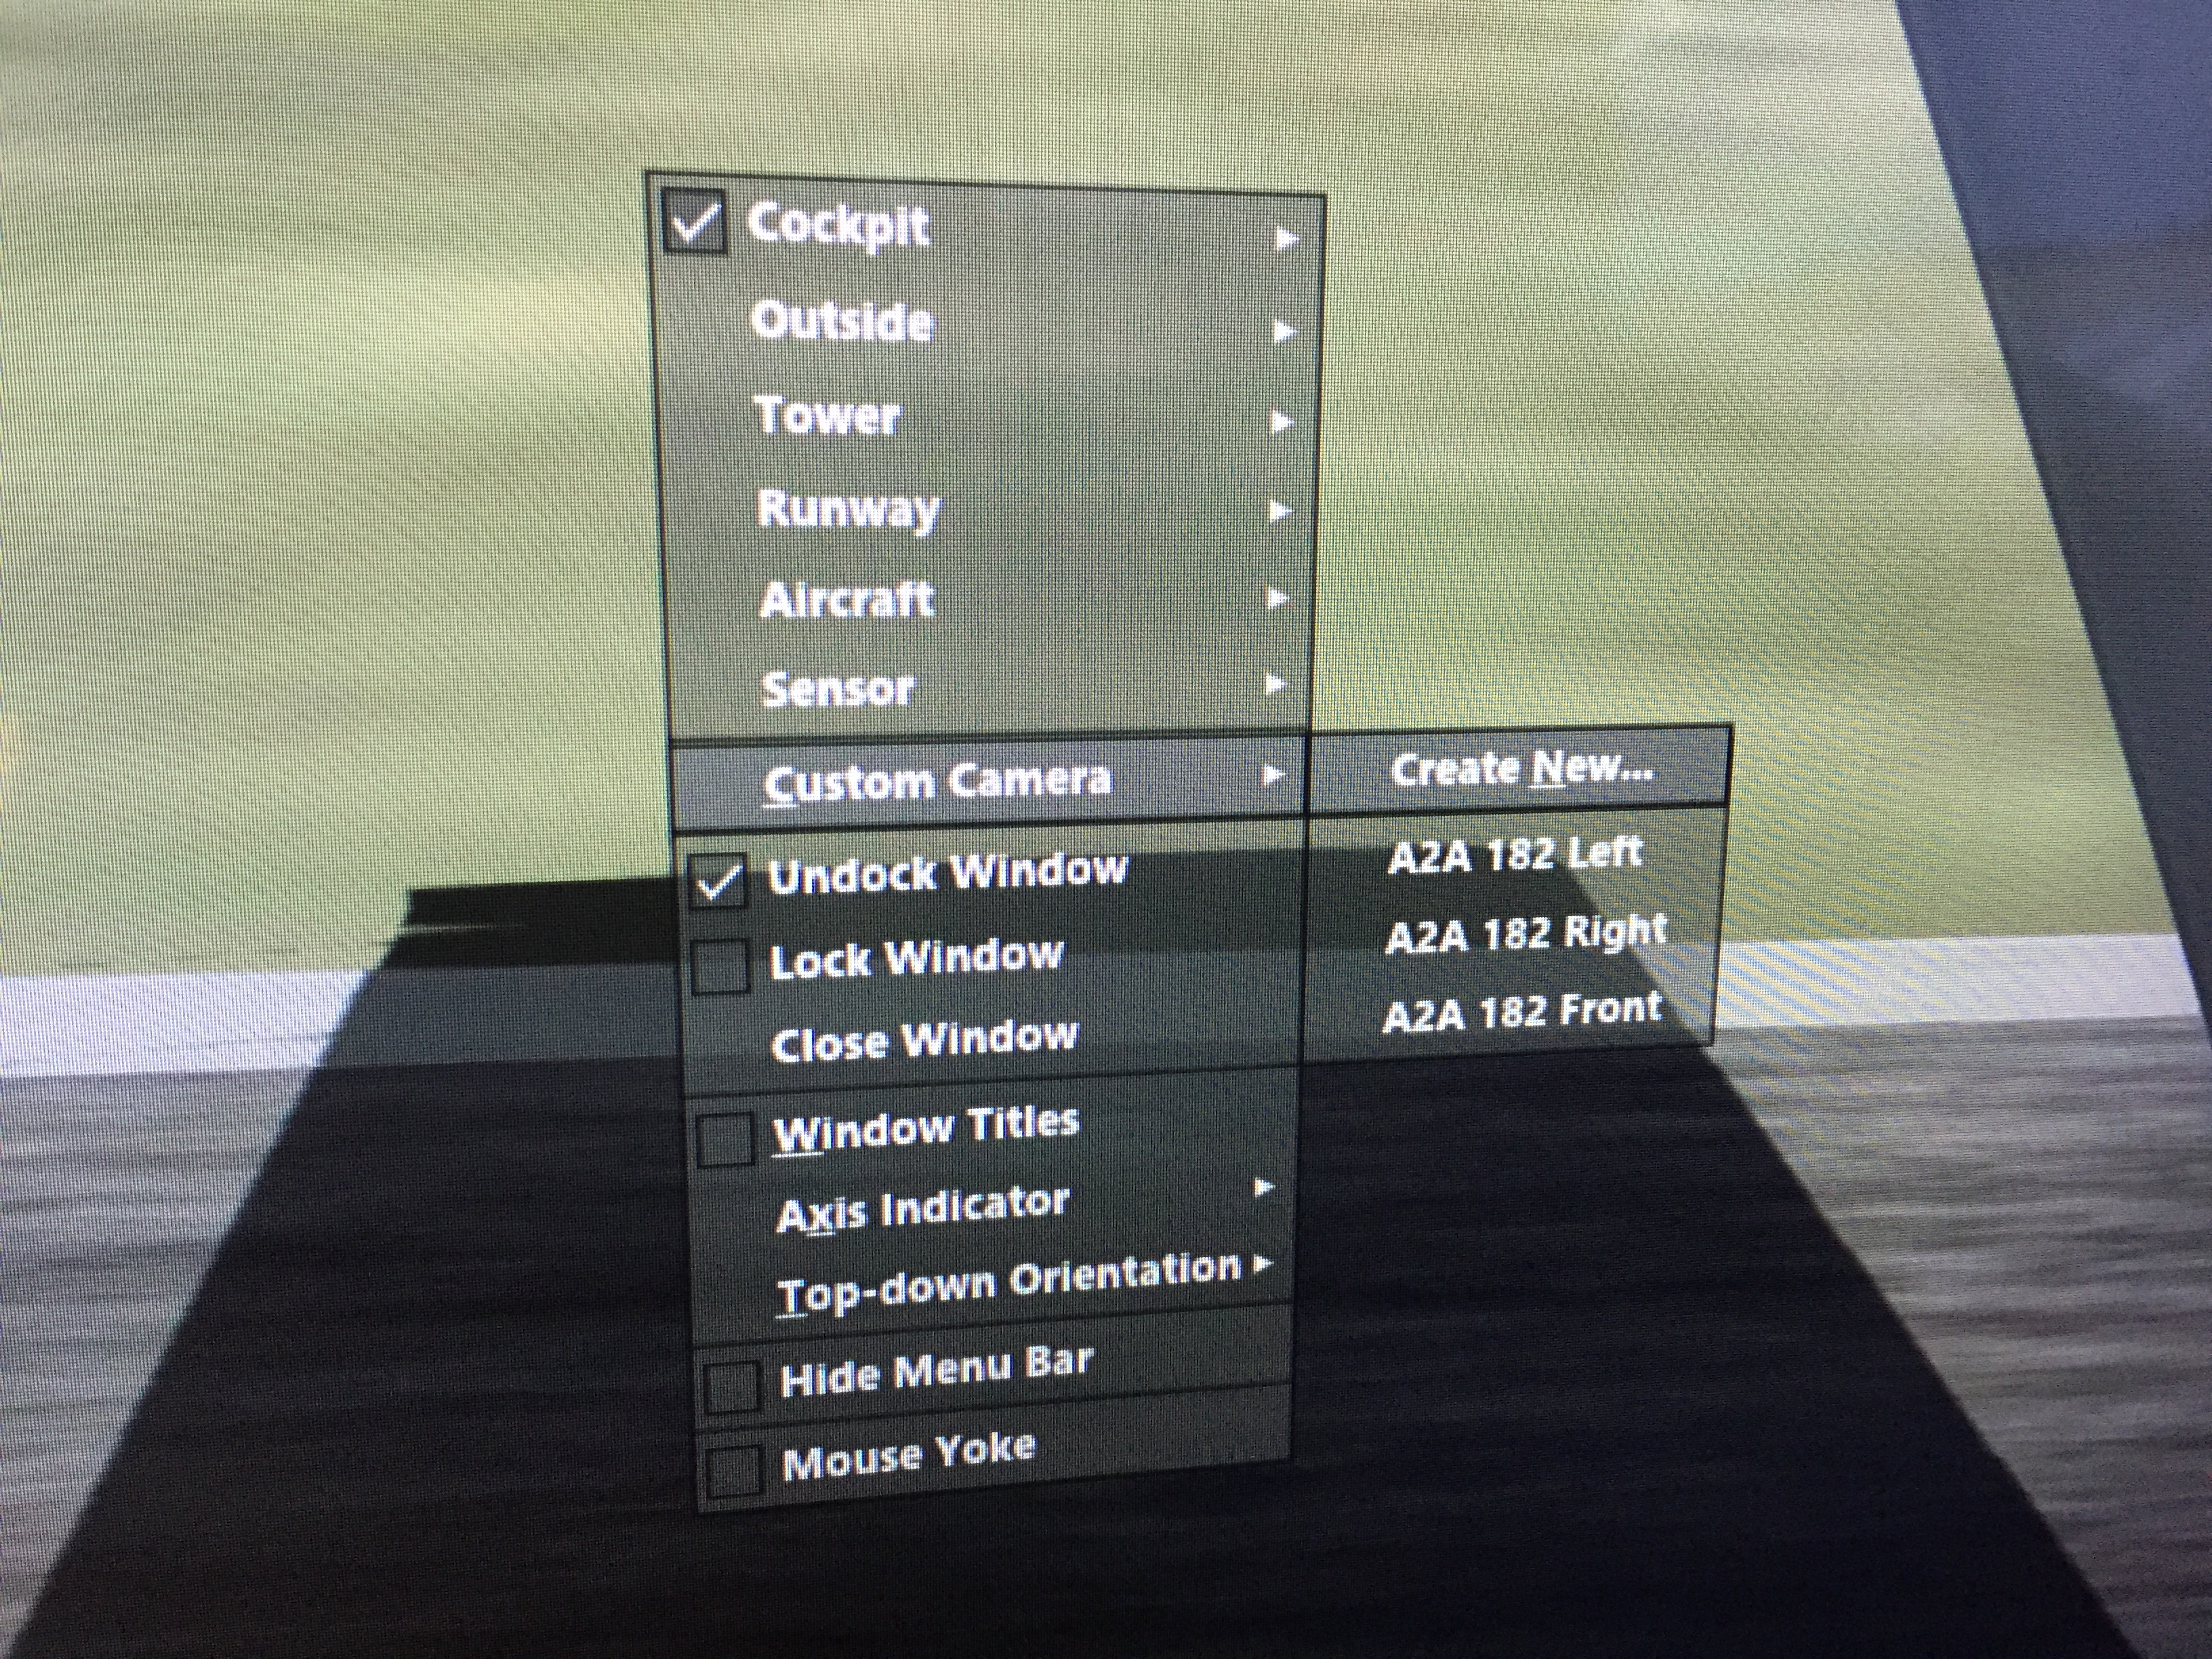
This brings up the Manage Camera Views screen:

Photo May 15, 8 54 29 AM

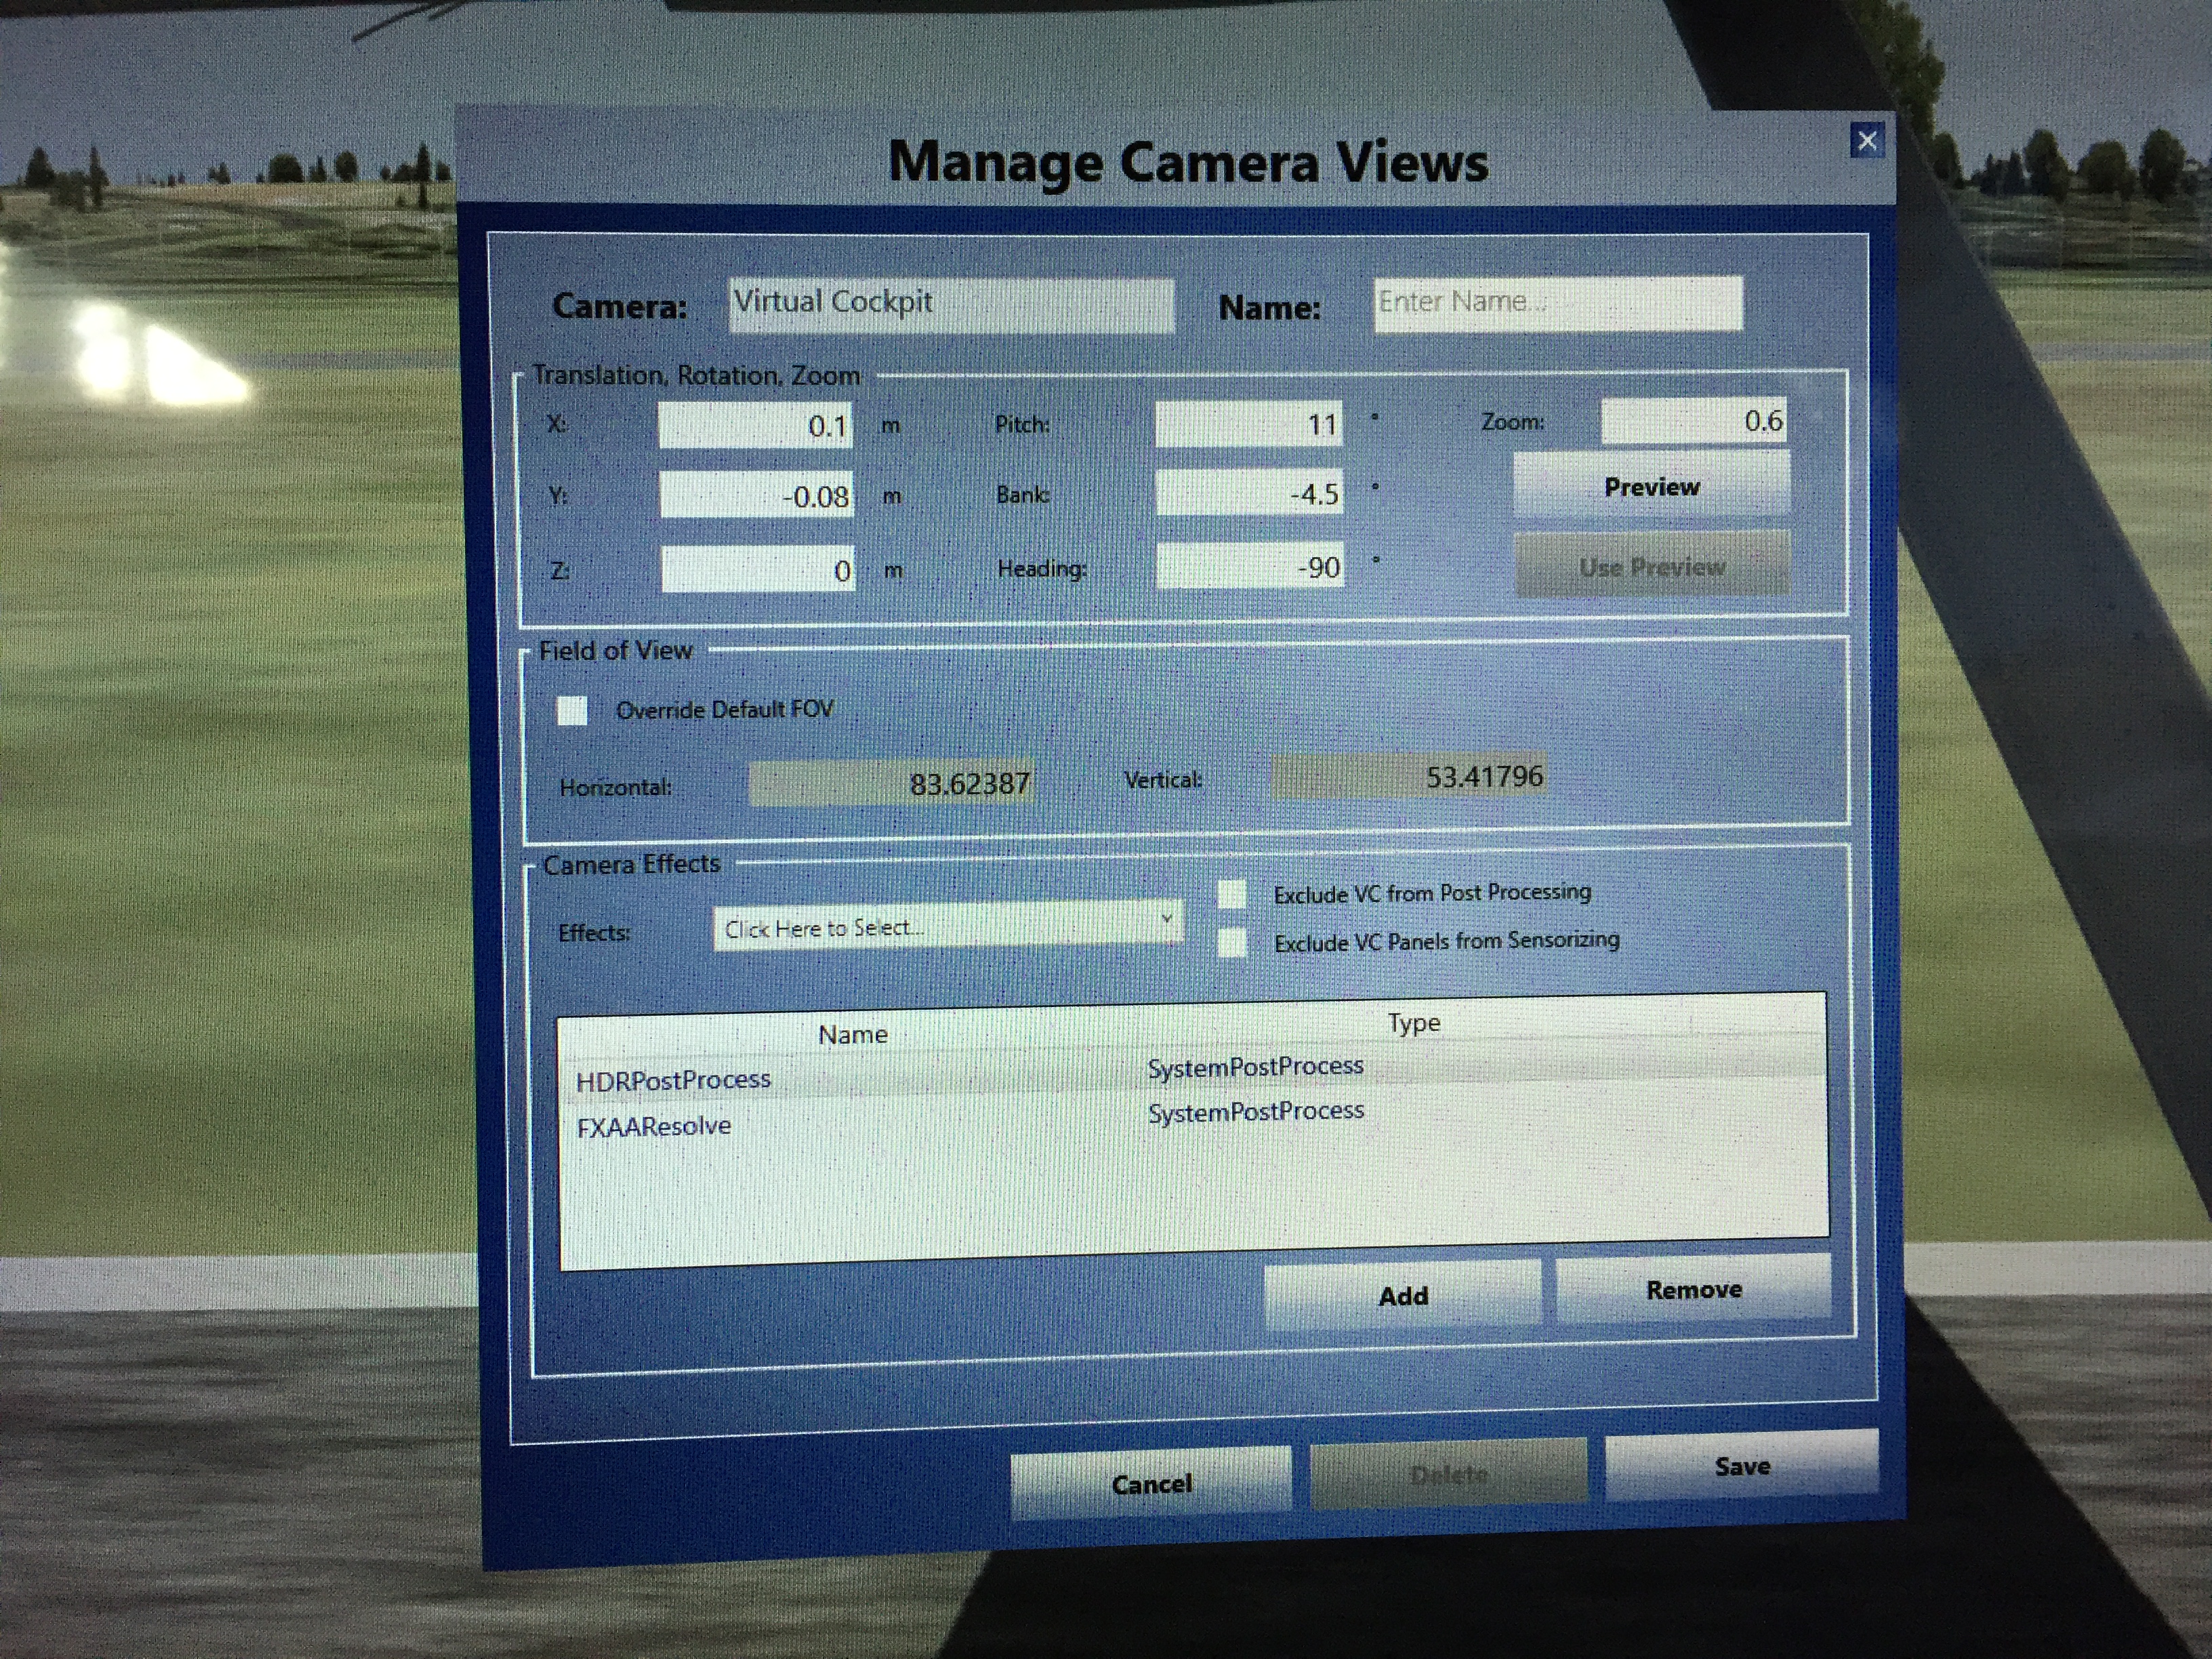
THIRD: I tweak that view to get it to my liking, and the easiest way to do this is to use previews. Click the Preview button, and it will open a new view window on the main screen that has inherited the view from which you clicked. Drag the window and its edges so it fills the front view screen. From now on any changes that you make to the variables in the Manage Camera Views dialogue will show instantly on that view screen when you click the Preview button. So you can easily tweak, preview, tweak, preview, etc.

As for the variables in the dialogue, here’s what they mean:

  • X is the placement of the eye point left or right of center in the aircraft
  • Y is the placement of the eye point above or below center in the aircraft
  • Z is the placement of the eye point front or back of center in the aircraft
  • Pitch is how “nose up” or “nose down” the view is
  • Bank is how angled left or angled right the view is
  • Heading is how turned to the left or turned to the right the view is

Tweak these settings until the view is how you like it, then give it a name in the dialog and click “Save.” P3D will then ask you if you want to quit or not. If you choose “Yes” the dialog will close as will the preview window, but a view with that name will now appear in the Custom Camera pop-up menu, and you can select it for your front view. With my front view is that I like to see the cowling of the aircraft, but not the glare shield (as my sim has one). This means my front view is pushed forward quite a bit along the Z axis, and yours may be different.

FOURTH: Once the front view is created, I make a left-hand view for the left window monitor. I follow the same process as above, using the keyboard keys to turn the view to the left, move it close to the window, adjust the height, etc. Again, I’m just trying to get it close. Once it is, I open the Manage Camera Views dialogue, create a preview, drag it over to the left window monitor, fill the screen, and begin tweaking the preview. One variable that I simply set rather than tweak is the Heading variable. For the Left view I set it to -90, as this has me looking directly out the left side of the aircraft.

Through trial and error I’ve learned two things are important with the side views. The first is that at least for me, the side views and front view need different zoom settings. My sim is really close to the projection screen, and it’s a 100-inch screen. To keep objects from being huge I have the front zoom at .30. For objects on the side views to be about the same size they need a greater zoom, and I use .60. I’ve come to this through trial and error, and in my sim this has things like the buildings and taxiway lines matching up well from a size perspective. Your zoom settings will be different, but know that the front and side views may need different zooms. The second is that the Bank variable is important. The default camera views nearly always have the horizon when viewed out the side window tilted toward the front or rear of the aircraft. I use the Bank variable to adjust the tilt to make the horizon straight, and the Pitch variable to adjust the height of the horizon so it lines up with the horizon of the front view across the two screens. This may take some trial and error, and might mean re-tweaking the front view’s Pitch a bit, but when it’s dialed in I can (1) see the cowling of the aircraft out the front, (2) see the bottom of the wing and my flaps out the side, and (3) have the horizon match up across both left and front screens.

When I have the left view correct I save it with the name “Left,” and instead of quitting the Manage Camera Views dialogue I click “No” because I want to continue with the next view: Right.

FIFTH: Once I have my Left view I do NOT close the Manage Camera Views dialogue. Instead, I rename the view Right, and keep all the variables THE SAME except three: X, Bank, and Heading. Bank and Heading are easy: just make them the inverse version of the Left value (so if the Bank and Heading were -4.5 and -90 for left, they should be 4.5 and 90 for right). Y, Z, Pitch, and Zoom should stay the same. This ensures your Left and Right views are mirror compliments of each other. The only variable to tweak is X, as it’s how far left or right of center the eye point is. For the Right view you’ll want it up close to the right window, so I tweak that variable, looking for a point where the both the left and right struts (or wings for a low-wing airplane) seem about the same size and position. Then I save that view as “Right” and close the dialogue.

At this point you should have three saved camera views, Front, Left, and Right, and you can assign them to their respective views and monitors. Now the question is how to keep them for use in other flights. I have two ways of doing this. First, and easiest, is to add the camera views you’ve defined to other saved scenarios. To make this easy (and to back up my work) I’ve created a text file on my desktop called “Cameras” into which I’ve pasted my camera settings so they are backed up and easily at hand. This is easy to do: go into the Documents/Preapar3d folder on your PC and open in a text editor the scenario .CFG file in which you created your custom views. Scroll down and you will see the standard camera views, and below that your custom ones. Just copy and paste the code into your backup Cameras file. Here’s a screen shot of part of mine:

Screenshot 2016-05-18 15.42.17

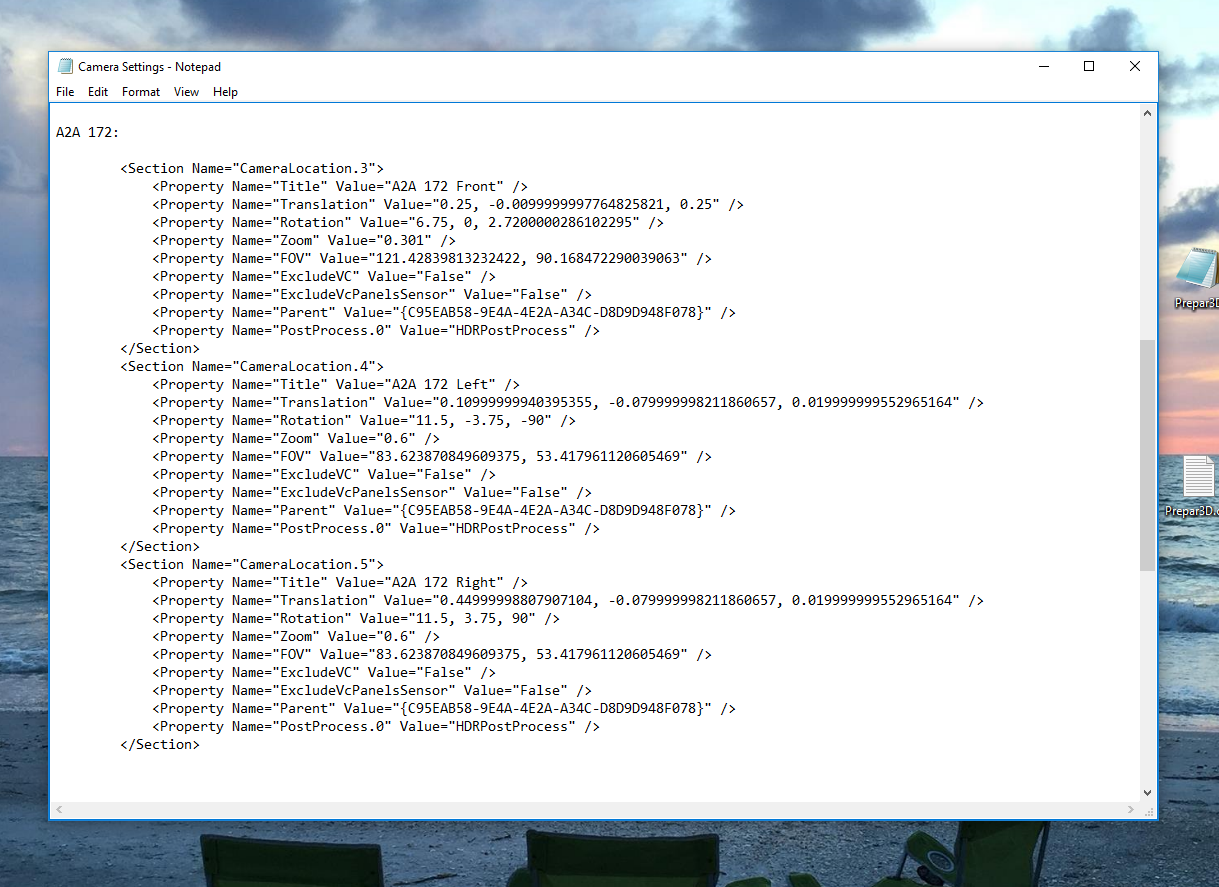
I have camera setups for four aircraft: the Carenado 182, A2A 182, A2A 172, and A2A Piper 180. All are pasted into this backup file so I have them. Then I can copy and paste the appropriate camera code into the config file of any particular scenario without having to create the camera views via the dialogues. Just open the scenario config file in a text editor and add the appropriate camera code at the bottom of the pre-existing camera locations. Just be sure to continue numbering the camera setups consecutively within the file.

You might also want your camera setups to be part of a default aircraft configuration, so those views are available whenever you start a flight with a particular aircraft (saved scenario or not). This is a little more complicated, but not much so. Let’s say I want to add my the A2A 172 Front / Left / Right camera setups to the default A2A 172 so they are always available whenever I use that aircraft. To do this I would go into my P3D directory / simobjects / airplanes / A2A 172 subdirectory and open the airplane .CFG file in a text editor. If you scroll down in an airplane .CFG file you will find the camera definitions, and they look like this:

Screenshot 2016-05-18 15.43.43

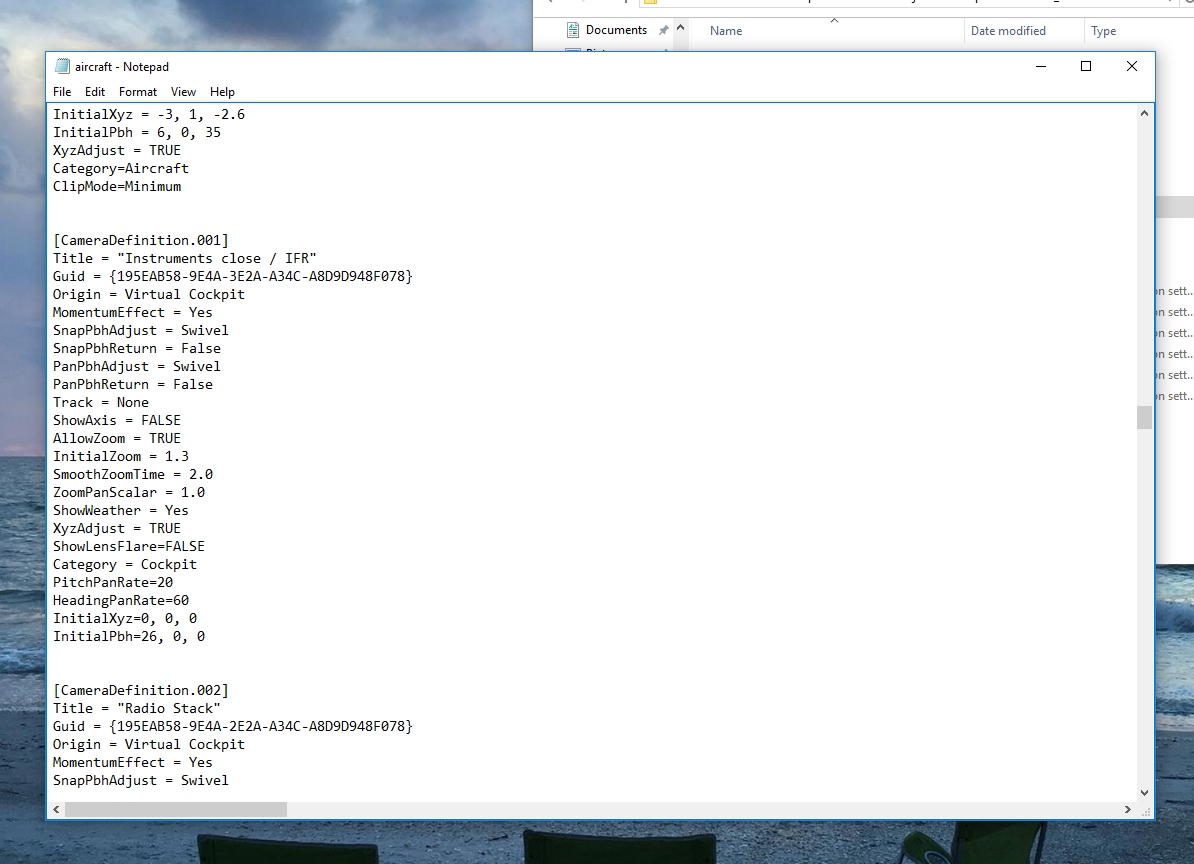
As you can see, these look DIFFERENT than the scenario camera definitions, which is where people get confused. The good news is that there are only a few lines of code that you need to change to convert one of these default views into a custom camera view. Here’s how to do it.

  • First, copy an existing camera definition within the airplane .CFG file. It doesn’t matter which one.
  • Second, paste it at the end of the camera definitions, and give it a new cameradefinition number that is next in the sequence from the definition above it.
  • Third, change the Title variable of the view to the name you want (e.g, “A2A 172 Front”).
  • Fourth, change the InitialZoom variable to be the correct zoom for your custom camera.
  • Fifth, change the InitialXyz line to reflect the X Y Z values from your custom camera.
  • Fifth, change the InitialPbh line to reflect the Pitch, Bank, and Heading values from your custom camera.
  • Sixth, and last, go to www.guidgenerator.com  and grab a GUID number. Each camera needs a unique identifier, and this site will give you one. Paste it OVER the GUID value between the brackets at the top of the camera definition. When you’re done, it should look something like this:

Screenshot 2016-05-18 15.44.08

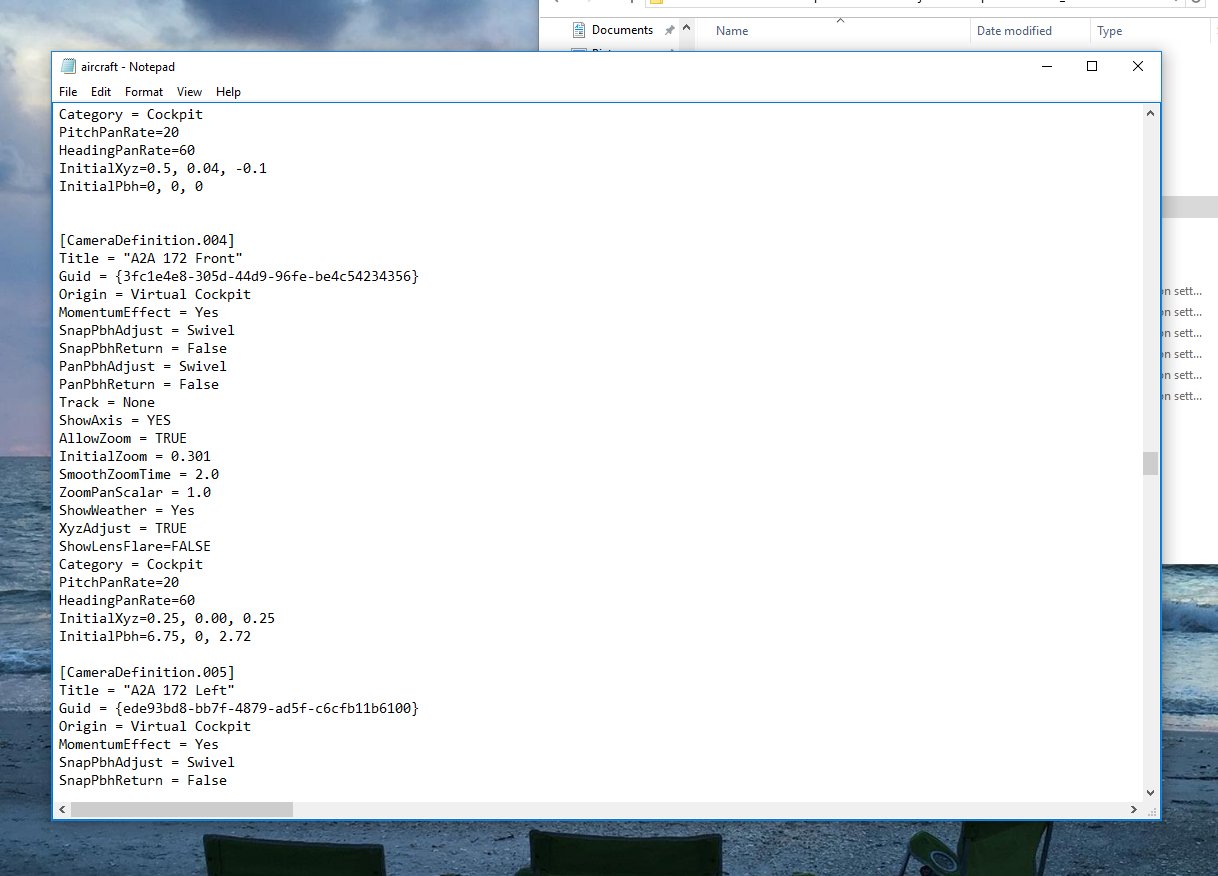
Save the file. That’s it, unless you want to add Left, Right, or other views, in which case you can repeat the process.

In terms of having this all look good from a REAL camera’s perspective if you’re filming with a GoPro etc., what I’ve learned is key is that the camera be at about the same height as your eyes in your simpit. Then everything should line up across the three monitors as they do from where you sit (with some minor variability).

I hope this is helpful.