Back In The Real Bird

I had a flight lesson today and it was the first time up since December 6th. I was home for much of December, and had visions of completing the next several flights from the curriculum, but weather intervened. It was just not good flying weather for several weeks in these parts. Since the beginning of the year I’ve been on the road quite a bit, so I was excited today to finally get back to the field and go up. Ceilings were too low for maneuvers, and that was just as well because it’s pattern work that I wanted to do to knock the rust off.

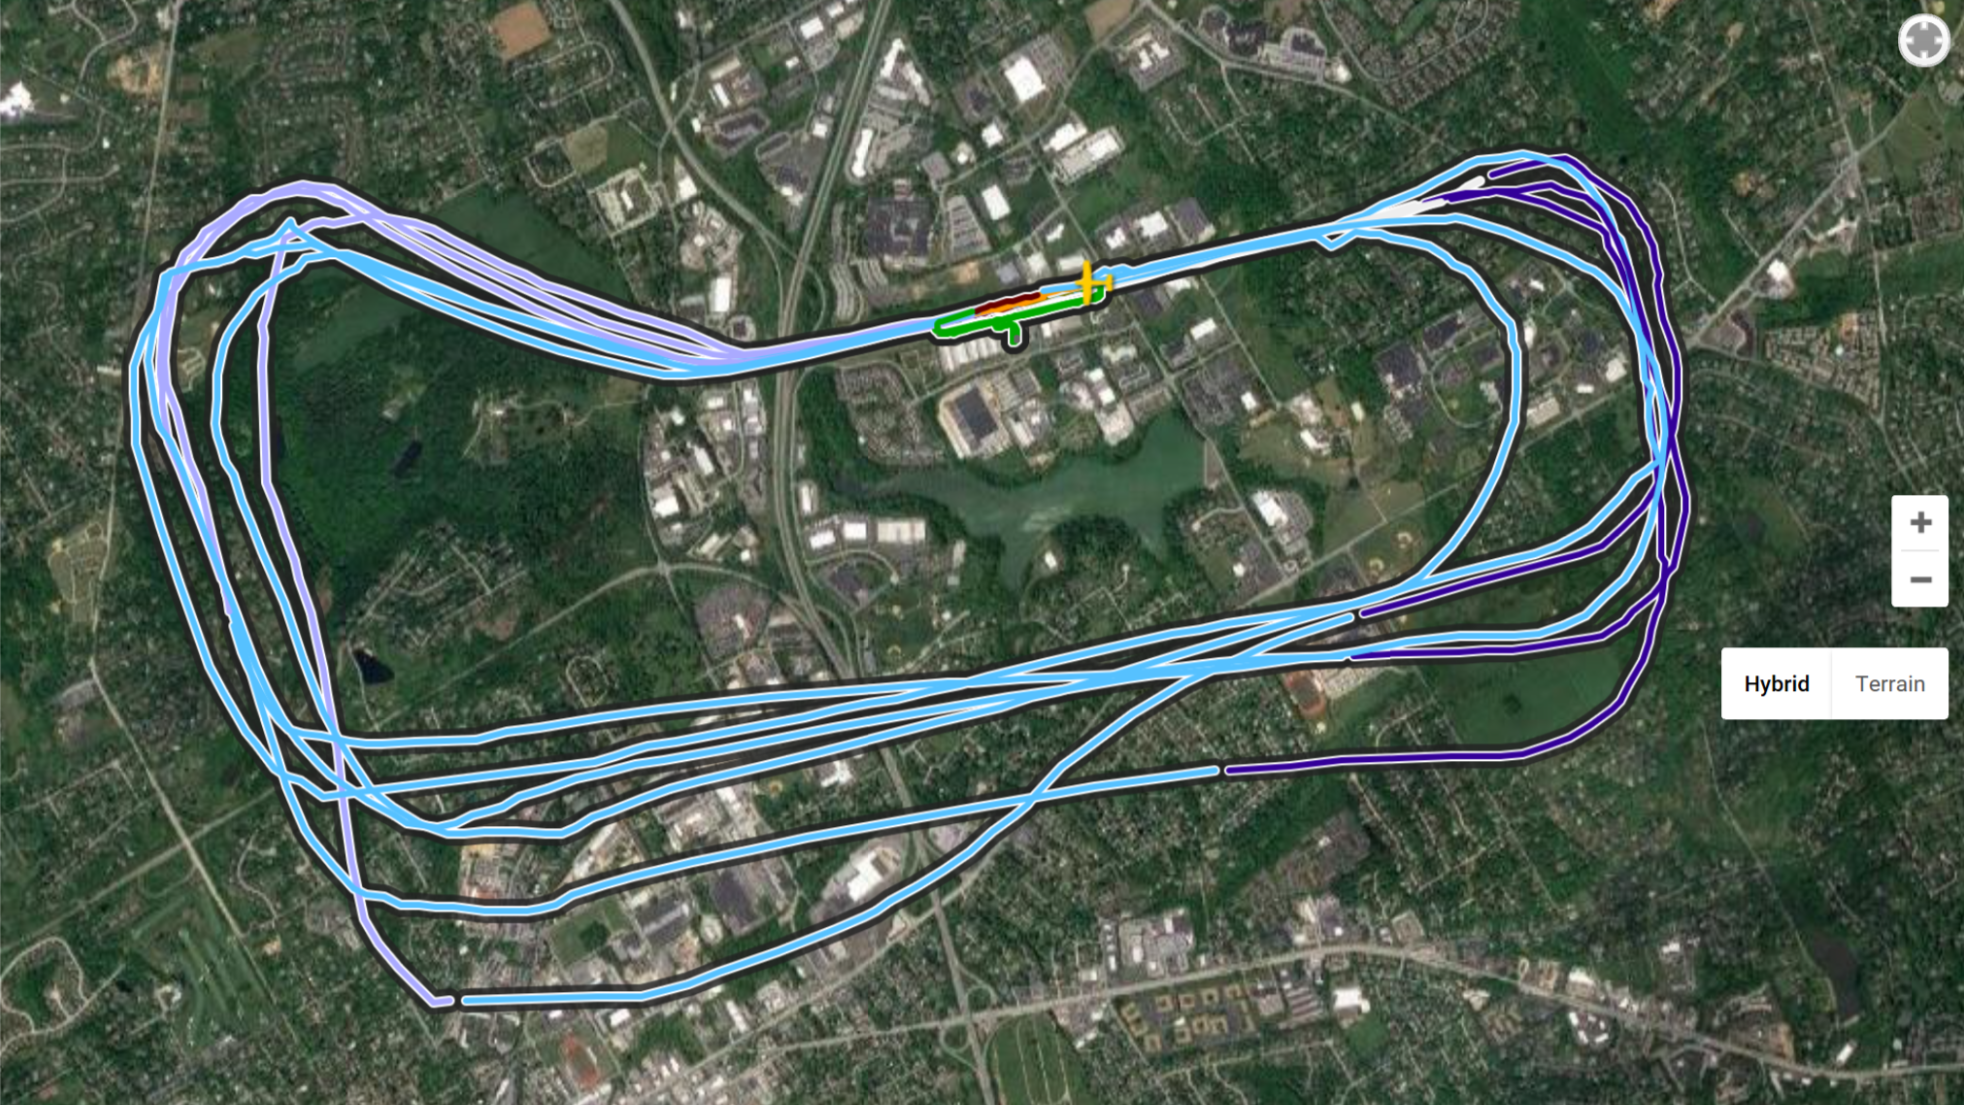
And there was some rust, as the below flight track shows. My takeoffs and landings were actually very solid, but the pattern itself was shaky at first. Those first two legs that are way out off track from the others were the first two laps, and after that I settled in. I flew an extended downwind, a turn-to-final, and a power-off landing in three of final four laps, which is why the base legs vary a bit.

pattern

So I feel back in the groove, and it’s amazing how relaxed I am after being up. Flying an airplane requires real focus, but it’s a focus that relaxes me, and I love it. Next flight will be a long cross country with my CFI: Brandywine to Harrisburg to Wilmington to Brandywine. We probably won’t get that on the books for a week or so, and I look forward to planning, simulating, and then making that flight.

Power Adapters For USB Hubs & Saitek Yokes

Saitek gear has had a very limited supply chain for more than a year now, and it’s making the aftermarket for some stuff a bit ridiculous. One of those things is the power adapter for the Saitek Pro and Cessna yokes, which are either on multiple-month backorder or being sold by some people on eBay for (the outrageous price) of $70 or more US.

No need to pay that, and I certainly wasn’t going to. Instead, I went to my local PC shop and bought a universal AC adapter that allowed me to match the ratings of the Saitek yoke. The Saitek Pro yoke needs voltages between 100 and 240 volts AC at 50-60 hertz, and the output is fixed at 5 volts and 2000 mA (2 amps). This is good as you need about 500 mA per USB device plugged into the yoke (or any USB hub you hope to use, for that matter). Given that, the Nippon America 2000mA Universal Adapter Multiple AC 3v 5v 6v 7.5 9v 12v should do the trick, and it’s available in the US at least at Amazon for $12.67.

51F4kkHK67L[1]

This is similar, but not the same, as the one I have, and it’s nice because it allows you to set multiple voltages, has multiple tips, and the tips are switchable so you can have the polarity positive outside or inside. There are other units available – just be certain the voltages, mAmps, and polarity are right.

A General Update

It’s been a bit quiet around here recently so I want to provide a bit of an update on things On The Glideslope …

First, the guide to building your own basement GA sim. My original hopes of having it done over Thanksgiving were nowhere close to realistic, but I have been working on it here and there and really trying to make it useful (especially if I’m going to charge for it). It’s currently 28 pages long, and I’ve been filling in sections and it’s getting closer all the time. I hope it’s done in a month or so.

Second, videos. I’ve not made any for several weeks. Some of that is because of my schedule, some of it is because I got interested in scenery design over the holidays, and some of it is because of the transition to X-Plane (which took a fair amount of my sim time). I do plan to get back to it next week, though, and have several videos in the queue that I hope to make over the next few weeks. Thanks for your patience.

Third, scenery design. I really have enjoyed making the few airports I’ve made for X-Plane. The first three (Brandywine, Chester County, and Lloyd Stearman) all turned out pretty well, and the next project is Wilmington. This is a big field, and it’s going to take some time. In the meantime, I plan to make versions of those first three that are suitable for upload to the X-Plane Scenery Gateway. They won’t be as close to the real thing as the originals as I’ll be limited to the native X-Plane objects library, but this way they have a chance to be included in future releases of X-Plane, which will benefit everyone. So that’s something I want to do.

Finally, the X-Plane migration. I’ve loved it, and am glad I did it. I’ve held off on the releases of betas 4 and 5 based on the problems they seemed to create, and think it’s generally a good idea to wait a few days when any new release comes along to see how it plays out. That said, beta 6 looks solid, and I’ll probably update when I have the chance. I also have learned enough about creating photorealistic scenery that I’ll probably make a few tiles, covering parts of the world where I want to fly but don’t have photorealistic so far (Scotland in particular). I also am going to try flying the sim WITHOUT World2XP America. The underlying textures and autogen of X-Plane 11 are pretty good, I already have HD mesh, and I just find that too many of the buildings in W2XP America don’t jive (they still look too European). I do want to get better European scenery, though, and will probably get W2XP Europe and see how it looks.

So that’s the latest. Thanks for your patience, and thanks for reading.

Make Your Own Photorealistic Scenery For X-Plane

More than a few readers have asked about where to find photorealistic scenery for X-Plane, and for copyright reasons you pretty much have to make your own. The good news is that with the latest version of Ortho4XP, the process appears really quite simple, as I learned from this video:

You can get the latest version of Ortho4XP here (download instructions are in the video), and Python here. Note that I’ve NOT done this process myself, but based on this video I do believe I will give it a try.

An Important Thing For Folks New To X-Plane

If you are used to Prepar3D or FSX, coming to X-Plane can take some unlearning of old habits. Sometimes it reminds me of when I moved from PC to Mac, in that things seem a bit confusing at first, but over time you realize the new way is much more simple than the old way. One of those things with X-Plane is how you install new scenery, plug-ins, airports, and aircraft. With Prepar3D and FSX new add-ons usually come with their own installers where you click an executable file and it puts files wherever they are supposed to be. This may make installation easier in some cases, but also makes uninstalls or moving your X-Plane install to a new drive a hassle as files are often spread (and left) all over the place. X-Plane is quite different, and honestly, much easier. All you do is drag the folder where it is supposed to be. This thread over at the AVSIM forums makes the point:

In X-Plane, at least for scenery and mostly for adding aircraft, you just use the native Windows/Mac/Linux folders. Drag and drop into whatever location the instructions require and you’re done. As a side benefit, it’s super easy to transfer all your X-Plane stuff to a different drive, or new computer.

Easy. And when you want to uninstall that scenery, aircraft, or airport? The vast majority of the time you just delete the folder (or if you want to hold onto it just in case, drag it someplace else outside the X-Plane folder structure). I really appreciated this about X-Plane when I recently moved my installation to a new solid-state drive. I simply dragged the X-Plane 11 folder from one drive to the other. That’s something I never could’ve done in Prepar3D or FSX.

My X-Plane Scenery_Packs.ini File

Folks have been asking for it so I’ve pasted it in after the break. Someone who really understands X-Plane may look at it and point out things that aren’t optimal, but so far it’s working for me. Here’s a truncated version:

I
1000 Version
SCENERY
SCENERY_PACK Custom Scenery/KPDX - Portland International/
[OTHER CUSTOM AIRPORTS HERE]
SCENERY_PACK Custom Scenery/Aerosoft - EBBR Brussels/
[OTHER AEROSOFT AIRPORTS HERE]
SCENERY_PACK Custom Scenery/x_Prefab_Airports_1/
SCENERY_PACK Custom Scenery/Global Airports/
SCENERY_PACK Custom Scenery/LOWI Demo Area/
SCENERY_PACK Custom Scenery/KSEA Demo Area/
SCENERY_PACK Custom Scenery/w2xp_America/
SCENERY_PACK Custom Scenery/x_Prefab_Library/
[OTHER LIBRARIES HERE]
SCENERY_PACK Custom Scenery/yOrtho4XP_Overlays/
SCENERY_PACK Custom Scenery/zNW_+42-123_medfordOR_bg/
[OTHER PHOTOREALISTIC SCENERY HERE]
SCENERY_PACK Custom Scenery/zzz_hd_global_scenery3/
As you can see, the general order I’m using is:
  1. Custom Airports
  2. Aerosoft Airports
  3. Prefab Airport Package
  4. Global Airports
  5. X-Plane Demo Areas
  6. W2XP America
  7. Libraries
  8. Ortho Overlays
  9. Photorealistic Scenery
  10. HD Mesh
 Continue reading "My X-Plane Scenery_Packs.ini File"